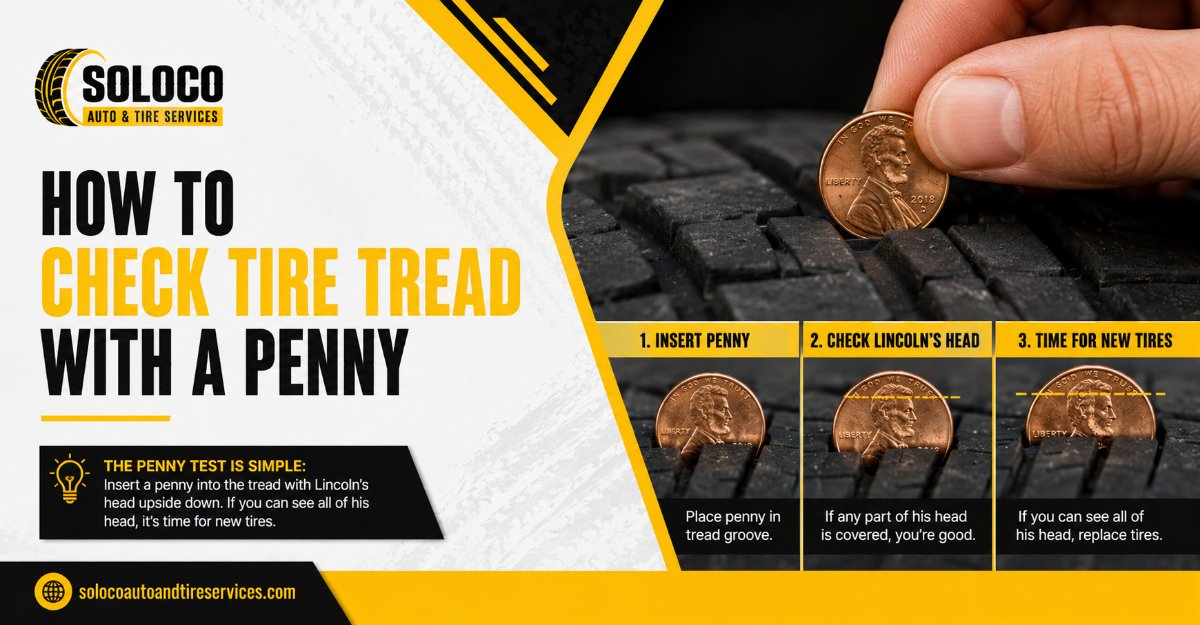
Checking your tire tread with a penny is a reliable, fast method to verify if your vehicle meets safe driving standards by measuring wear against the critical 2/32 of an inch threshold. This complete six-step process takes 3 to 5 minutes per vehicle, requires zero specialized equipment beyond a standard United States one-cent coin, and relies on proper wheel positioning and precise visual inspection to guarantee accurate results.
Before You Start
- Time Required: 3 to 5 minutes total.
- Difficulty Level: Very Easy (beginner friendly).
- Cost Range: $0.00 (using pocket change).
- Tools and Materials Checklist:
- Exactly 1 US Penny (copper or zinc composition both work identically).
- 1 smartphone flashlight or pen light (optional, for dark fender wells).
- 1 standard pocket flathead screwdriver or house key (for removing embedded stones).
- 1 notepad or smartphone memo app (optional, to log specific tread measurements).
- Prerequisite Conditions: Vehicle parked on a completely flat, level concrete or asphalt surface with the engine turned off and the transmission in park or first gear.
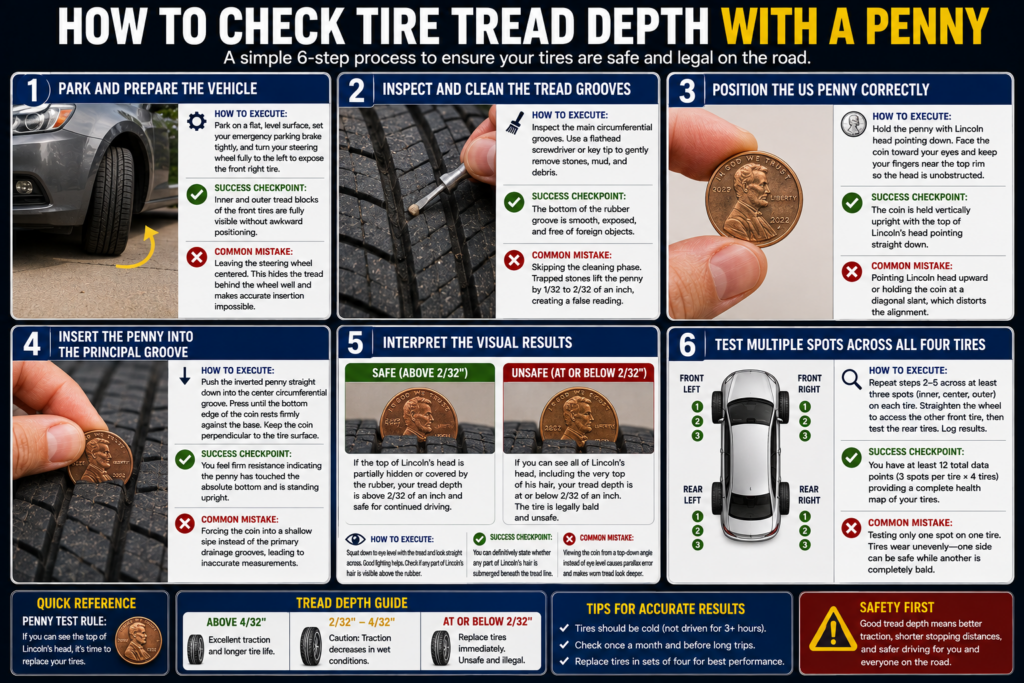
Step 1: Park and Prepare the Vehicle
Park on a flat, level surface, set your emergency parking brake tightly, and turn your steering wheel fully outward to expose the front tires.
- How to execute: Pull your vehicle into a well-lit driveway or garage. Engage your mechanical handbrake or electronic parking brake firmly. Turn the steering wheel all the way to the left to angle the front right tire outward, granting you unobstructed visual and physical access to the tread face.
- Success checkpoint: You will know this step worked when the inner and outer tread blocks of the front tires are fully visible without you needing to crouch awkwardly or crawl beneath the vehicle fender.
- Common mistake: Leaving the steering wheel centered. This hides the tread profile behind the wheel well structure and makes accurate vertical insertion impossible.
Step 2: Inspect and Clean the Tread Grooves
Clear all embedded gravel, mud, and debris out of the principal circumferential grooves before inserting the coin.
- How to execute: Inspect the wide channels running around the circumference of the tire. If you see trapped small stones, compacted mud, or bits of road salt, take your flathead screwdriver or key tip and gently pry them out.
- Success checkpoint: You will know this step worked when the bottom of the rubber groove is smooth, exposed, and free of foreign objects that could artificially prop up the penny.
- Common mistake: Skipping the cleaning phase. Trapped stones lift the penny by 1/32 to 2/32 of an inch, creating a false reading that makes worn tires look safe.
Step 3: Position the US Penny Correctly
Hold the US penny firmly between your thumb and index finger with Abraham Lincoln head pointing directly downward.
- How to execute: Take a standard penny and orient it so Lincoln is upside down relative to the ground. Face the coin directly toward your eyes so you can read the profile clearly once inserted. Keep your fingers positioned near the top rim of the coin so they do not block your view of the top of Lincoln head.
- Success checkpoint: You will know this step worked when the coin is held vertically upright with the top of Lincoln head pointing straight down toward the core of the tire.
- Common mistake: Pointing Lincoln head upward or holding the coin at a diagonal slant, which distorts the alignment against the surrounding rubber blocks.
Step 4: Insert the Penny Into the Principal Groove
Insert the penny straight down into the deepest central tread groove until it bottoms out completely.
- How to execute: Push the inverted penny directly into the center circumferential groove of the tire tread block. Press downward gently until the bottom edge of the coin rests firmly against the base of the rubber channel. Keep the coin perpendicular to the tire surface rather than leaning it forward or backward.
- Success checkpoint: You will know this step worked when you feel firm resistance indicating the penny has touched the absolute bottom of the tread channel and is standing upright on its own or held steady by your fingers.
- Common mistake: Forcing the coin down into a shallow secondary sipe instead of the primary longitudinal drainage grooves, which leads to inaccurate measurements.
Step 5: Interpret the Visual Results
Check whether the top of Abraham Lincoln head is covered by the surrounding rubber tread blocks.
- How to execute: Squat down to eye level with the top of the tire tread. Look closely at Lincoln head. If the top of his head is partially hidden or covered by the rubber, your tread depth is above 2/32 of an inch and safe for continued driving. If you can see all of Lincoln entire head, including the very top of his hair, your tread depth is at or below 2/32 of an inch, meaning the tire is legally bald and unsafe.
- Success checkpoint: You will know this step worked when you can definitively state whether any part of Lincoln hair is submerged beneath the tread surface line.
- Common mistake: Viewing the coin from a top-down standing angle instead of squatting to eye level, which creates an optical parallax error and makes worn tread look deeper than it actually is.
Step 6: Test Multiple Spots Across All Four Tires
Test multiple locations across the inner, center, and outer ribs of all four tires to identify uneven wear patterns.
- How to execute: Repeat steps two through five across at least three distinct spots spaced evenly around the circumference of each tire. Test the inner edge, center groove, and outer edge of every tire. Once the front wheels are done, straighten your steering wheel, turn it fully in the opposite direction to access the other front tire, and repeat the process for the rear tires. Log any discrepancies in your notepad.
- Success checkpoint: You will know this step worked when you have gathered at least twelve total data points (three spots per tire across four tires) providing a complete health map of your vehicle rubber.
- Common mistake: Testing only a single spot on a single tire. Tires often wear unevenly due to alignment issues or improper inflation, meaning one side can be safe while another is completely bald.
Common Mistakes and How to Fix Them
- Using a Quarter Instead of a Penny: Using a US quarter measures a 4/32 inch threshold instead of the critical 2/32 inch safety limit. Fix: Switch immediately to a penny. A quarter will cause you to prematurely replace tires that still have usable life remaining.
- Testing Wet or Icy Tires: Frozen moisture or heavy mud coats the base of the groove and elevates the coin. Fix: Wipe the tire tread clean with a dry cloth or microfiber towel before performing the test.
- Ignoring Asymmetrical Wear: Finding great tread on the outer shoulder while the inner shoulder is completely smooth. Fix: Have a professional suspension technician inspect your vehicle for negative camber issues or worn control arm bushings.
- Forgetting to Straighten Wheels for Rear Tires: Trying to inspect rear tires while the front steering is still locked outward. Fix: Return the steering wheel to the dead-center straight position before moving back to check the rear tires.
Variations: Adapting the Test for Special Situations
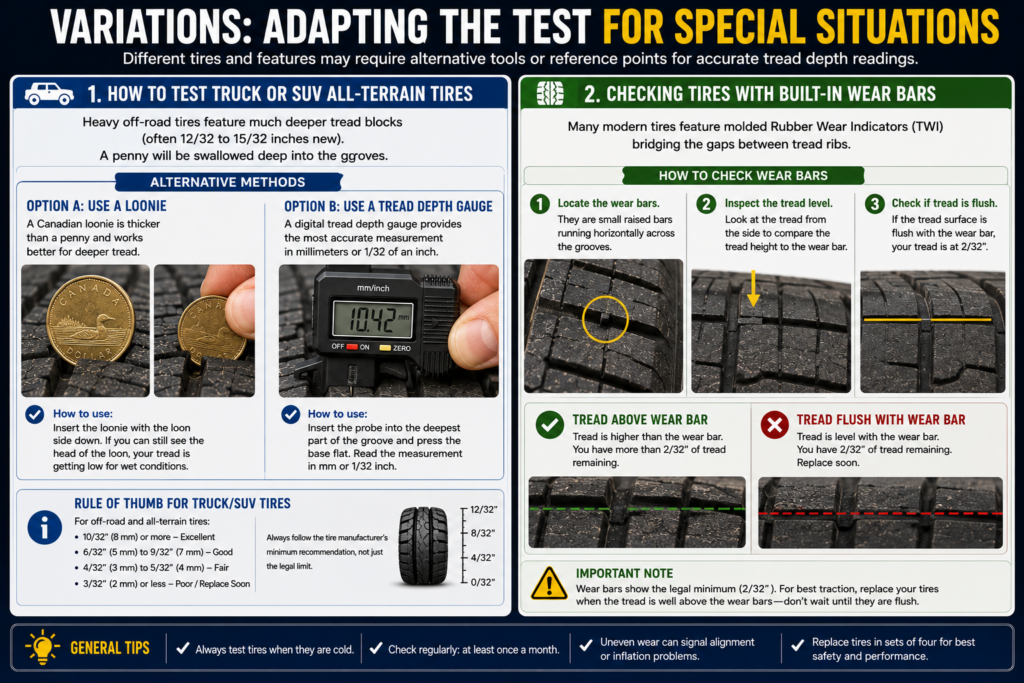
- How to Test Truck or SUV All-Terrain Tires: Heavy off-road tires feature much deeper tread blocks (often 12/32 to 15/32 inches new). A penny will be swallowed deep into the grooves. Alternative: Use a Canadian coin like a loonie or a dedicated digital tread depth gauge measured in millimeters for deep-lug tires.
- Checking Tires with Built-In Wear Bars: Many modern tires feature molded Rubber Wear Indicators (TWI) bridging the gaps between tread ribs. Alternative: Look for these small raised bars running horizontally across the grooves. If the tread surface is flush with these bars, your tread is at 2/32 inches regardless of what the penny test shows.
How Long Does It Take and What Does It Cost
- Time Investment: Completing this test across all four tires takes approximately 3 to 5 minutes for an experienced individual, or up to 8 minutes if you encounter heavily dirt-packed grooves requiring careful cleaning.
- Financial Cost: $0.00 using pocket change. Professional digital tread depth gauges cost between $5.00 and $15.00 if you prefer a numerical millimeter reading over a coin test.
Frequently Asked Questions
What exact depth does a penny measure?
A US penny measures tread depth against the critical safety limit of 2/32 of an inch (approximately 1.6 millimeters). When the tread wears down to this level, water evacuation channels fail, drastically increasing your risk of hydroplaning on wet asphalt surfaces at highway speeds.
Can I use a Canadian penny for this test?
You should avoid using a standard Canadian penny because older Canadian versions feature different physical dimensions and portrait alignments. If you are located in Canada, use a Canadian quarter to check against the 4/32 inch mark or use a metric tire depth gauge calibrated in millimeters.
How often should I perform the penny test?
You should perform the penny test on your vehicle at least once every month, as well as immediately before taking any long road trips. Regular monthly checks catch alignment issues and slow air pressure leaks before they result in catastrophic tread failure or sudden blowouts.
What should I do if my tires fail the penny test?
If all or part of your tires show Lincoln entire head during the test, you must visit a local tire service center to purchase replacements as soon as possible. Driving on tires below 2/32 inches reduces braking traction on wet roads and can result in failing state vehicle safety inspections.
Why do tires wear out unevenly across the tread?
Uneven tread wear is typically caused by incorrect tire inflation pressures, worn suspension components, bent control arms, or a misaligned steering geometry. If your penny test reveals that the inner edge is bald while the outer edge is thick, schedule a professional four-wheel alignment immediately.


