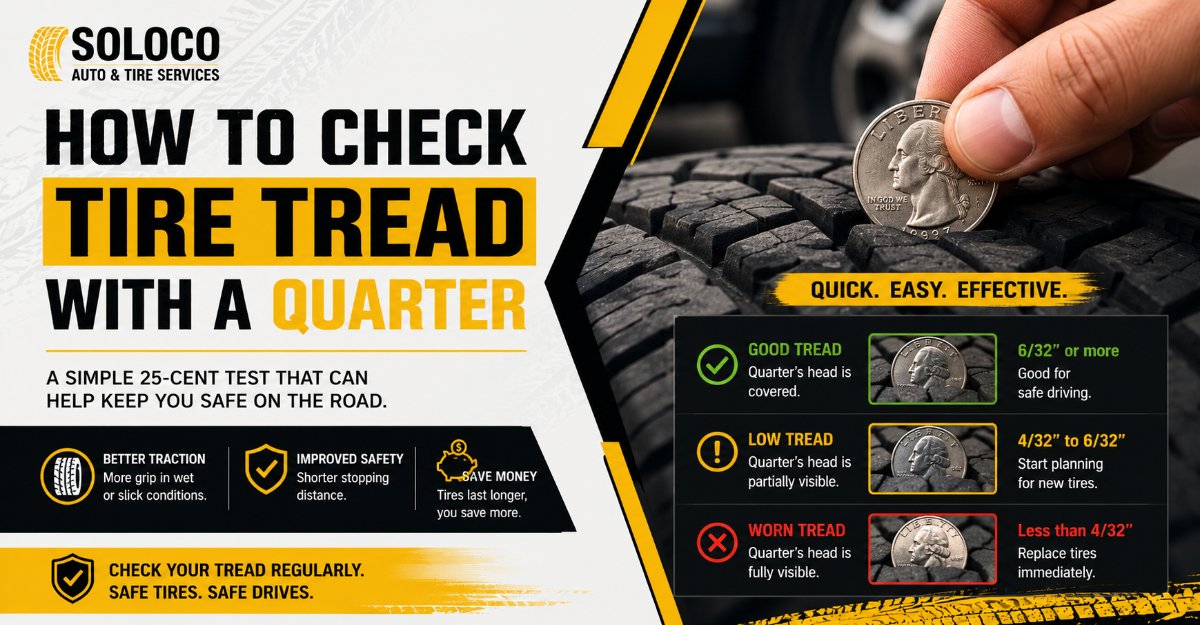
Checking your tire tread depth takes less than three minutes using a standard US 25-cent coin, requiring zero specialized mechanical tools while providing an instant assessment of wet-weather safety. This definitive 6-step procedure covers vehicle preparation, proper coin orientation, groove selection, and multi-point wear mapping, ensuring you can determine whether your tires are safe above 4/32 of an inch or require replacement.
Before You Start
- Time Required: 3 to 5 minutes total.
- Difficulty Level: Beginner.
- Cost: Free (requires 1 standard US Washington quarter).
- Tools and Materials: 1 Washington quarter, 1 smartphone flashlight (optional for dark wheel wells), 1 tire pressure gauge (optional).
- Prerequisite Conditions: Vehicle parked on a completely flat, level surface with the engine off, parking brake fully engaged, and wheels turned to expose the tread face.
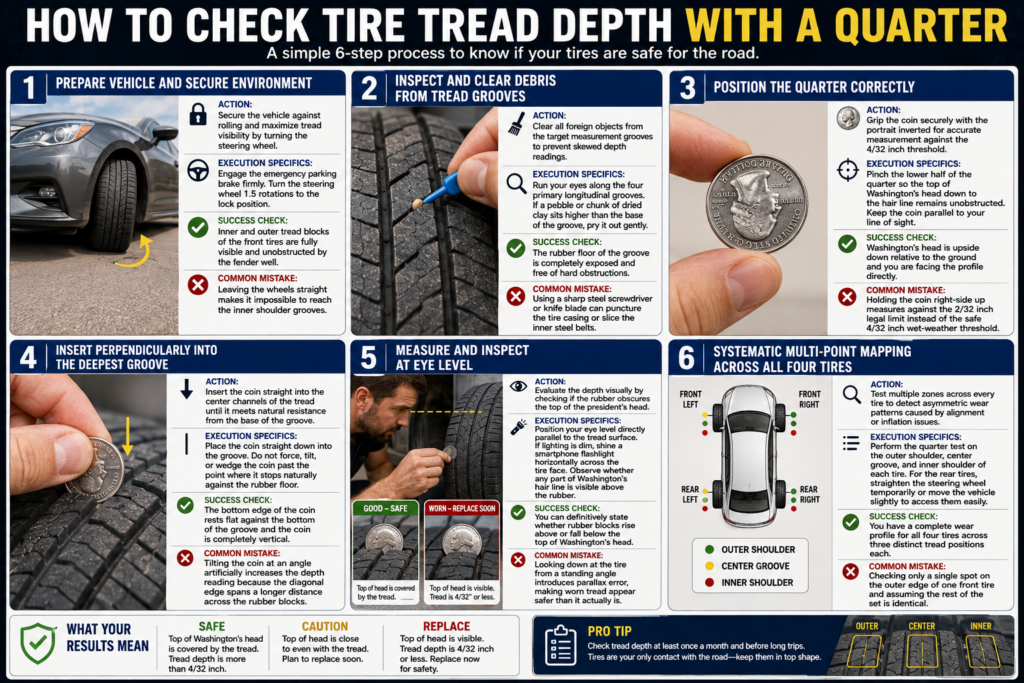
Step 1: Prepare Vehicle and Secure Environment
Park your vehicle on a flat, level concrete or asphalt surface, engage the parking brake fully, and place an automatic transmission in Park or a manual transmission in Reverse. Turn the steering wheel fully to the left or right to expose the front tire treads completely, then turn off the engine and exit the vehicle.
- Action: Secure the vehicle against rolling and maximize tread visibility by turning the steering wheel.
- Execution Specifics: Engage the emergency parking brake firmly until tension is felt. Turn the steering wheel 1.5 rotations to the lock position to angle the front tires outward.
- Success Check: You will know this step worked when the inner and outer tread blocks of the front tires are fully visible and unobstructed by the vehicle fender well.
- Common Mistake: Leaving the wheels straight makes it physically impossible to reach the inner shoulder grooves of the front tires.
Step 2: Inspect and Clear Debris from Tread Grooves
Examine the main circumferential channels running around the circumference of the tire and remove any trapped stones, gravel, mud, or packed ice using a non-sharp plastic tool or a blunt key.
- Action: Clear all foreign objects from the target measurement grooves to prevent skewed depth readings.
- Execution Specifics: Run your eyes along the four primary longitudinal grooves. If a pebble or chunk of dried clay sits higher than the base of the groove, pry it out gently.
- Success Check: You will know this step worked when the rubber floor of the groove is completely exposed and free of hard obstructions.
- Common Mistake: Using a sharp steel screwdriver or knife blade to dig out stones can easily puncture the tire casing or slice the inner steel belts.
Step 3: Position the Quarter Correctly
Hold a standard US Washington quarter between your thumb and forefinger, orienting George Washington’s head upside down with the top of his head pointing toward the ground.
- Action: Grip the coin securely with the portrait inverted for accurate measurement against the 4/32 inch threshold.
- Execution Specifics: Pinch the lower half of the quarter so that the upper portion, specifically the top of Washington’s head down to the hair line, remains unobstructed. Keep the coin parallel to your line of sight.
- Success Check: You will know this step worked when Washington’s head is upside down relative to the ground and you are facing the profile directly.
- Common Mistake: Holding the coin right-side up measures against the 2/32 inch legal limit instead of the safe 4/32 inch wet-weather threshold.
Step 4: Insert Perpendicularly into the Deepest Groove
Lower the upside-down quarter straight down into the deepest part of the tire tread groove, ensuring the coin sits perpendicular to the tire surface without pressing onto a raised wear bar.
- Action: Insert the coin straight into the center channels of the tread until it meets natural resistance from the base of the groove.
- Execution Specifics: Place the coin straight down into the groove. Do not force, tilt, or wedge the coin past the point where it stops naturally against the rubber floor.
- Success Check: You will know this step worked when the bottom edge of the coin rests flat against the bottom of the groove and the coin is completely vertical.
- Common Mistake: Tilting the coin at an angle artificially increases the depth reading because the diagonal edge spans a longer distance across the rubber blocks.
Step 5: Measure and Inspect at Eye Level
Squat down to eye level with the tire tread, look straight across the surface of the rubber blocks, and check whether the top of Washington’s head is covered by the tread.
- Action: Evaluate the depth visually by checking if the rubber obscures the top of the president’s head.
- Execution Specifics: Position your eye level directly parallel to the tread surface. If lighting is dim, shine a smartphone flashlight horizontally across the tire face. Observe whether any part of Washington’s hair line is visible above the rubber.
- Success Check: You will know this step worked when you can definitively state whether rubber blocks rise above or fall below the top of Washington’s head.
- Common Mistake: Looking down at the tire from a standing angle introduces parallax error, making worn tread appear safer than it actually is.
Step 6: Systematic Multi-Point Mapping Across All Four Tires
Repeat the insertion and inspection process across the outer, center, and inner grooves of all four tires, logging individual measurements for comprehensive wear analysis.
- Action: Test multiple zones across every tire to detect asymmetric wear patterns caused by alignment or inflation issues.
- Execution Specifics: Perform the quarter test on the outer shoulder, center groove, and inner shoulder of each tire. For the rear tires, straighten the steering wheel temporarily or move the vehicle slightly to access them easily.
- Success Check: You will know this step worked when you have a complete wear profile for all four tires across three distinct tread positions each.
- Common Mistake: Checking only a single spot on the outer edge of one front tire and assuming the rest of the set is identical.
Result Interpretation
Interpreting your quarter test results accurately prevents hydroplaning and ensures your vehicle maintains adequate traction on wet and dry roads:
- Head is covered: The rubber extends past the top of Washington’s head, indicating your tread depth is over 4/32 of an inch. Your tires possess safe wet-weather traction.
- Head is entirely visible: The top of Washington’s head is completely exposed above the rubber, indicating your tread depth is under 4/32 of an inch. Plan to replace your tires soon, as stopping distances increase significantly in rain.
- The Penny Reference: If you substitute a penny and see the top of Abraham Lincoln’s head, your tread depth is below 2/32 of an inch. This is legally bald, highly dangerous, and requires immediate tire replacement.
Common Mistakes and How to Fix Them
- Measuring Wear Bars Only: Testing directly on the raised rubber wear bars embedded in the grooves gives a false sense of security. Always measure in the deep channels between these bars.
- Angling the Coin: Tilting the quarter creates a diagonal measurement that exaggerates remaining tread depth. Keep the coin strictly perpendicular to the rolling surface.
- Ignoring Asymmetric Wear: Failing to check inner and outer shoulders misses rapid edge wear caused by negative camber or bad toe alignment. Always test all three groove sections across the tire width.
- Testing Hot Tires Immediately After Driving: Driving long distances heats and expands tire rubber slightly. Perform checks when the vehicle has been parked for at least 2 hours for maximum accuracy.
Variations and Alternative Methods
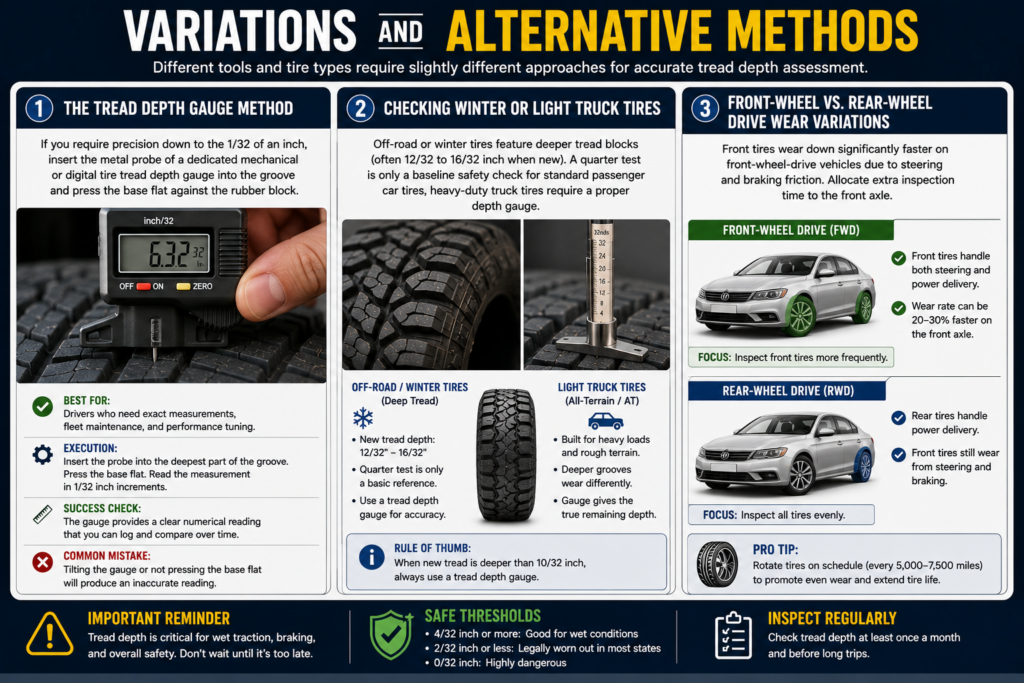
- The Tread Depth Gauge Method: If you require precision down to the 1/32 of an inch, insert the metal probe of a dedicated mechanical or digital tire tread depth gauge into the groove and press the base flat against the rubber block.
- Checking Winter or Light Truck Tires: Off-road or winter tires feature deeper tread blocks (often 12/32 to 16/32 inch when new). A quarter test is only a baseline safety check for standard passenger car tires; heavy-duty truck tires require a proper depth gauge.
- Front-Wheel vs. Rear-Wheel Drive Wear Variations: Front tires wear down significantly faster on front-wheel-drive vehicles due to steering and braking friction. Allocate extra inspection time to the front axle.
How Long Does It Take / What Does It Cost
- Time Investment: 3 to 5 minutes for a complete four-tire inspection across all three groove positions.
- Financial Cost: Zero dollars when using a standard US 25-cent coin found in your pocket or change jar. A mechanical tread depth gauge costs between 3 and 7 dollars if you prefer a digital or dial readout.
Frequently Asked Questions
Can I use any coin besides a Washington quarter?
Yes, you can use a Lincoln penny as a secondary emergency check, where seeing the top of Lincoln’s head indicates 2/32 of an inch of remaining tread. However, a quarter is superior because its larger face tests against the safer 4/32 inch threshold recommended for wet-weather driving.
Why does the 4/32 inch threshold matter so much?
Tires lose the ability to channel water effectively away from the contact patch as rubber wears down. While 2/32 of an inch is the legal minimum in most jurisdictions, testing at 4/32 of an inch with a quarter ensures you maintain adequate resistance against hydroplaning during heavy downpours.
What causes a tire to wear down faster in the center?
Center tread wear is almost exclusively caused by chronic over-inflation. When a tire has too much air pressure, the center portion billows outward and bears the majority of the vehicle weight, wearing down the middle grooves while leaving the shoulders intact.
What causes a tire to wear down on both outer edges?
Outer and inner shoulder wear on both sides of a single tire indicates chronic under-inflation. Low air pressure causes the tire sidewalls to flex excessively, transferring vehicle load onto the outer edges of the tread blocks while the center groove remains untouched.
How often should I check my tire tread depth?
You should check your tire tread depth using the quarter method once every month, as well as before embarking on any long road trips or seasonal weather transitions. Regular checks catch alignment issues and uneven wear patterns early.


