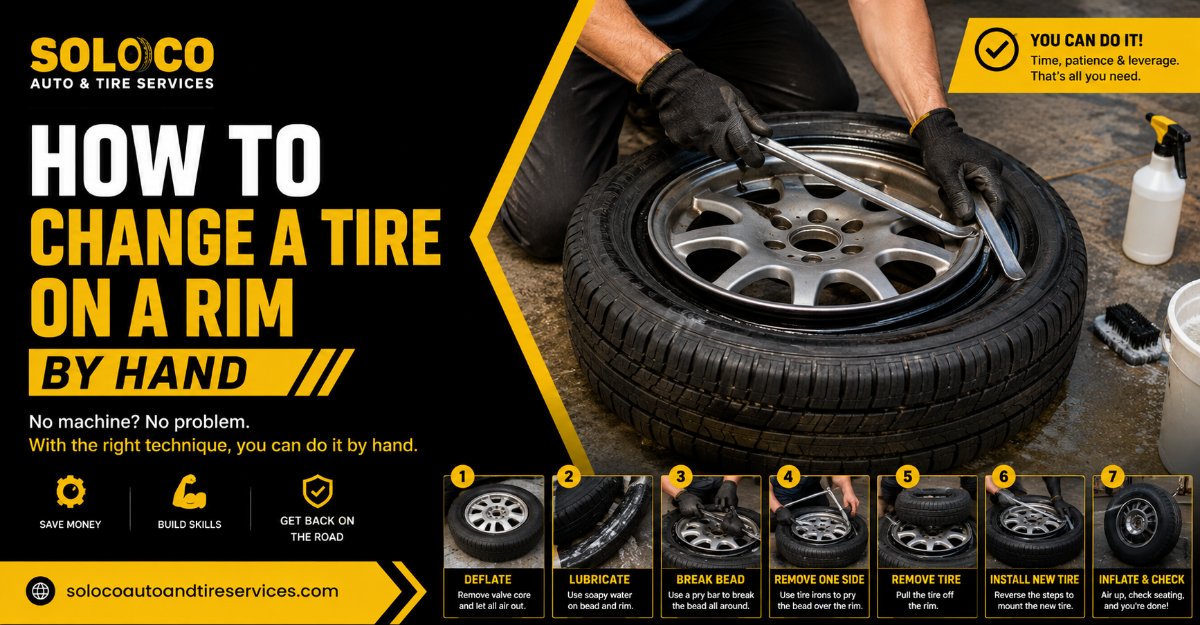
Changing a tire on a rim by hand requires patience, physical effort, and proper leverage to protect the wheel from damage.
This complete process takes 45 to 80 minutes across 9 sequential steps, requiring intermediate physical exertion, standard manual tire spoons, and adequate lubrication, with success resting entirely on keeping the tire bead positioned inside the wheel drop-center well during prying.
Before You Start
- Time Required: 45 to 80 minutes
- Difficulty Level: Intermediate (requires physical strength and technique)
- Cost Range: $15 to $40 (if purchasing tire spoons and paste; free if using household soap and borrowed irons)
- Tools and Materials:
- Tire spoons or irons: 2 or 3 count, minimum 12-inch length (with smooth, rounded edges)
- Rim protectors: 2 to 3 count (optional but recommended for alloy wheels)
- Valve core tool: 1 count
- Bead breaker tool: 1 count (or a stable vehicle jack/lever mechanism)
- Tire lubricant: 4 to 8 ounces (commercial tire mounting paste or a 1:1 dish soap and water mixture in a spray bottle)
- New tire: 1 count (verify correct size and directional rotation arrows)
- New rubber or metal valve stem: 1 count
- Air compressor or high-volume floor pump: 1 count (capable of 40 to 60 PSI)
- Safety gear: Heavy-duty work gloves and safety glasses
- Prerequisite Conditions: Clean, stable work surface (such as a workbench or concrete floor covered with cardboard to protect the wheel face).
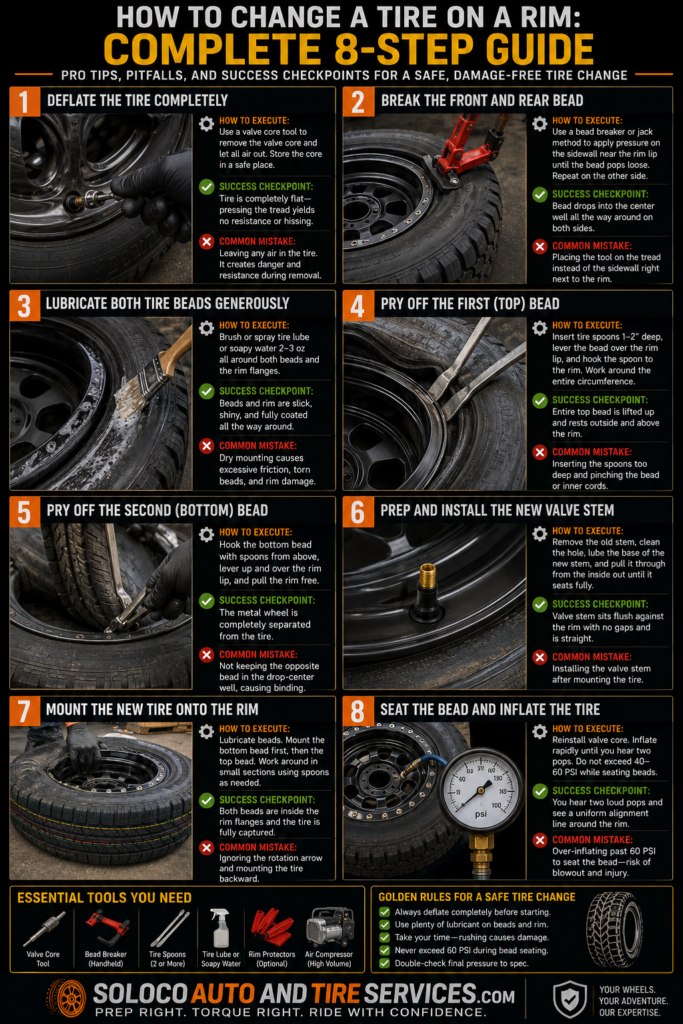
Step 1: Deflate the Tire Completely
Completely deflate the tire by removing the valve core from the valve stem. Screw the valve core tool securely into the center of the valve stem, turn it counterclockwise to unscrew the core, and allow all internal air pressure to vent until the tire is completely flat.
- How to execute: Keep your face clear of the valve stem as you loosen the core, as residual dust or sealant may spit out. Store the tiny metal valve core in a safe container so it does not get lost in your workspace.
- Success Checkpoint: You will know this step worked when pressing firmly down on the tire tread yields zero resistance or hissing sound, and the tire sidewalls collapse flat against each other.
- Common Mistake: Leaving even a small amount of air inside the tire. Trying to break the bead or insert spoons on an inflated or partially pressurized tire creates extreme resistance and potential danger.
Step 2: Break the Front and Rear Bead
Break the tight rubber-to-metal bond on both sides of the tire by applying concentrated downward pressure along the outer sidewalls. Place your bead breaker tool or a DIY lever apparatus directly on the tire sidewall as close to the outer rim lip as possible, apply steady downward force until the bead unseats and drops into the center well, then flip the wheel over and repeat the process on the reverse side.
- How to execute: If using a commercial handheld bead breaker, step firmly on its lever arm. If using a vehicle jack method, place the wheel flat under the bumper of a heavy vehicle and lower a secure jack extension onto the tire sidewall just outside the rim edge, stopping the moment the rubber pops loose.
- Success Checkpoint: You will know this step worked when the rubber bead pulls cleanly away from the metal rim flange, dropping inward toward the center barrel of the wheel all the way around the circumference.
- Common Mistake: Placing the bead breaker too far inward toward the center of the tread. If you press on the flexible tread instead of the stiff sidewall right next to the rim, the tool will simply compress the rubber without breaking the bead seal.
Step 3: Lubricate Both Tire Beads Generously
Lubricate both upper and lower tire beads along with the entire circumference of the metal rim flange. Spray or brush 2 to 3 ounces of your commercial tire paste or 1:1 dish soap and water mixture thoroughly around the entire perimeter where the rubber meets the metal on both the front and back faces of the wheel.
- How to execute: Use a brush or spray bottle to flood the gap between the unseated bead and the rim edge. Ensure the lubricant creeps deep down into the crevice. This liquid acts as a vital slip agent.
- Success Checkpoint: You will know this step worked when the rubber bead and rim metal are visibly coated, slick, and shiny all the way around, creating a slippery surface for the upcoming metal tool work.
- Common Mistake: Dry mounting. Attempting to pry a tire over a rim without wet lubrication creates massive friction that will tear the rubber bead, ruin the tire carcass, or gouge your aluminum rims.
Step 4: Pry Off the First (Top) Bead
Pry the top tire bead completely over the outer edge of the rim using your tire spoons. Insert the tip of the first tire spoon between the rim lip and the top tire bead (about 1 to 2 inches deep maximum), push the handle down toward the center of the wheel to lever the bead up, and flip it over the rim flange. Hook the spoon’s integrated notch onto a nearby spoke or rim edge if applicable, then insert your second spoon 3 to 4 inches away and repeat the prying motion, working your way progressively around the entire circle.
- How to execute: Always push the opposite side of the tire bead deeply down into the center drop-center well of the wheel while prying. This slackens the tension on the side you are working on. Use plastic rim protectors underneath your spoons if you are working with expensive alloy wheels.
- Success Checkpoint: You will know this step worked when the entire top half of the tire bead is completely lifted up and rests entirely outside and above the upper lip of the rim.
- Common Mistake: Biting too deep with the tire spoons. Shoving the spoons several inches deep into the tire catches the inner steel cords or tube, pinching the rubber and making extraction impossible. Only catch the literal lip of the bead wire.
Step 5: Pry Off the Second (Bottom) Bead
Extract the rim completely from the interior of the tire by hooking and lifting the bottom bead over the top rim flange. Push the shafts of your tire spoons straight down through the center hole or past the top rim edge to hook the underside of the bottom bead, lever the tool upward, and pull the bottom bead up and over the same top rim edge.
- How to execute: Stand over the wheel, tilt the freed side of the rim upward, and use one hand to guide the bottom bead while your spoons lever sections of it over the rim lip. Once a 12-inch section of the bottom bead clears the rim, grab the metal rim and pull it free from the tire body entirely.
- Success Checkpoint: You will know this step worked when the metal wheel is completely separated from the tire casing.
- Common Mistake: Forgetting to keep the lower bead inside the drop-center well on the far side during extraction, which causes excessive binding and bent tire spoons.
Step 6: Prep and Install the New Valve Stem
Remove the old valve stem and install a fresh, pliable rubber or metal valve stem into the wheel hole. Cut the old rubber valve stem cleanly in half using utility shears or push it inward to pull it out, clean any corrosion or rubber residue from the rim valve hole using a wire brush, lubricate the base of the new valve stem, and pull it firmly through the hole from the inside out using pliers or a dedicated valve puller tool.
- How to execute: Pull straight outward with steady, firm pressure on the new valve stem until the rubber base seats fully into the rim hole with a distinct snap. Verify that the valve stem points straight outward and is not crooked or twisted.
- Success Checkpoint: You will know this step worked when the thick rubber collar of the valve stem is flush against the inner wall of the rim with no gaps visible from either side.
- Common Mistake: Installing the valve stem after mounting the new tire. Always install the valve stem while the bare rim is completely empty to ensure proper leverage and seating.
Step 7: Mount the New Tire Onto the Rim
Mount the new tire onto the rim by feeding the bottom bead first, followed by the top bead. Thoroughly lubricate both beads of the new tire. Push the bottom bead down at an angle so part of it drops past the top rim flange into the center drop-center well, then use your hands to push as much of the remaining bottom bead over the rim as possible, finishing stubborn sections with your tire spoons. Repeat this exact sequence for the top bead.
- How to execute: Check the sidewall of the new tire for a rotational arrow and ensure it points in the correct forward direction relative to the vehicle’s movement. As you work the final sections of the top bead on with your spoons, take small 2-inch bites to avoid pinching the inner bead wire.
- Success Checkpoint: You will know this step worked when both the top and bottom beads of the tire are resting inside the outer flanges of the metal rim, and the tire is fully captured on the wheel.
- Common Mistake: Ignoring tire rotation direction. Mounting a directional tire backward forces you to unmount and restart the entire process.
Step 8: Seat the Bead and Inflate the Tire
Inflate the tire rapidly to seat both beads tightly against the rim sealing surfaces. Reinstall the valve core securely using your valve core tool. Connect your high-volume air compressor hose directly to the valve stem without the valve core installed if you are struggling with airflow, or with the core installed if the tire fits snugly. Inflate the tire steadily until you hear two distinct, loud metallic or popping sounds.
- How to execute: Monitor the pressure gauge closely during inflation. Never exceed 40 to 60 PSI during the bead seating phase. Once the beads pop into place, disconnect the air source and adjust the final operating pressure to your vehicle manufacturer’s precise manual specification (typically 30 to 35 PSI for standard passenger cars or light duty equipment).
- Success Checkpoint: You will know this step worked when you hear two loud pops, and a continuous visual inspection around both sides of the rim reveals a uniform raised alignment ridge running parallel to the rim edge.
- Common Mistake: Over-inflating past 60 PSI to force a stubborn bead to seat. Continuing to pump air into a misaligned tire past 60 PSI risks a catastrophic sidewall blowout and severe injury.
Common Mistakes and How to Fix Them
- Dry Mounting the Tire: Attempting to force a tire over a rim without lubricant tears the rubber bead or scratches the wheel. Recovery: Unmount the tire immediately, wipe down all surfaces, and apply a generous coat of commercial tire paste or soapy water before re-attempting.
- Ignoring the Drop-Center Well: Failing to keep the opposite side of the tire bead pushed down into the deepest recess of the rim well makes prying physically impossible. Recovery: Stop forcing the spoons, reposition your knees or hands on the opposite side of the tire to push the bead deep into the center well, and notice how the working side instantly gains slack.
- Biting Too Deep with Tire Spoons: Inserting the metal spoons too far catches the internal bead bundle or punctures a tube. Recovery: Insert only the extreme tip of the spoon (less than 1 inch) underneath the outer wire core of the bead.
- Bead Fails to Seal / Air Escapes Instantly: Large gaps between the unseated bead and the rim prevent air pressure from building. Recovery: Remove the valve core temporarily to allow maximum CFM airflow from your compressor, or wrap a ratchet strap tightly around the outer tread circumference of the tire to force the rubber sidewalls outward against the rim lips.
Variations: How the Process Adapts
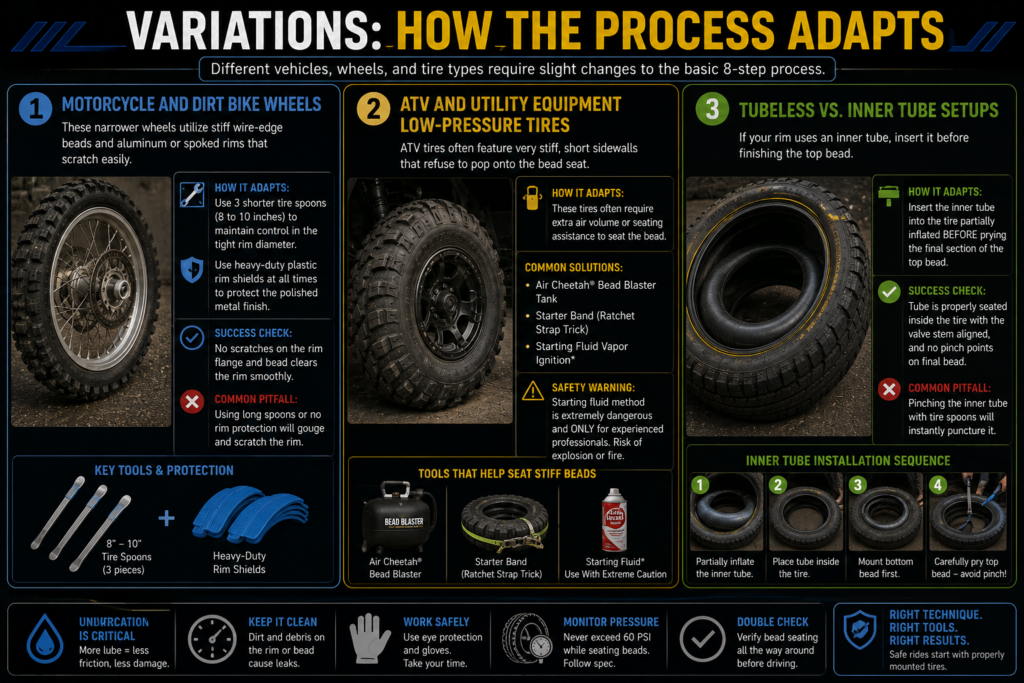
- Motorcycle and Dirt Bike Wheels: These narrower wheels utilize stiff wire-edge beads and aluminum or spoked rims that scratch easily. You must use 3 shorter tire spoons (8 to 10 inches) and heavy-duty plastic rim shields at all times to protect the polished metal finish.
- ATV and Utility Equipment Low-Pressure Tires: ATV tires often feature very stiff, short sidewalls that refuse to pop onto the bead seat with a standard compressor. These require either an air cheetah bead blaster tank, a starter band (ratchet strap trick), or starting fluid vapor ignition (performed only by experienced professionals due to extreme safety hazards).
- Tubeless vs. Inner Tube Setups: If your rim runs an inner tube (common on older motorcycles, bicycles, and some agricultural equipment), you must insert the inner tube into the tire partially inflated before prying the final section of the top bead, taking extreme care not to pinch the tube with your tire spoons.
How Long Does It Take and What Does It Cost?
- Time Investment: Expect to spend 45 to 80 minutes for your first attempt. Experienced technicians can complete a manual tire change in 15 to 20 minutes, but beginners should budget extra time for stubborn beads and learning proper leverage technique.
- Financial Cost: If you already own basic tire irons and an air compressor, the cost is near zero aside from the new tire and valve stem. Buying a starter kit consisting of three 12-inch tire spoons, a valve tool, and tire paste costs roughly $20 to $40 total.
Frequently Asked Questions
Do I need a professional tire balancing machine after changing a tire by hand?
Yes, dynamic wheel balancing is highly recommended for any highway-speed vehicle tire. Changing a tire by hand does not inherently balance the weight distribution of the new rubber relative to the wheel assembly, which can cause steering wheel vibration at speeds above 45 miles per hour. Static bubble balancing can be performed at home, but machine balancing is superior.
Can I change a tire on a rim without any tire spoons or irons?
No. While you can break beads using alternative leverage like a vehicle bumper jack, you cannot safely or effectively lift stiff rubber tire beads over a metal rim flange without dedicated metal tire spoons or heavy-duty lever bars without destroying the wheel or injuring yourself.
Why won’t my tire bead pop onto the rim seat when inflating?
This usually happens because there is an air gap between the tire bead and the rim flange, allowing air to escape faster than your compressor can supply it. To fix this, remove the valve core to let maximum air volume rush into the tire instantly, or wrap a ratchet strap around the center tread and crank it down to push the rubber beads outward against the rim lips.
How do I prevent my metal tire spoons from scratching my aluminum alloy rims?
You can prevent rim damage by slipping commercial plastic rim shields over the rim edge before inserting each tire spoon. Alternatively, you can wrap the working tips of your metal tire spoons in several layers of duct tape or electrical tape to cushion the contact point against the soft aluminum alloy.


