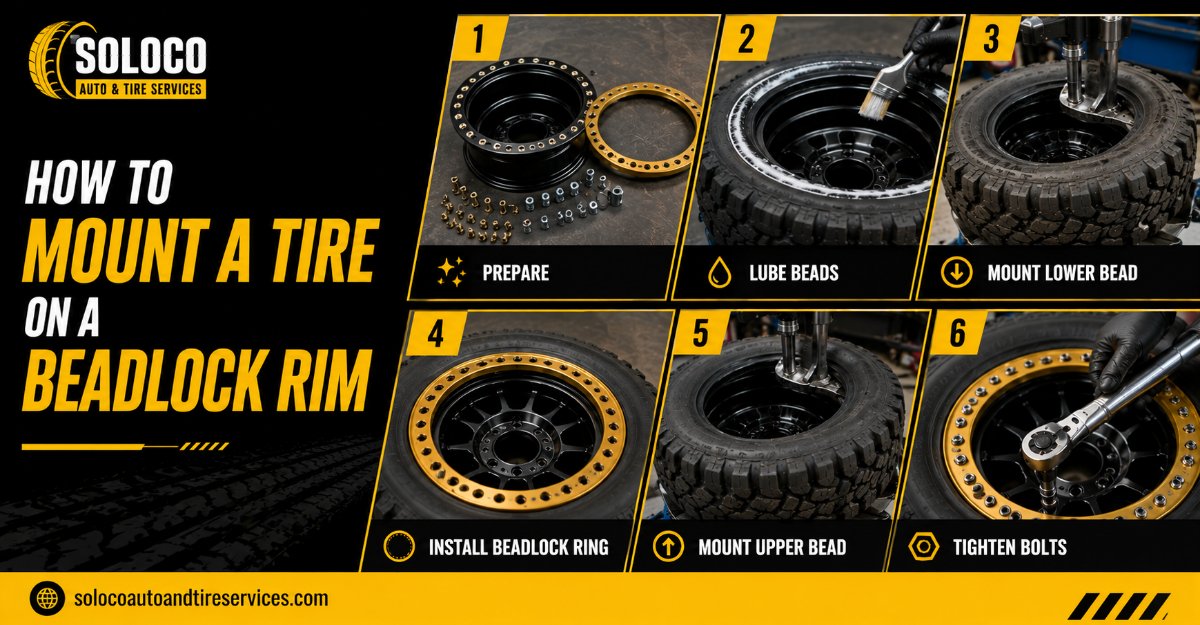
Mounting a tire on a functional, multi-bolt external beadlock rim requires replacing standard tire-mounting machines with manual compression and a methodical, progressive torquing sequence to clamp the outer tire bead safely. By executing these six precise steps in 45 to 60 minutes per wheel, you will achieve an airtight, trail-ready assembly on your first attempt without warping the aluminum ring.
Before You Start
- Time Required: 45 to 60 minutes per wheel
- Difficulty Level: Intermediate to Advanced
- Cost Range: $0 (if you already own tools) to $40 for consumables (anti-seize, tire lube)
- Prerequisite Skills: Basic mechanical aptitude, proper use of a hand torque wrench, and safety awareness around high-pressure air systems.
Tools and Materials Checklist
- Beadlock Rims & Rings: Full set (4 or 5 wheels)
- Beadlock Bolts & Washers: Factory-provided kit (typically 24 to 36 bolts per wheel)
- Anti-Seize Lubricant: 1 small tube of Nickel or Marine grade
- Tire Lubricant: Commercial tire lube or thick dish soap mixed with water in a spray bottle
- Calibrated Torque Wrench: 3/8-inch drive capable of low-torque readouts (10 to 25 ft-lbs)
- Hand Ratchet & Socket: Matching socket size (typically 1/2 inch or 9/16 inch)
- 5-Gallon Plastic Bucket: 1 sturdy bucket for rim elevation
- Valve Stem Tool: 1 standard tool for core removal and valve installation
- Air Compressor: Capable of reaching 80 to 100 PSI surge capacity
- Paint Pen or Sharpie: 1 marker for tracking torque patterns
- Feer Gauge: 1 standard blade feeler gauge set
- Safety Gear: Safety glasses and heavy work gloves
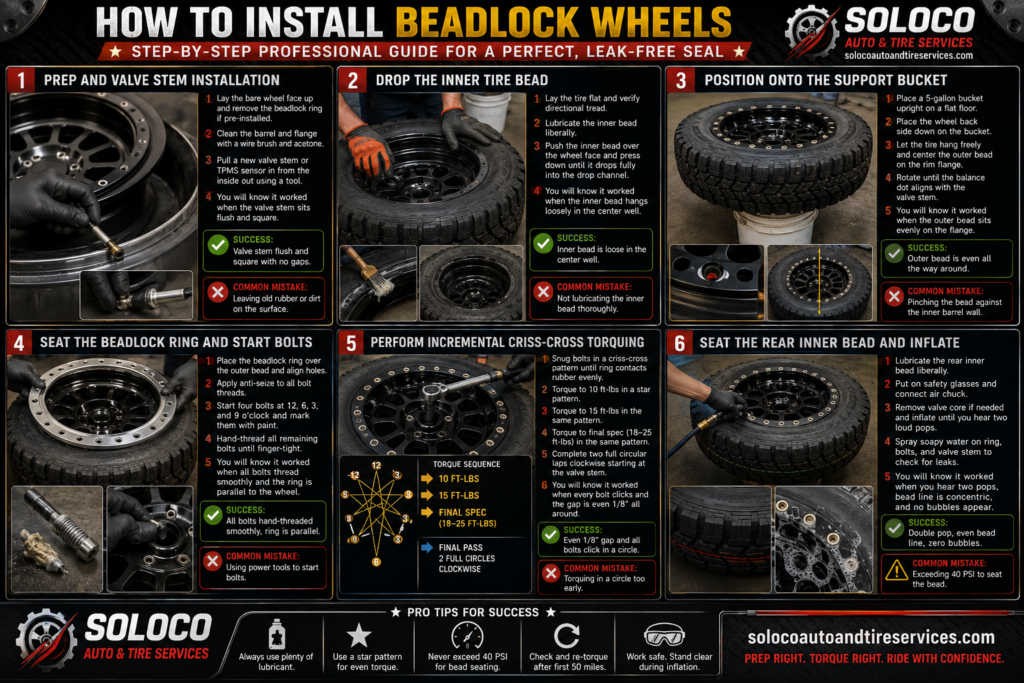
Step 1: Prep and Valve Stem Installation
- Lay the bare wheel face up on a clean, protected workbench and remove the beadlock ring if it arrived pre-installed.
- Inspect the wheel barrel and outer mounting flange, using a wire brush and acetone to remove any manufacturing burrs, oxidation, or debris.
- Use a valve stem tool to pull a new rubber valve stem or metal TPMS sensor firmly into the designated rim hole from the inside out.
- You will know it worked when the valve stem sits flush and square against the inner contour of the wheel well without any visible pinching or gaps.
- Common Mistake: Leaving old rubber remnants or dirt on the mating surface. Always wipe the flange completely clean so the tire bead makes metal-to-rubber-to-metal contact without obstruction.
Step 2: Drop the Inner Tire Bead
- Lay your tire flat on the ground and verify its directional tread orientation if applicable.
- Liberally apply your commercial tire lubricant or thick soapy water solution around the entire circumference of the inner tire bead.
- Push the inner tire bead over the upper face of the wheel, pressing downward on alternating corners until the inner bead drops completely past the outer wheel flange and rests deep into the rim’s center drop channel.
- You will know it worked when the entire inner bead hangs loosely inside the central well of the wheel barrel without binding against the outer edge.
- Common Mistake: Forgetting to lubricate the inner bead thoroughly. Without lubrication, the rubber will catch on the drop channel and refuse to drop into position.
Step 3: Position onto the Support Bucket
- Place your sturdy 5-gallon plastic bucket upright on a flat concrete floor.
- Lift the wheel-and-tire assembly and place the back side of the rim flat onto the open rim of the bucket so the tire hangs freely underneath.
- Allow the weight of the hanging tire to pull downward naturally, leaving the outer tire bead perfectly centered and sitting flush against the rim’s outer flange.
- Rotate the tire until the yellow or red balance dot aligns directly with the newly installed valve stem.
- You will know it worked when the outer tire bead rests evenly all the way around the rim flange without pinching against the inner barrel wall.
Step 4: Seat the Beadlock Ring and Start Bolts
- Lay the aluminum beadlock ring flat over the outer tire bead, making sure to align the bolt holes with the threaded inserts on the wheel.
- Lightly coat the threads of every single bolt with a thin layer of nickel or marine-grade anti-seize lubricant.
- Thread in four starter bolts by hand at the 12, 6, 3, and 9 o’clock positions to center the ring, and mark these four bolts with your paint pen.
- Thread in all remaining bolts completely by hand until finger-tight to verify that zero threads are cross-threading.
- You will know it worked when all bolts thread smoothly by hand with uniform thread engagement and the ring sits parallel to the wheel face.
- Common Mistake: Using power tools to start the bolts. Always thread bolts completely by hand to prevent stripping expensive aluminum wheel threads.
Step 5: Perform Incremental Criss-Cross Torquing
- Use a hand ratchet to gently snug the bolts down in a star or criss-cross pattern until the ring makes light contact with the rubber, keeping the gap uniform.
- Set your calibrated torque wrench to 10 ft-lbs and work strictly in a criss-cross star pattern across the entire ring.
- Increase your torque wrench setting to 15 ft-lbs and repeat the exact same criss-cross pattern entirely.
- Adjust your torque wrench to your wheel manufacturer’s final specification, which is typically between 18 and 25 ft-lbs for aluminum wheels, and repeat the criss-cross pattern.
- Complete two full circular laps in a continuous clockwise direction starting at the valve stem, clicking each bolt at your final torque setting until no bolts turn further.
- You will know it worked when every single bolt clicks the torque wrench in a continuous circle and the gap between the ring and wheel edge measures an even 1/8 inch all the way around.
- Common Mistake: Torquing in a circle too early. Tightening in a circle before the ring is fully pulled down flat pinches the tire bead unevenly and creates massive air leaks.
Step 6: Seat the Rear Inner Bead and Inflate
- Spray the unseated inner tire bead on the back side of the wheel liberally with your tire lubricant or soapy water.
- Stand clear of the tire face, put on your safety glasses, and hook up your clip-on air chuck directly to the valve stem.
- Remove the valve core to maximize airflow if your compressor has low CFM volume, and inflate the tire until you hear two distinct, loud pops as the inner tire bead climbs and seats itself onto the rear safety hump of the rim.
- Spray soapy water over the entire front beadlock ring, bolts, and valve stem to check for bubbling air leaks.
- You will know it worked when you hear the double pop, the inner bead line runs concentric to the wheel rim all the way around, and zero bubbles appear during the soapy water test.
- Common Mistake: Exceeding the maximum tire sidewall inflation rating to force a stubborn bead. If it does not seat by 40 PSI, stop immediately, deflate, and re-lubricate.
Common Mistakes and How to Fix Them
- Using Power Impact Tools for Final Tightening: Impact wrenches generate high-frequency vibration and torque spikes that easily snap small beadlock hardware, strip aluminum threads, or warp the clamping ring. Always finish with a hand torque wrench.
- Skipping Anti-Seize: Off-road wheels encounter mud, water, and salt. Skipping anti-seize causes steel bolts to gall and seize inside aluminum threads, causing them to shear off during your next tire change.
- Lubricating the Outer Beadlock Surface: Only lubricate the inner bead. Lubricating the outer bead allows the rubber to slip out from under the mechanical clamp of the lock ring under heavy vehicle load.
- Neglecting the Break-In Re-Torque: Beadlock hardware naturally settles as the rubber stretches and compresses under vehicle weight. Failing to re-torque all bolts after the first 50 miles can result in hardware backing out on the trail.
Troubleshooting Failures
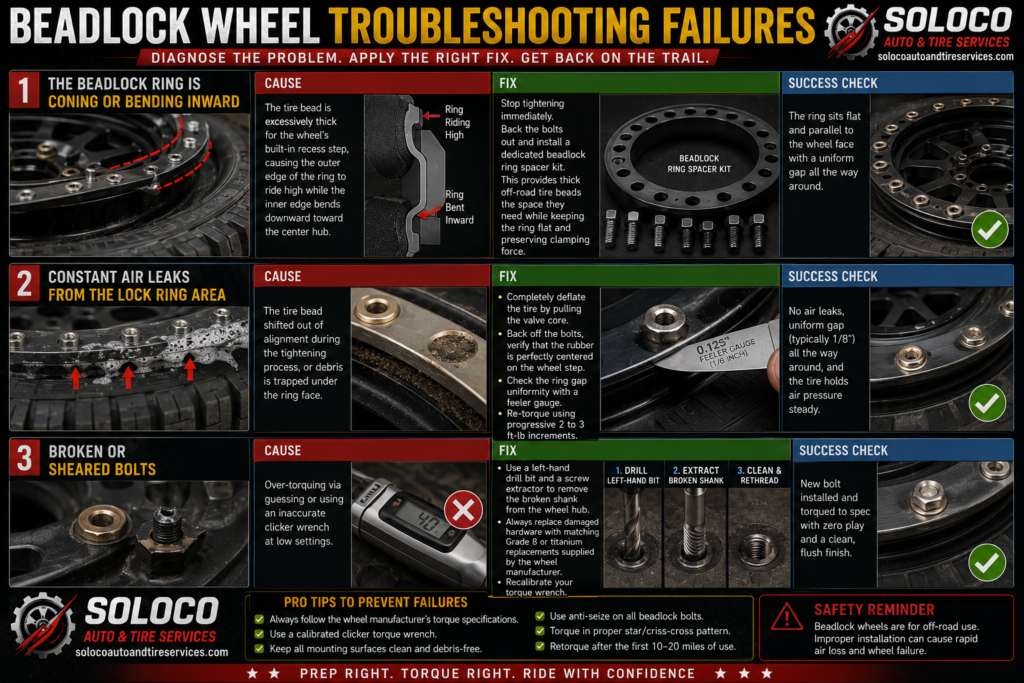
1. The Beadlock Ring is Coning or Bending Inward
- Cause: The tire bead is excessively thick for the wheel’s built-in recess step, causing the outer edge of the ring to ride high while the inner edge bends downward toward the center hub.
- Fix: Stop tightening immediately. Back the bolts out and install a dedicated beadlock ring spacer kit. This provides thick off-road tire beads the space they need while keeping the ring flat and preserving clamping force.
2. Constant Air Leaks from the Lock Ring Area
- Cause: The tire bead shifted out of alignment during the tightening process, or debris is trapped under the ring face.
- Fix: Completely deflate the tire by pulling the valve core. Back off the bolts, verify that the rubber is perfectly centered on the wheel step, and check the ring gap uniformity with a feeler gauge. Re-torque using progressive 2 to 3 ft-lb increments.
3. Broken or Sheared Bolts
- Cause: Over-torquing via guessing or using an inaccurate clicker wrench at low settings.
- Fix: Use a left-hand drill bit and a screw extractor to remove the broken shank from the wheel hub. Always replace damaged hardware with matching Grade 8 or titanium replacements supplied by the wheel manufacturer, and recalibrate your torque wrench.
4. The Inner Bead Won’t Pop Into Place During Inflation
- Cause: Insufficient lubrication on the inner wheel barrel hump or weak air compressor CFM volume.
- Fix: Deflate the tire completely, apply a heavier coating of dedicated tire lube directly to the inner wheel hump, and use a high-flow compressor with the valve stem core removed to dump air into the tire faster.
Variations Based on Equipment
- UTV versus Full-Size Truck Wheels: UTV beadlock rings typically use smaller 1/4-inch or 5/16-inch hardware requiring lower torque specifications around 12 to 15 ft-lbs, whereas full-size truck and Jeep setups use 5/16-inch or 3/8-inch hardware requiring 18 to 25 ft-lbs. Always consult your specific manufacturer manual.
- Steel versus Aluminum Beadlock Rims: Steel beadlock rings tolerate higher clamping forces and are less prone to thread stripping, but require a liberal coating of anti-seize to prevent rust-locking. Aluminum wheels demand precise torque adherence to prevent thread galling in the soft alloy hubs.
Frequently Asked Questions
Can I use an impact gun to remove beadlock bolts?
Yes, using an electric or pneumatic impact wrench for removal is standard practice to save time across 100+ bolts. However, never use an impact gun for installation or final torquing, as uneven torque delivery will warp the aluminum ring permanently.
How often should I check my beadlock bolt torque?
You should check your beadlock bolt torque after the first 50 miles of driving, and then every time you service your vehicle or before every major off-road trip. Hardware naturally experiences stretch and thermal expansion cycles during use.
Do I need to balance beadlock tires differently?
Yes, because beadlock wheels and rings add substantial weight to the outer edge of the assembly, dynamic spin balancing often requires significantly more stick-on lead weights. Many off-road enthusiasts also use internal balancing beads inside the tire to compensate.
What grade of bolts should be used on beadlock rims?
You must always use high-strength Grade 8 steel bolts or manufacturer-certified factory replacements. Standard hardware store Grade 2 or Grade 5 bolts lack the tensile strength required to maintain proper clamping pressure against off-road shock loads.
Can any tire be mounted on a beadlock rim?
No, the tire must feature a sufficiently thick outer bead profile designed to be gripped mechanically by an external ring. Low-profile passenger tires or tires with exceptionally thin beads cannot be safely clamped by functional beadlock wheels.


