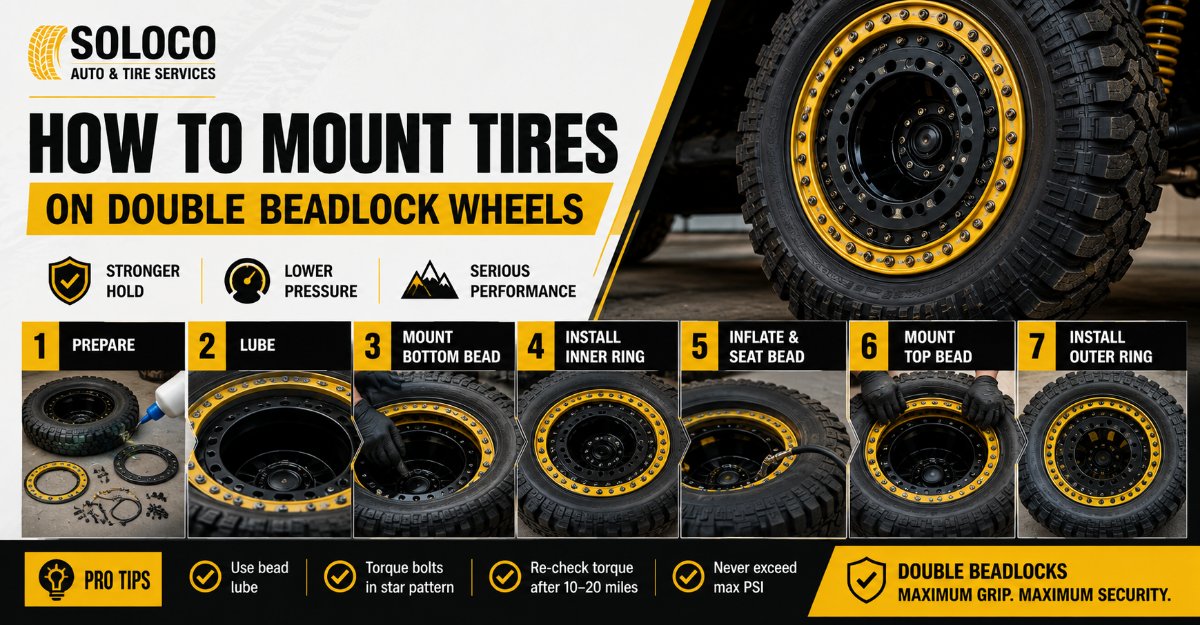
Mounting tires on double beadlock wheels requires clamping both the inner and outer tire beads to the wheel using an internal sleeve or liner, preventing the tire from slipping at ultra-low air pressures. Accomplishing this successfully takes 8 precise assembly steps, approximately 45 to 60 minutes per wheel, intermediate mechanical skill, and strict adherence to sequential star-pattern torque sequences to ensure a permanently airtight, failure-free off-road configuration.
Before You Start: Requirements Checklist
- Time Required: 45 to 60 minutes per wheel.
- Difficulty Level: Intermediate to Advanced.
- Typical Cost: $30 to $60 per wheel in consumables (hardware refresh, anti-seize, O-rings, and tire paste).
- Prerequisite Skills: Basic hand tool proficiency, accurate use of a calibrated torque wrench, and wheel-tire safety awareness.
- Tools and Materials Checklist:
- Double Beadlock Wheel Assemblies (wheel halves, inner inserts, outer clamp rings).
- Fresh rubber O-rings (1 per wheel).
- High-quality valve stems.
- Grade 8 or higher steel bolts and matching washers (16 to 36 fasteners per wheel depending on brand).
- High-grade anti-seize lubricant (nickel or copper formulation).
- Tire lubricant paste or concentrated soap-and-water solution in a spray bottle.
- Calibrated torque wrench (measuring 10 to 45 ft-lbs range).
- Pneumatic air compressor with a clip-on chuck and inline regulator.
- Safety glasses and heavy-duty work gloves.
- Wire wheel, scotch-brite pads, and brake cleaner solvent.
Step-by-Step Installation Process
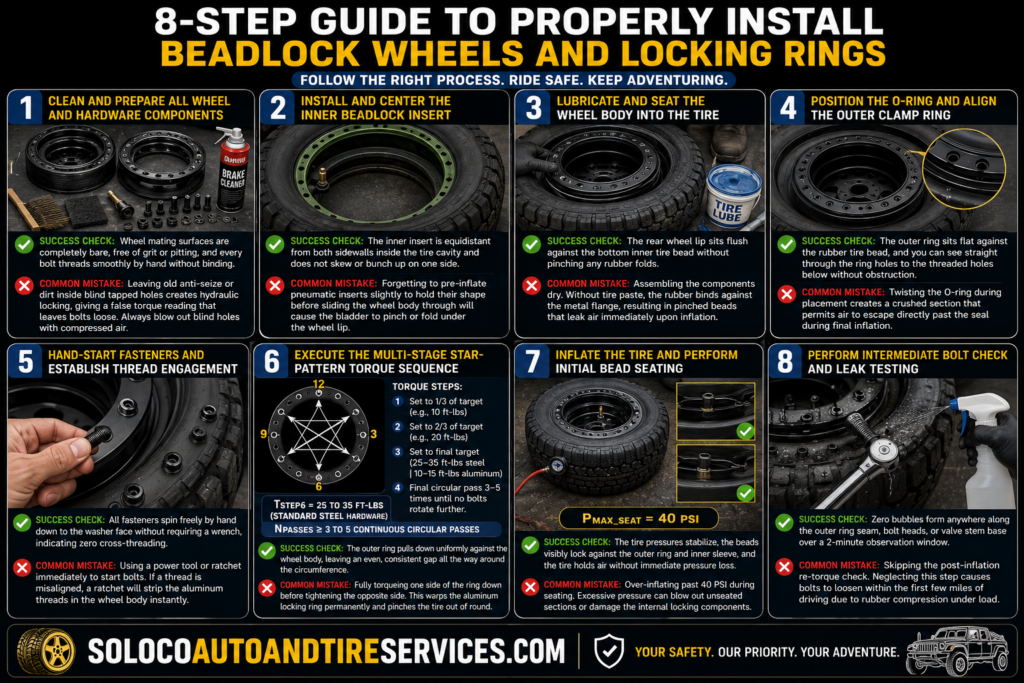
Step 1: Clean and Prepare All Wheel and Hardware Components
Clean the wheel halves, inner insert, valve stems, and thread holes thoroughly before assembly.
Use a wire brush, scotch-brite pads, and brake cleaner to scrub away all old rubber residue, brake dust, and oxidation from the inner and outer wheel sealing flanges. Install the high-quality valve stems into the wheel body and torque them to manufacturer specifications. Next, run a thread chaser or wire brush through every tapped hole in the wheel body to clear out old anti-seize or debris, then apply a thin, uniform coat of anti-seize lubricant to the entire threaded shaft of every beadlock bolt.
- Success Check: You will know this step worked when the wheel mating surfaces are completely bare, free of grit or pitting, and every bolt threads smoothly by hand into the wheel body without binding.
- Common Mistake: Leaving old anti-seize or dirt inside blind tapped holes creates hydraulic locking, giving a false torque reading that leaves bolts loose. Always blow out blind holes with compressed air.
Step 2: Install and Center the Inner Beadlock Insert
Squeeze and manipulate the inner beadlock insert inside the tire carcass until it rests squarely in the center.
Reach inside the unmounted tire and compress the rubber, aluminum, or inflatable pneumatic insert, working it past the tire beads until it centers perfectly between both inner tire beads. If you are using an inflatable pneumatic liner (such as a dual-valve or internal bladder system), ensure the inner tube or bladder valve stem aligns precisely with the dedicated secondary valve stem hole in the wheel body before proceeding.
- Success Check: You will know this step worked when the inner insert is equidistant from both sidewalls inside the tire cavity and does not skew or bunch up on one side.
- Common Mistake: Forgetting to pre-inflate pneumatic inserts slightly to hold their shape before sliding the wheel body through will cause the bladder to pinch or fold under the wheel lip.
Step 3: Lubricate and Seat the Wheel Body into the Tire
Apply a generous layer of tire lubricant to both tire beads and press the wheel body through the assembly.
Lay the tire flat on a clean, stable work surface. Coat both the front and rear tire beads thoroughly with tire lubricant paste or a soapy water mixture. Position the main wheel body over the top opening, push it straight down through the top tire bead and through the center of the inner beadlock insert, and guide it downward until the rear wheel flange bottoms out evenly against the bottom tire bead.
- Success Check: You will know this step worked when the rear wheel lip sits flush against the bottom inner tire bead without pinching any rubber folds.
- Common Mistake: Assembling the components dry. Without tire paste, the rubber binds against the metal flange, resulting in pinched beads that leak air immediately upon inflation.
Step 4: Position the O-Ring and Align the Outer Clamp Ring
Place the fresh rubber O-ring into its designated groove and drop the outer clamp ring onto the tire bead.
Flip the wheel assembly over if your specific wheel design requires back-side loading (follow your manufacturer manual). Inspect the main O-ring groove on the wheel body, wipe it clean, and seat a fresh rubber O-ring into the channel without twisting it. Apply a light smear of silicone grease or tire lube to the O-ring. Drop the outer beadlock clamp ring directly onto the upper tire bead, aligning all bolt holes on the ring with the threaded holes in the wheel body.
- Success Check: You will know this step worked when the outer ring sits flat against the rubber tire bead, and you can see straight through the ring holes to the threaded holes below without obstruction.
- Common Mistake: Twisting the O-ring during placement creates a crushed section that permits air to escape directly past the seal during final inflation.
Step 5: Hand-Start Fasteners and Establish Thread Engagement
Start four opposing bolts by hand and thread all remaining fasteners to ensure proper engagement.
Screw four beadlock bolts into place by hand at the 12, 6, 9, and 3 o’clock positions to securely center and hold the outer ring. Once the ring is stable, thread all remaining bolts into the wheel body entirely by hand. Verify that you achieve at least 3 to 4 full thread turns by hand on every single bolt before introducing any mechanical tools.
- Success Check: You will know this step worked when all fasteners spin freely by hand down to the washer face without requiring a wrench, indicating zero cross-threading.
- Common Mistake: Using a power tool or ratchet immediately to start bolts. If a thread is misaligned, a ratchet will strip the aluminum threads in the wheel body instantly.
Step 6: Execute the Multi-Stage Star-Pattern Torque Sequence
Tighten all bolts progressively using a calibrated torque wrench in a strict crisscross star pattern.
Set your calibrated torque wrench to one-third of the target specification (for instance, 10 ft-lbs if your target is 30 ft-lbs). Tighten all bolts using a crisscross star pattern across the face of the wheel. Increase the torque setting to two-thirds specification (20 ft-lbs) and repeat the star pattern. Next, increase the wrench to your final target torque specification (typically 25 to 35 ft-lbs for steel hardware, or 10 to 15 ft-lbs for aluminum hardware). Finally, go around the outer ring in a continuous circular pass at final target torque 3 to 5 times until no fasteners rotate further.
$$T_{\text{step6}} = 25 \text{ to } 35 \text{ ft-lbs (Standard Steel Hardware)}$$
$$N_{\text{passes}} \ge 3 \text{ to } 5 \text{ continuous circular passes}$$
- Success Check: You will know this step worked when the outer ring pulls down uniformly against the wheel body, leaving an even, consistent gap all the way around the circumference between the ring and the wheel flange.
- Common Mistake: Fully torqueing one side of the ring down before tightening the opposite side. This warps the aluminum locking ring permanently and pinches the tire out of round.
Step 7: Inflate the Tire and Perform Initial Bead Seating
Inflate the tire assembly to seat the beads against the internal locks safely.
Connect your air compressor hose equipped with a clip-on air chuck to the primary valve stem. Inflate the tire slowly while monitoring the pressure gauge. Listen for distinct popping sounds as the inner and outer tire beads snap outward into their locking channels against the beadlock inserts. Do not exceed 40 PSI during this initial seating phase.
$$P_{\text{max\_seat}} = 40 \text{ PSI}$$
- Success Check: You will know this step worked when the tire pressures stabilize, the beads visibly lock against the outer ring and inner sleeve, and the tire holds air without immediate pressure loss.
- Common Mistake: Over-inflating past 40 PSI during seating. Excessive pressure can blow out unseated sections or damage the internal locking components.
Step 8: Perform Intermediate Bolt Check and Leak Testing
Re-check bolt torque after initial inflation, then spray the entire assembly with soapy water to check for leaks.
Because the rubber tire bead compresses significantly when the tire is inflated, the tension on the beadlock bolts will relax immediately after inflation. Take your torque wrench set to final specification and run one more continuous circular pass around all bolts; you will notice several bolts turn slightly. Next, mix dish soap and water in a spray bottle and coat the outer ring gap, bolt heads, and valve stems heavily.
- Success Check: You will know this step worked when zero bubbles form anywhere along the outer ring seam, bolt heads, or valve stem base over a 2-minute observation window.
- Common Mistake: Skipping the post-inflation re-torque check. Neglecting this step causes bolts to loosen within the first few miles of driving due to rubber compression under load.
Common Mistakes and How to Fix Them
- Using Impact Guns for Final Torque: Impact wrenches apply erratic, high-speed hammering forces that warp aluminum rings, strip soft threads, and snap bolts. Always finish with a manual torque wrench.
- Skipping Anti-Seize on Steel-to-Aluminum Assemblies: Raw steel bolts threaded into aluminum wheel halves will gall and weld themselves permanently due to galvanic corrosion. Always use high-grade anti-seize.
- Dry Assembly Without Lubricant: Assembling components without tire paste pinches the rubber bead, preventing an airtight seal. Use liberal amounts of tire lubricant on all mating surfaces.
- Uneven Crisscross Execution: Tightening one quadrant completely down before the rest bends the locking ring, rendering it structurally compromised and prone to catastrophic air leaks.
Variations Based on Wheel and Insert Types
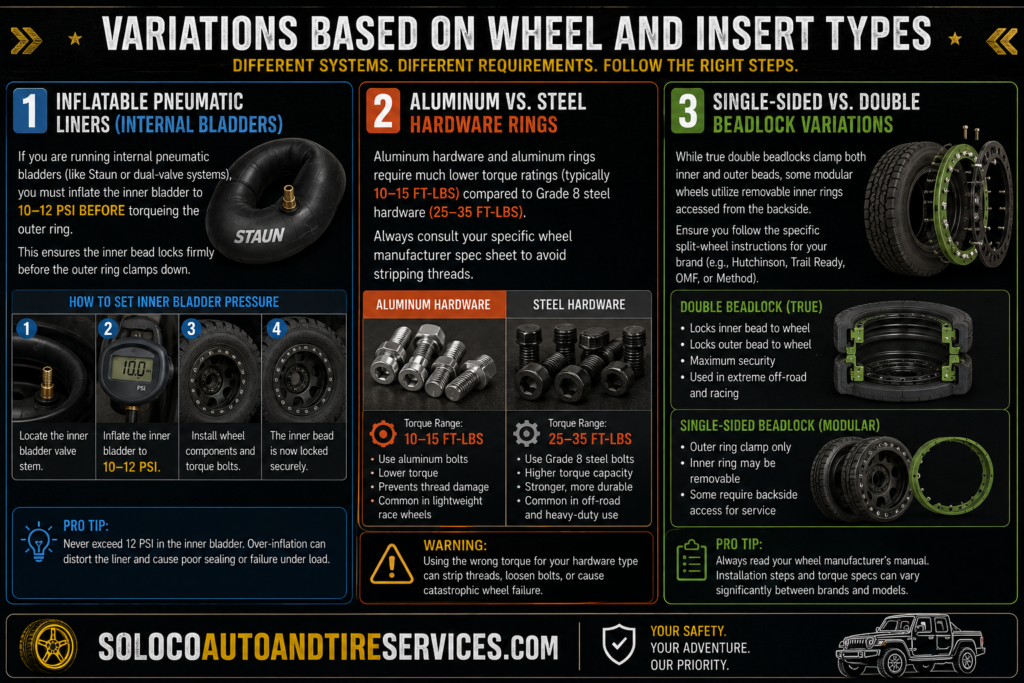
- Inflatable Pneumatic Liners (Internal Bladders): If you are running internal pneumatic bladders (like Staun or dual-valve systems), you must inflate the inner bladder to 10 to 12 PSI before torqueing the outer ring. This ensures the inner bead locks firmly before the outer ring clamps down.
- Aluminum vs. Steel Hardware Rings: Aluminum hardware and aluminum rings require much lower torque ratings (typically 10 to 15 ft-lbs) compared to Grade 8 steel hardware (25 to 35 ft-lbs). Always consult your specific wheel manufacturer spec sheet to avoid stripping threads.
- Single-Sided vs. Double Beadlock Variations: While true double beadlocks clamp both inner and outer beads, some modular wheels utilize removable inner rings accessed from the backside. Ensure you follow the specific split-wheel instructions for your brand (e.g., Hutchinson, Trail Ready, OMF, or Method).
How Long Does It Take and What Does It Cost?
- Time Investment: Expect to spend 45 to 60 minutes per wheel for a meticulous first-time installation. Rushing the cleaning or torque sequence leads to air leaks that require a complete teardown.
- Financial Investment: While the wheels themselves represent a major upfront cost, consumable maintenance expenses (fresh O-rings, replacement Grade 8 bolts, anti-seize, and tire paste) typically run between $30 and $60 per wheel during a tire swap.
Frequently Asked Questions
How often should I check the torque on double beadlock bolts?
You should check the torque on all beadlock bolts after the first 50 miles of driving, as the rubber bead settles and relaxes under load. Following that initial break-in period, inspect and verify bolt torque with a manual torque wrench before every major off-road trip or every 3,000 miles.
Can I use regular threadlocker like Loctite instead of anti-seize?
No. Threadlockers like Loctite cure anaerobically and can react adversely with aluminum wheel halves or trap moisture, causing severe galvanic corrosion. Anti-seize lubricant is mandatory to ensure accurate torque transmission and prevent bolts from seizing permanently.
What causes air to leak continuously from the bolt heads?
Air leaking from bolt heads is almost always caused by a pinched, twisted, or unlubricated main O-ring behind the outer ring, or a damaged sealing washer under a bolt head. To fix this, deflate the tire completely, back out the bolts, inspect the O-ring channel, replace damaged seals, and re-torque.
Why is my outer ring bottoming out against the wheel body?
The outer clamp ring bottoming out against the wheel body before clamping the tire bead means the tire bead is too thin for the specific spacer or wheel configuration. You must install a specialized beadlock spacer shim ring to fill the gap and properly clamp the rubber.
Is it safe to drive on the highway with double beadlock wheels?
Many double beadlock wheels are designed for off-road use only and may not carry a Department of Transportation (DOT) street-legal rating. Always verify whether your specific wheel model is DOT-approved before driving on public highways, and check local state regulations regarding multi-piece wheels.


