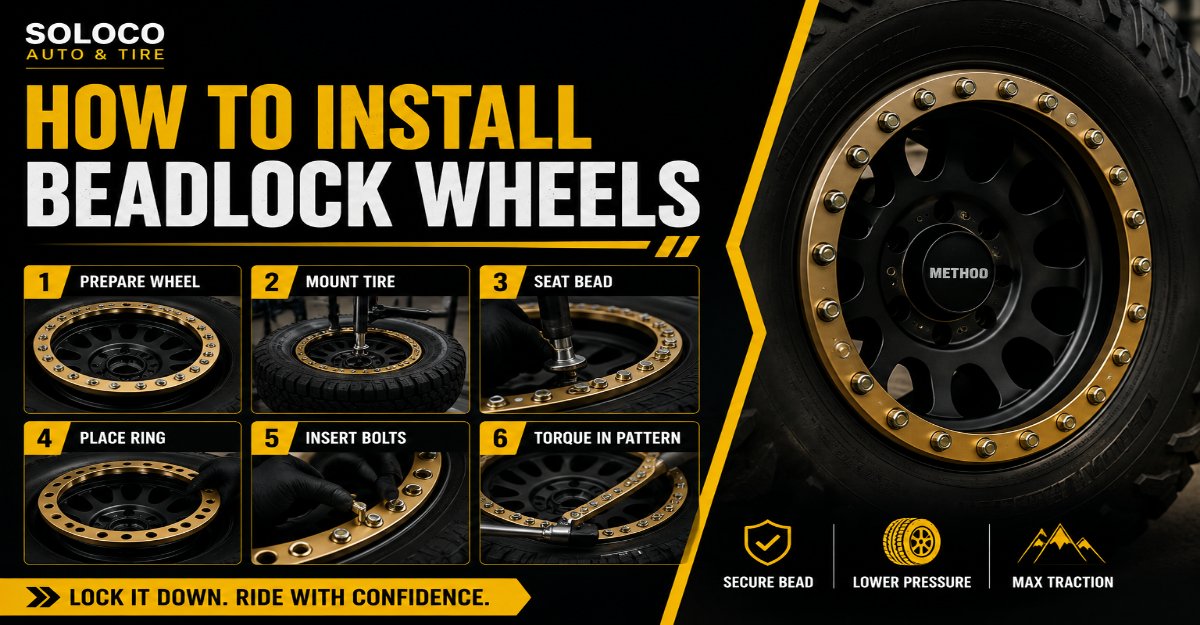
Installing beadlock wheels is a precise mechanical procedure that secures the outer tire bead between the wheel and a heavy-duty aluminum ring using dozens of high-strength fasteners. You will complete this task across six systematic phases in approximately 4 to 6 hours using hand tools, a clicker torque wrench, and an air compressor. Success depends entirely on uniform torque sequencing, meticulous thread preparation, and strict adherence to manufacturer specifications.
Before You Start
- Time Required: 4 to 6 hours total (1 to 1.5 hours per wheel)
- Difficulty Level: Advanced DIY / Intermediate Mechanical
- Estimated Cost: $1,200 to $3,500+ (depending on wheel and tire package)
- Tools and Materials Checklist:
- 4 or 5 beadlock wheels and outer rings
- 24 to 36 grade-8 bolts and washers per wheel (up to 180 total)
- High-quality clicker torque wrench rated for 10 to 25 ft-lbs
- Calibrated digital tire pressure gauge (0 to 50 PSI range)
- 1 tube of marine-grade or copper anti-seize lubricant
- 1 spray bottle of soapy water solution (water mixed with 3 drops of dish soap)
- 4 or 5 new rubber valve stems with removable cores
- 1 pair of safety glasses and 1 pair of mechanics gloves
- 1 rubber or plastic dead-blow mallet
- 1 air compressor with a high-flow tire inflator chuck
- 1 digital caliper or feeler gauge set
- Prerequisite Conditions: Clean, dry workspace on level concrete with adequate lighting.
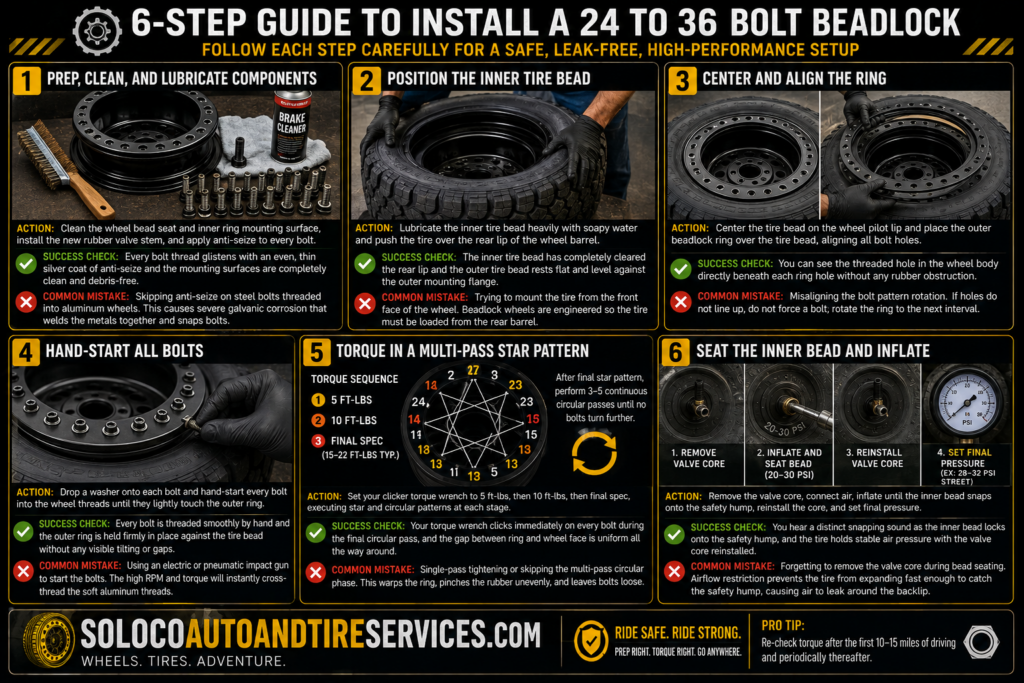
Step 1: Prep, Clean, and Lubricate Components
Clean every mounting surface thoroughly and prepare your fasteners to prevent galvanic corrosion and ensure accurate torque readings.
- Action: Clean the wheel bead seat and inner ring mounting surface thoroughly with a wire brush and brake cleaner, install the new rubber valve stem, and apply anti-seize to every bolt.
- Execution Details: Spray brake cleaner onto a lint-free shop towel and wipe down the flat aluminum mating surface of the wheel where the outer tire bead and ring will rest. Run a clean wire brush through every threaded bolt hole in the wheel body to remove any residual factory powder coat or aluminum shavings. Insert the rubber valve stem through the valve hole from the inside of the wheel barrel, pulling it firmly from the outside with valve stem installation pliers until it seats fully. Apply a thin, uniform layer of copper or marine-grade anti-seize lubricant across the entire threaded length of all 24 to 36 beadlock bolts. Wear mechanics gloves to keep anti-seize off the tire rubber and your hands.
- Success Check: You will know this step worked when every bolt thread glistens with an even, thin silver coat of anti-seize without giant globs, and the wheel mounting surfaces are completely free of dirt, oil, and debris.
- Common Mistake: Skipping anti-seize on steel bolts threaded into aluminum wheels. This causes severe galvanic corrosion that welds the dissimilar metals together, resulting in snapped bolt heads during your next tire rotation.
Step 2: Position the Inner Tire Bead
Drop the tire over the backside of the wheel body so the inner bead rests securely in the drop-center well.
- Action: Lubricate the inner tire bead heavily with soapy water and push the tire over the rear lip of the wheel barrel.
- Execution Details: Lay the beadlock wheel flat on the floor with the front face pointing upward. Spray a generous amount of soapy water solution around the entire circumference of the tire’s inner bead. Stand over the tire, tilt it at a 45-degree angle, and push the bottom edge over the rear lip of the wheel barrel. Use your hands or a rubber dead-blow mallet to walk the rest of the inner bead down until it drops entirely past the rear safety hump and sits loosely in the center well of the wheel. Ensure the outer tire bead is resting squarely on the flat aluminum beadlock surface of the wheel front face.
- Success Check: You will know this step worked when the inner tire bead has completely cleared the rear lip and the outer tire bead rests flat and level against the outer mounting flange of the wheel.
- Common Mistake: Trying to mount the tire from the front face of the wheel. Beadlock wheels are engineered so that the tire must be loaded exclusively from the rear barrel.
Step 3: Center and Align the Ring
Center the tire bead on the wheel pilot lip and position the outer beadlock ring over the assembly.
- Action: Center the tire bead perfectly around the wheel’s raised inner pilot lip and place the outer beadlock ring over the tire bead, aligning all bolt holes.
- Execution Details: With the wheel and tire flat on the ground, manipulate the tire carcass until the inner bead centers itself uniformly around the raised inner pilot lip of the wheel. Take your aluminum outer beadlock ring and place it directly on top of the outer tire bead. Rotate the ring clockwise or counterclockwise until the bolt holes in the ring line up precisely with the threaded holes in the wheel body. Drop a hardened steel washer onto each bolt before inserting them to prepare for hand-threading.
- Success Check: You will know this step worked when you can peer down through any bolt hole in the outer ring and see the threaded hole in the wheel body centered perfectly beneath it without any rubber obstruction.
- Common Mistake: Misaligning the bolt pattern rotation. If holes do not line up, do not force a bolt; rotate the ring to the next bolt hole interval matching the manufacturer’s drilling pattern.
Step 4: Hand-Start All Bolts
Thread every single fastener by hand to guarantee proper engagement and eliminate cross-threading risks.
- Action: Drop a washer onto each bolt and hand-start every bolt into the wheel threads until they lightly touch the outer ring.
- Execution Details: Insert a washer onto each beadlock bolt. Working in a star or crisscross pattern across the wheel, thread each bolt into the wheel by hand for at least 4 to 5 full revolutions. Never use power tools, impact drivers, or ratchets to start these bolts. As you progress around the ring, ensure the outer ring makes uniform contact with the tire bead. Continue hand-threading until every single bolt is seated and snug against the outer ring face, meaning you cannot turn them any further with your bare fingers.
- Success Check: You will know this step worked when every bolt is threaded smoothly by hand and the outer ring is held firmly in place against the tire bead without any visible tilting or gaps.
- Common Mistake: Using an electric or pneumatic impact gun to start the bolts. The high RPM and torque of power tools will instantly cross-thread the soft aluminum threads, ruining the wheel body.
Step 5: Torque in a Multi-Pass Star Pattern
Apply torque incrementally in a strict crisscross pattern followed by final circular passes to clamp the ring evenly.
- Action: Set your clicker torque wrench to 5 ft-lbs, then 10 ft-lbs, then final spec, executing star and circular patterns at each stage.
- Execution Details: Set your clicker torque wrench to 5 ft-lbs. Tighten the bolts using a strict star or crisscross pattern (similar to lug nuts). Increase the torque wrench setting to 10 ft-lbs and repeat the entire star pattern. Increase the wrench to the wheel manufacturer’s final specification, which is typically between 15 to 22 ft-lbs, and repeat the star pattern one final time. Once the final torque spec is reached, switch to a continuous circular pattern around the ring. Keep repeating this circular pattern until no bolts turn further at the set click value. This usually requires 3 to 5 full circular passes. Use a digital caliper or feeler gauge to verify that the gap between the outer ring and the wheel face is uniform all the way around the circumference.
- Success Check: You will know this step worked when your torque wrench clicks immediately on every single bolt during the final circular pass, and a feeler gauge measures an identical gap width between the ring and wheel face at all points.
- Common Mistake: Single-pass tightening or skipping the multi-pass circular phase. Tightening bolts down fully one by one pinches the rubber unevenly, warps the aluminum ring, and leaves adjacent bolts loose, leading to immediate air leakage.
Step 6: Seat the Inner Bead and Inflate
Remove the valve core for high airflow, snap the inner bead into place, and inflate the tire to operating pressure.
- Action: Remove the valve core, connect your air compressor chuck, inflate until the inner bead snaps onto the safety hump at 20 to 30 PSI, reinstall the core, and set final pressure.
- Execution Details: Use a standard valve core removal tool to back the core out of the rubber valve stem, maximizing airflow into the tire. Connect your high-flow air compressor chuck directly to the open stem. Trigger the air flow; the high volume will force the inner tire bead outward to snap loudly onto the wheel’s safety bead hump. This typically occurs between 20 to 30 PSI. Never exceed 40 PSI while attempting to seat beads. Immediately disconnect the air source, quickly screw the valve core back into the stem, and inflate the tire to your desired street or trail operating pressure, such as 28 to 32 PSI for street use or 12 to 15 PSI for off-road use.
- Success Check: You will know this step worked when you hear a distinct snapping sound as the inner bead locks onto the safety hump, and the tire holds stable air pressure with the valve core reinstalled.
- Common Mistake: Forgetting to remove the valve core during bead seating. Standard airflow restriction through a core often prevents the tire from expanding fast enough to catch the safety hump, resulting in air escaping around the backlip.
Common Mistakes and How to Fix Them
- Air Leak Around the Outer Ring: Caused by uneven bolt torque or a pinched tire bead during the clamping process. Deflate the tire fully, loosen all bolts completely, re-center the tire bead within the pilot lip, and re-torque the bolts using the multi-pass circular method outlined in Step 5.
- Bolt Snaps During Torque Sequence: Caused by over-tightening past specification or lack of thread lubrication. Remove the outer ring. Use a left-handed drill bit and a screw extractor to back the broken stud out of the aluminum wheel body. Clean the threads and replace the damaged fastener with an identical grade-8 bolt.
- Ring Bends or Cones Inward: Caused by applying excessive torque or using incorrect spacer configurations on thick-beaded tires. Replace the bent aluminum ring. If your tire brand features an extra-thick bead, install specific beadlock spacer rings designed to bridge the gap and prevent coning.
- Inner Bead Fails to Seat: Caused by insufficient lubrication or low air volume from a standard compressor hose. Deflate the tire completely, re-lubricate the inner bead heavily with soapy water, remove the valve core for maximum airflow, and try inflating again. If necessary, wrap a ratchet strap around the tire tread centerline and ratchet it tight to force the sidewalls outward.
Variations and Adaptations
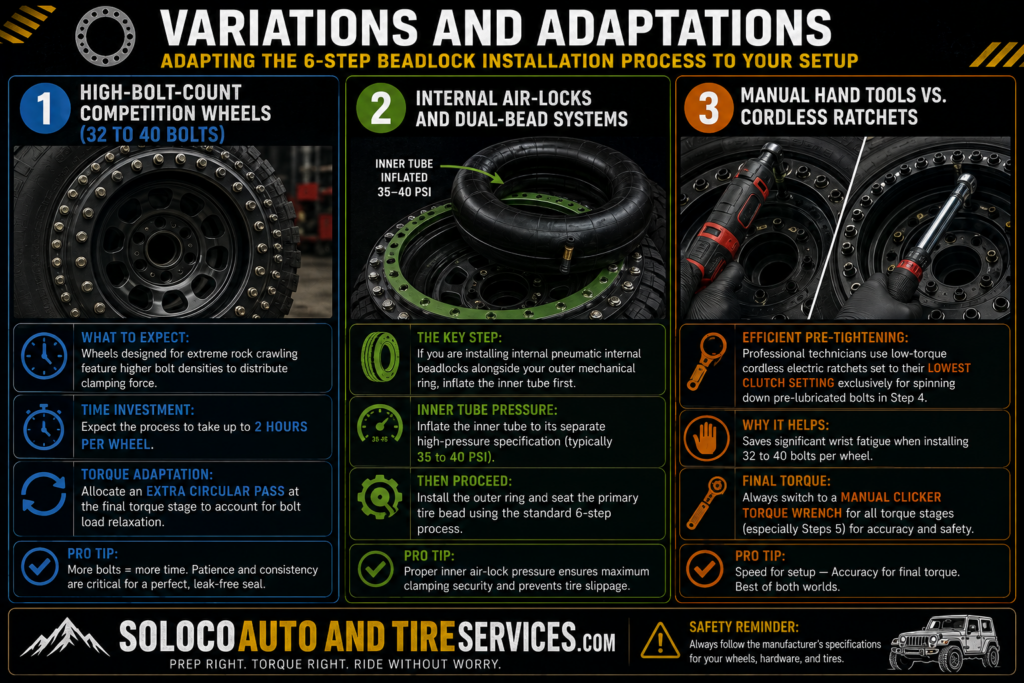
- High-Bolt-Count Competition Wheels (32 to 40 Bolts): Wheels designed for extreme rock crawling feature higher bolt densities to distribute clamping force. When servicing these wheels, expect the process to take up to 2 hours per wheel, and allocate an extra circular pass at the final torque stage to account for bolt load relaxation.
- Internal Air-Locks and Dual-Bead Systems: If you are installing internal pneumatic internal beadlocks alongside your outer mechanical ring, inflate the inner tube to its separate high-pressure specification (typically 35 to 40 PSI) before installing the outer ring and seating the primary tire bead.
- Manual Hand Tools vs. Cordless Ratchets: While pneumatic or impact tools are strictly prohibited for final torque and starting, professional technicians frequently use low-torque cordless electric ratchets set to their lowest clutch setting exclusively for spinning down pre-lubricated bolts in Step 4, saving significant wrist fatigue before switching to a manual clicker torque wrench for Steps 5.
Frequently Asked Questions
How often should I check the torque on beadlock wheel bolts?
You must verify and re-torque beadlock bolts after your first 50 miles of driving, as the rubber tire bead compresses and settles under vehicle weight. Afterward, check torque every 3,000 miles or before every major off-road trip as part of standard vehicle maintenance.
Can beadlock wheels be driven legally on public streets?
Street legality depends entirely on your local state vehicle regulations and the certification of the wheel. Wheels stamped with Department of Transportation approval are street legal, whereas competition-only or off-road-only beadlocks lack DOT certification and violate highway safety laws in many jurisdictions.
Do I need to balance beadlock wheels after installation?
Yes, beadlock wheels and heavy off-road tires require dynamic balancing. Because the outer ring adds significant weight to the outer face of the wheel, balancing beads or traditional lead clip-on and stick-on wheel weights are necessary to eliminate high-speed steering wheel vibrations.
What grade of bolts should be used for beadlock wheels?
You must always use high-strength Grade 8 steel bolts or metric equivalents (Grade 10.9 or 12.9) with appropriate corrosion-resistant plating. Never substitute standard hardware-store Grade 2 or Grade 5 bolts, as they lack the tensile strength required to safely clamp tire beads under load.


