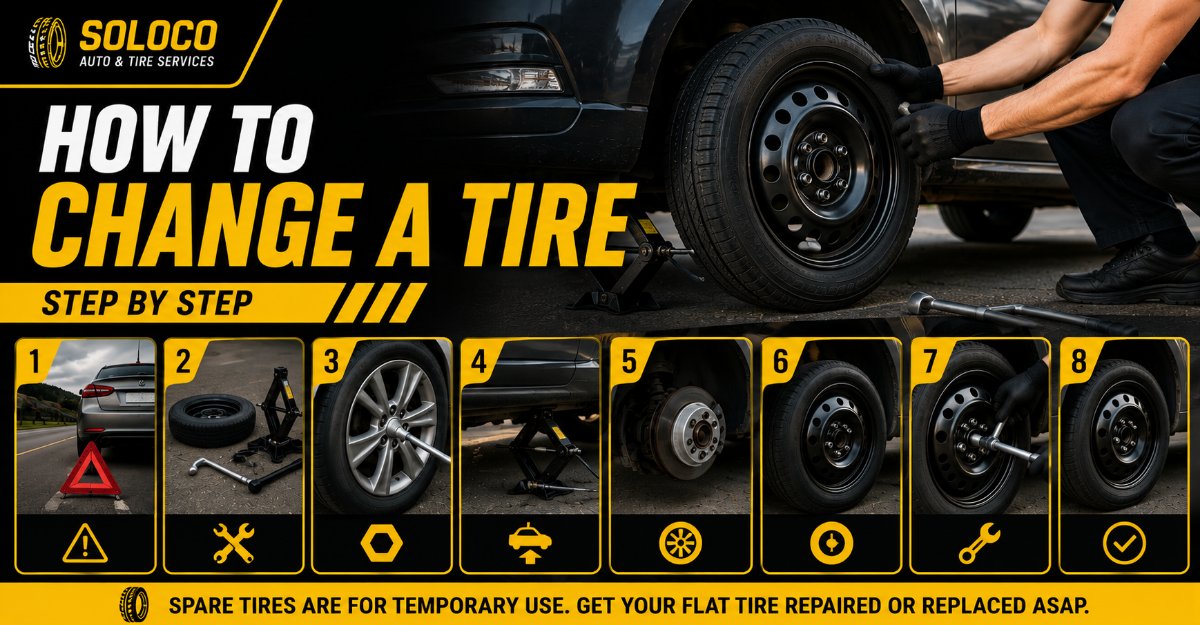
Changing a flat tire safely requires a methodical, safety-first approach that combines correct tool handling with precise vehicle stabilization. By following this complete seven-step process, you can replace a punctured wheel in 15 to 20 minutes, even as a first-timer, by letting vehicle physics and correct leverage do the hard work for you.
Before You Start
- Time Required: 15 to 20 minutes
- Difficulty Level: Beginner-friendly (physical strength matters less than correct technique)
- Typical Cost: $0 (using factory-included roadside tools) to $150 if purchasing a replacement spare or professional jack equipment
- Tools and Materials Checklist:
- Spare tire (1, fully inflated to your vehicle’s factory specification)
- Car jack (1, factory scissor jack or hydraulic bottle/floor jack)
- Lug wrench (1, sized precisely to your vehicle’s lug nut dimensions, typically 17mm, 19mm, 21mm, or 3/4-inch)
- Wheel chocks (2, heavy rubber chocks, or heavy rocks, bricks, or blocks of wood)
- Tire pressure gauge (1, digital or dial gauge)
- Flashlight or headlamp (1, essential for night changes or low-light conditions)
- Vehicle owner’s manual (1, for exact jack point locations and torque specifications)
- Work gloves and a small mat or piece of cardboard to kneel on
- Prerequisite Conditions: Park on firm, level asphalt or concrete, completely away from active traffic lanes, with your hazard lights flashing continuously.
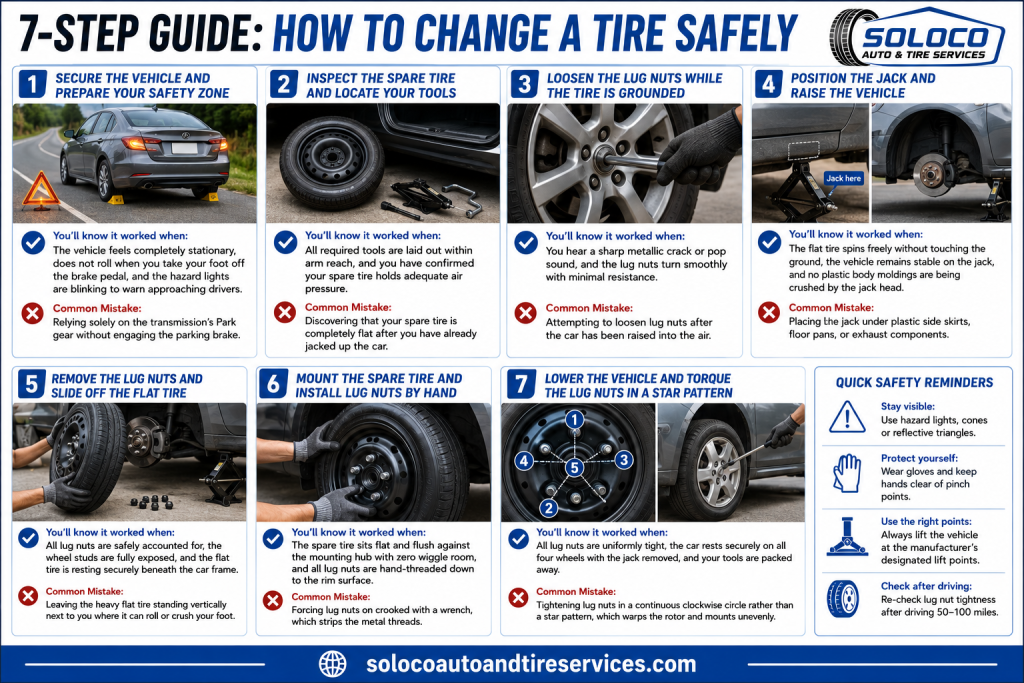
Step 1: Secure the Vehicle and Prepare Your Safety Zone
Turn on your hazard lights immediately, pull onto a wide shoulder or flat parking lot away from traffic, engage your parking brake completely, and place wheel chocks firmly behind the tires diagonally opposite the flat tire.
When you experience a flat tire on a highway, do not slam on your brakes or pull onto soft, muddy dirt shoulders if you can avoid it. Drive slowly to a well-lit, level paved area. Once stationary, shift your automatic transmission into Park (or reverse gear if driving a manual), and pull your parking brake lever up or press the electronic parking brake switch until fully engaged. Take your wheel chocks and wedge them tightly against the tread of the tire positioned on the opposite corner of the vehicle. For example, if your front passenger tire is flat, place chocks directly against the rear driver-side tire. Turn on your interior dome light and position your flashlight if it is dark outside.
- You’ll know it worked when: The vehicle feels completely stationary, does not roll when you take your foot off the brake pedal, and the hazard lights are blinking to warn approaching drivers.
- Common Mistake: Relying solely on the transmission’s Park gear without engaging the parking brake. This allows the driveshaft to play, letting the car shift a few inches and potentially slip off a scissor jack.
Step 2: Inspect the Spare Tire and Locate Your Tools
Retrieve your spare tire, jack, and lug wrench from the trunk storage compartment, and verify that your spare tire is properly inflated before lifting the car.
Open your trunk, lift the floor carpet or liner, and unscrew the center plastic wingnut holding your spare tire and tool kit in place. Pull the spare tire out and inspect its tread and sidewalls for cracks or damage. Use your tire pressure gauge to check the pressure against the vehicle manufacturer specification printed on the driver-side door placard (typically 60 PSI for compact space-saver spares or standard PSI for full-size spares). Gather your factory scissor jack and lug wrench. If your car utilizes locking wheel nuts requiring a special cylindrical key adapter, locate that key inside your glove box or center console now before you begin loosening hardware.
- You’ll know it worked when: All required tools are laid out within arm reach on the ground, and you have confirmed your spare tire holds adequate air pressure to support driving.
- Common Mistake: Discovering that your spare tire is completely flat after you have already jacked up the car and removed the broken tire.
Step 3: Loosen the Lug Nuts While the Tire is Grounded
Remove any hubcap or wheel cover, fit your lug wrench securely onto a lug nut, and turn the wrench counterclockwise by about 1 quarter to 1 half turn to break the factory torque seal while the tire remains firmly on the ground.
Pry off plastic wheel covers or hubcaps using the flat edge of your lug wrench or a flathead screwdriver. Slide the socket end of your lug wrench fully onto one lug nut, ensuring it is pushed all the way flush against the nut so it does not slip and round off the corners. Turn the handle counterclockwise following the traditional rule of lefty-loosey. Because factory lug nuts are torqued tightly (typically between 80 and 100 foot-pounds of force), you will need significant leverage. If the nut refuses to budge, place your hands on the wrench handle and apply firm downward body weight, or carefully step down with one foot on the wrench arm while holding onto the car body for balance. Loosen every lug nut on the wheel by 1/4 to 1/2 turn. Do not unscrew them completely yet.
- You’ll know it worked when: You hear a sharp metallic crack or pop sound, and the lug nuts turn smoothly with minimal resistance.
- Common Mistake: Attempting to loosen lug nuts after the car has been raised into the air. The wheel will spin freely in place, making it impossible to apply the necessary torque.
Step 4: Position the Jack and Raise the Vehicle
Consult your vehicle owner’s manual to identify the designated steel frame reinforcement notch closest to your flat tire, place your jack underneath it, and crank the handle slowly until the flat tire clears the ground by roughly 6 inches or 15 centimeters.
Look underneath the side skirt of your car near the flat tire for two small notches or reinforced vertical metal flanges stamped into the unibody frame or chassis rail. Position the head of your car jack directly underneath this designated lift point. If you are using a mechanical scissor jack, insert the metal crank rod or hook into the eyelet of the jack screw. Rotate the handle clockwise to raise the jack until its saddle makes firm, flush contact with the vehicle frame notch. Continue cranking smoothly and steadily. Watch the car rise vertically without tilting. Raise the vehicle until the flat tire hangs completely suspended in the air with approximately 6 inches of clearance between the rubber tread and the pavement.
- You’ll know it worked when: The flat tire spins freely without touching the ground, the vehicle remains perfectly stable on the jack, and no plastic body moldings are being crushed by the jack head.
- Common Mistake: Placing the jack under plastic side skirts, floor pans, or exhaust components, which will crumple under the weight of the vehicle and cause the car to drop.
Step 5: Remove the Lug Nuts and Slide Off the Flat Tire
Unscrew all lug nuts completely by hand, place them in a secure location such as your pocket or tool tray, pull the flat tire straight off the wheel mounting bolts, and slide the flat tire underneath the center frame rail of the car as an emergency safety backup.
Take your lug wrench and remove each loosened lug nut one by one by hand, turning them counterclockwise until completely free. Drop them into your jacket pocket or tool tray so they cannot roll away into a storm drain or grass. Grasp the flat tire firmly with both hands at the 9 o’clock and 3 o’clock positions. Pull the tire straight toward you off the threaded wheel studs. Because heavy steel or alloy wheels can weigh 30 to 50 pounds, keep your back straight and lift using your legs. Once removed, lay the flat tire flat on the ground and slide it horizontally underneath the vehicle frame right next to your jack. This provides a physical safety buffer; if the jack unexpectedly fails, your car will land safely on the tire rather than crushing the brake rotor.
- You’ll know it worked when: All lug nuts are safely accounted for, the wheel studs are fully exposed, and the flat tire is resting securely beneath the car frame.
- Common Mistake: Leaving the heavy flat tire standing vertically next to you while working, where it can easily tip over, roll into traffic, or crush your foot.
Step 6: Mount the Spare Tire and Install Lug Nuts by Hand
Lift your spare tire, align its rim holes with the threaded wheel bolts on the wheelbase, push it firmly inward until flush, and thread every lug nut back onto the studs by hand clockwise until snug.
Pick up your spare tire, align the circular holes in the wheel rim with the protruding threaded studs on the vehicle hub. Lift the tire onto the hub bolts, pushing straight back until the wheel sits completely flush against the mounting plate. Take your set of lug nuts and thread them onto the bolts clockwise using your fingers. Spin them down as far as they will go by hand. Ensure the tapered, conical side of each lug nut faces inward toward the wheel countersink. Tighten them firmly by hand to center the wheel evenly on the hub. Do not use your wrench to tighten them yet, as tightening a suspended wheel with a wrench will cause the vehicle to rock and potentially slip off the jack.
- You’ll know it worked when: The spare tire sits flat and flush against the mounting hub with zero wiggle room, and all lug nuts are hand-threaded down to the rim surface.
- Common Mistake: Forcing lug nuts on crooked with a wrench, which strips the fine metal threads on the wheel studs and ruins the hardware.
Step 7: Lower the Vehicle and Torque the Lug Nuts in a Star Pattern
Carefully lower the car by turning your jack counterclockwise until the tire bears the full vehicle weight, use your lug wrench to tighten all lug nuts firmly in a star or crosswise pattern, and lower the vehicle completely to the ground.
Crank your jack handle counterclockwise to lower the vehicle slowly until the spare tire makes solid contact with the pavement and supports most of the car weight, though the jack should still be touching the frame. Take your lug wrench and tighten the lug nuts following a strict star pattern: tighten one nut, move across the center to tighten the opposite nut, and repeat until all nuts are secured. This ensures even clamping pressure across the wheel hub. Step on the wrench arm or pull down firmly to achieve maximum hand tightness. Once all nuts are torqued, lower the jack completely, slide it out from under the car, remove the wheel chocks, and give every lug nut one final check for absolute tightness. Store your flat tire and tools securely in the trunk.
- You’ll know it worked when: All lug nuts are uniformly tight, the car rests securely on all four wheels with the jack removed, and your tools are packed away.
- Common Mistake: Tightening lug nuts in a continuous clockwise circle rather than a star pattern, which warps the brake rotor and causes the wheel to mount unevenly.
Common Mistakes and How to Fix Them
Using the Wrong Jack Point and Crashing the Chassis
- Problem: Placing the scissor jack under plastic rocker panels or decorative trim damages the bodywork and destabilizes the lift.
- Recovery: Immediately stop cranking, lower the vehicle by turning the jack counterclockwise, relocate the jack to the reinforced steel weld notch specified in your owner’s manual, and restart the lift safely.
Overtightening or Stripping Rusted Lug Nuts
- Problem: Rusted or corroded factory lug nuts refuse to turn even with maximum arm strength, causing frustration and rounded fastener edges.
- Recovery: Spray a penetrating catalyst like PB Blaster or WD-40 onto the wheel stud threads, wait 5 minutes for it to penetrate, and place your lug wrench so the handle points to the left. Carefully step down with one foot on the wrench handle to use your body weight for leverage while holding the car body for balance.
Wheel Stuck Solid to the Hub Due to Rust Seizure
- Problem: Corrosion welds the center of the aluminum or steel wheel rim tightly to the iron wheel hub, preventing the flat tire from sliding off even after all lug nuts are removed.
- Recovery: Thread one single lug nut back onto a top stud loosely by a couple of turns so the wheel cannot fly off unexpectedly. Stand facing the tire and kick firmly with the heel of your boot against the upper rubber sidewall of the tire to break the rust bond. Once the wheel breaks loose, unscrew the final nut and slide the tire off.
Variations: How the Process Changes for Different Situations
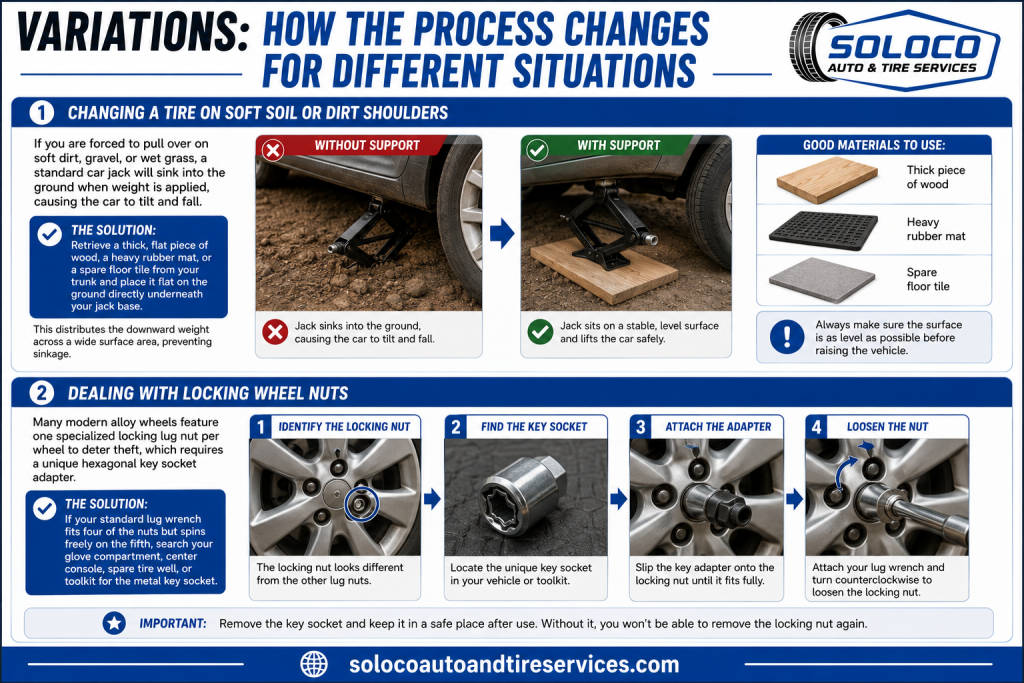
Changing a Tire on Soft Soil or Dirt Shoulders
If you are forced to pull over on soft dirt, gravel, or wet grass, a standard car jack will sink into the ground when weight is applied, causing the car to tilt and fall.
To fix this, retrieve a thick, flat piece of wood, a heavy rubber mat, or a spare floor tile from your trunk and place it flat on the ground directly underneath your jack base. This distributes the downward weight across a wide surface area, preventing sinkage.
Dealing with Locking Wheel Nuts
Many modern alloy wheels feature one specialized locking lug nut per wheel to deter theft, which requires a unique hexagonal key socket adapter.
If your standard lug wrench fits four of the nuts but spins freely on the fifth, search your glove compartment, center console, spare tire well, or toolkit for the metal key socket. Slip this adapter onto the locking nut before attaching your wrench.
Frequently Asked Questions
Can I drive on a compact space-saver spare tire at highway speeds?
Compact space-saver spares (often called donut tires) are designed strictly for temporary emergency use to get you to a repair shop. They have strict performance limitations and typically carry a maximum speed rating of 50 miles per hour (80 kilometers per hour) and a total lifespan distance of under 50 miles. Drive cautiously, avoid hard acceleration, and replace the tire with a standard rubber tire as soon as possible.
How tight should lug nuts be when tightening by hand?
Without a calibrated torque wrench, tighten the lug nuts as securely as possible using your upper body weight and standard hand force on the factory lug wrench. Because factory specifications require roughly 80 to 100 foot-pounds of torque, standard arm strength applied at the end of a factory wrench provides adequate initial clamping force to drive safely to a nearby service station for professional torque verification.
What should I do with the flat tire after changing it?
Place the damaged flat tire into your trunk or cargo area, taking care to protect your interior upholstery with a trash bag or mat if the tire is muddy. Drive directly to a local tire repair shop or service center. If the puncture is located in the main tread area and is smaller than a quarter-inch, technicians can usually patch or plug the tire for a nominal fee instead of forcing you to purchase an entirely new replacement tire.
Why is my tire pressure warning light still on after installing the spare?
Most factory spare tires do not contain a Tire Pressure Monitoring System (TPMS) radio sensor. Consequently, once you mount the spare and drive away, your vehicle dashboard will display a low pressure or TPMS warning light because it cannot detect a sensor signal from that wheel position. The warning light will automatically turn off once you repair and reinstall your original wheel equipped with its functional sensor.


