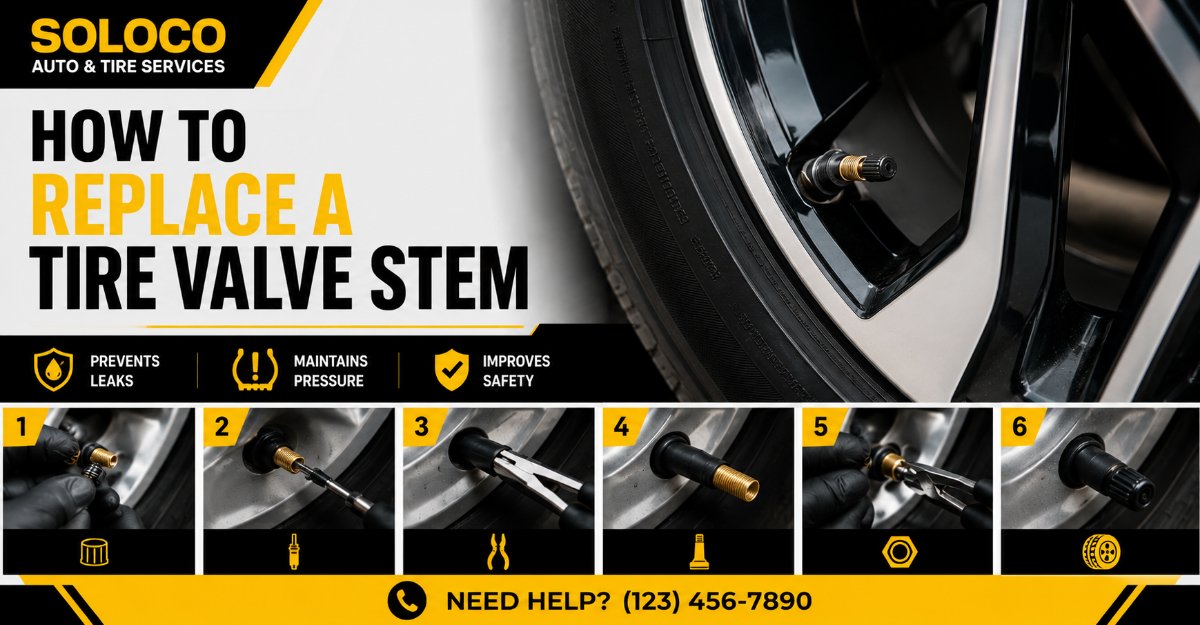
Replacing a leaking or cracked tire valve stem requires breaking the tire bead away from the wheel rim to access the interior base, removing the old hardware, and installing a fresh stem using precise lubrication and pulling techniques.
This comprehensive process takes 45 to 60 minutes per wheel, carries a moderate DIY difficulty rating, and succeeds entirely based on meticulous cleanliness and proper leverage control.
Before You Start
- Time Required: 45 to 60 minutes per tire
- Difficulty Level: Intermediate (requires physical exertion and proper safety gear)
- Typical Cost: $5 to $15 for tools/stems if you already own a jack and air compressor
- Tools and Materials Checklist:
- 1 New valve stem (Snap-in TR413/TR414 rubber or metal clamp-in)
- 1 Valve stem puller/installer tool
- 1 Valve core removal tool (Schrader valve tool)
- 1 Tire pressure gauge
- 1 Air compressor with a standard chuck
- 1 Hydraulic floor jack and 2 heavy-duty steel jack stands
- 1 Lug wrench or 1/2-inch drive impact wrench
- 1 Bead breaker tool, heavy pry bars, or a dedicated bead-breaking clamp
- Lubricant mix: 2 ounces liquid dish soap combined with 8 ounces water in a spray bottle
- 1 Clean shop rag and 1 stiff wire brush
- Prerequisite Conditions: Flat, level concrete surface; vehicle parked with the parking brake fully engaged; awareness of whether your wheel utilizes a direct TPMS sensor.
Step 1: Safety and Vehicle Preparation
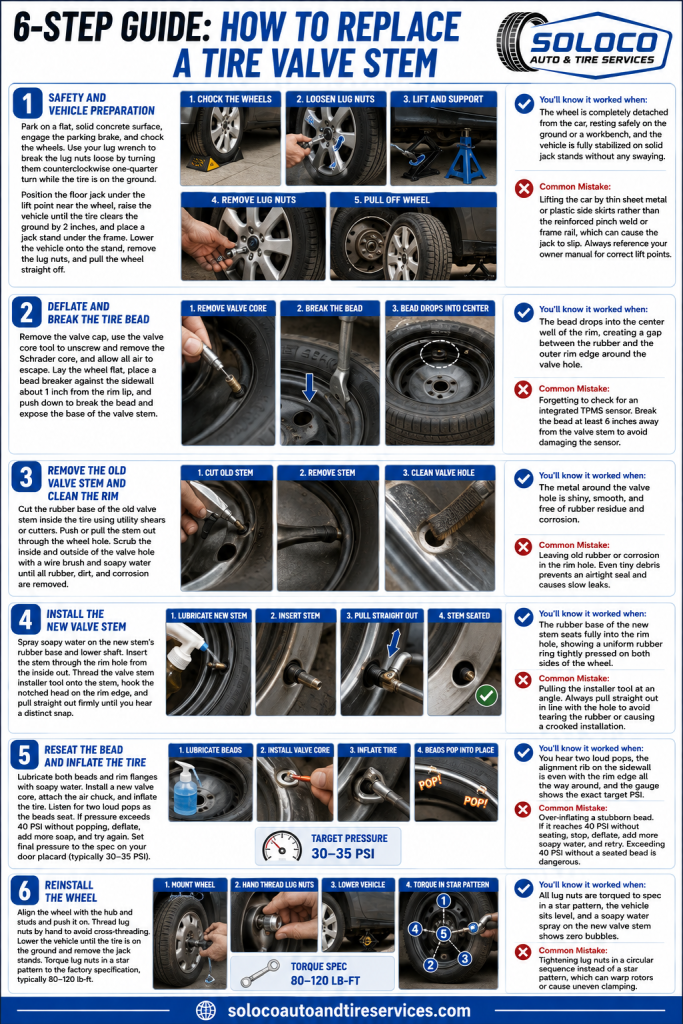
Park your vehicle on a flat, solid concrete surface, engage the parking brake firmly, and chock the wheels that remain on the ground. Use your lug wrench to break the lug nuts loose by turning them counterclockwise one-quarter turn while the tire still bears the vehicle weight. Position your hydraulic floor jack under the manufacturer-designated lift point near the target wheel, raise the vehicle until the tire clears the ground by 2 inches, and slide a rated steel jack stand securely underneath the frame. Lower the vehicle slightly until its weight rests squarely on the jack stand, remove the loosened lug nuts completely, and pull the wheel assembly straight off the wheel studs.
- You’ll know it worked when: The wheel is completely detached from the car, resting safely on the ground or a workbench, and the vehicle is fully stabilized on solid jack stands without any swaying.
- Common Mistake: Lifting the car by thin sheet metal or plastic side skirts rather than the reinforced pinch weld or frame rail, which can cause the jack to slip. Always reference your owner manual for correct lift points.
Step 2: Deflate and Break the Tire Bead
Remove the plastic valve cap from the stem, insert the slotted end of your valve core removal tool into the center of the valve, and unscrew the Schrader core counterclockwise. Allow all pressurized air to rush out completely until the hiss stops, then verify zero pressure by pressing the center pin. Lay the wheel flat on a clean piece of cardboard or carpet to protect the outer face, position a bead breaker tool or the foot of a manual bead-breaking lever against the tire sidewall roughly 1 inch away from the outer rim lip, and apply downward force. Push the tire sidewall down into the drop center of the rim to expose the internal base of the valve stem.
- You’ll know it worked when: The heavy rubber bead of the tire drops down into the center well of the wheel, creating a distinct gap between the rubber and the outer rim edge right around the valve hole.
- Common Mistake: Forgetting to check for an integrated TPMS sensor. If your valve stem has a small electronic sensor screwed to its base on the inside, do not drive a bead breaker directly on top of it. Break the bead at least 6 inches away from the valve stem location to protect the sensor module.
Step 3: Remove the Old Valve Stem and Clean the Rim
Reach inside the gap between the tire and the rim with a pair of sharp utility shears or diagonal cutters and slice through the rubber base of the old valve stem just above its flat anchor foot. Push or pull the remaining top portion of the stem outward through the front of the wheel hole. Take your stiff wire brush and a clean shop rag, dip them into your soapy water mixture, and scrub the interior and exterior surfaces of the valve hole until all rubber residue, road salt, and white aluminum corrosion are completely gone.
- You’ll know it worked when: The metal surface inside and surrounding the valve hole is shiny, smooth, and entirely free of flaky oxidation or old rubber remnants.
- Common Mistake: Leaving old rubber flakes or corrosion inside the rim hole. Even microscopic debris prevents the new rubber base from forming an airtight seal, resulting in a persistent slow leak.
Step 4: Install the New Valve Stem
Spray a generous amount of your soap and water mixture onto the rubber base and lower shaft of the new snap-in valve stem to act as a temporary slick lubricant. Insert the narrow threaded end of the new valve stem through the inside of the rim hole so that it pokes out through the front face of the wheel. Thread the swivel head of your valve stem puller or installer tool securely onto the external threads of the stem. Hook the notched metal head of the tool against the outer lip of the wheel rim, and pull the handle firmly toward you in a smooth, straight motion until you feel and hear a distinct snap.
- You’ll know it worked when: The thick rubber collar of the new valve stem seats fully into the rim hole, showing a uniform rubber ring pressed tightly against both the inside and outside of the metal wheel.
- Common Mistake: Pulling the valve stem installer tool sideways at an angle. This puts uneven shear stress on the fresh rubber, tearing the casing or leaving the stem sitting crooked, which compromises the seal. Always pull straight out aligned with the axis of the hole.
Step 5: Reseat the Bead and Inflate the Tire
Spray a liberal coat of soapy water around both the top and bottom tire beads and the corresponding rim flanges to reduce friction during inflation. Thread a fresh Schrader valve core tightly into the center of the valve stem using your core tool. Connect your air compressor hose chuck directly to the valve stem. Inflate the tire rapidly while keeping your hands clear of the pinch points; listen closely for two loud, distinct popping sounds as the tire beads climb up the rim safety humps and lock against the outer lips. Monitor your pressure gauge carefully, stop inflation immediately if pressure exceeds 40 PSI without the bead popping, and adjust the final air pressure to the exact PSI listed on your vehicle door placard (typically 30 to 35 PSI).
- You’ll know it worked when: The two loud pops occur, a visual inspection shows the continuous alignment rib on the tire sidewall running parallel to the rim edge all the way around, and your tire gauge displays the exact target PSI.
- Common Mistake: Over-inflating a stubborn bead that refuses to seat. If the tire reaches 40 PSI and the bead has not popped into place, stop immediately, deflate the tire completely, apply more soapy water, and reposition the tire. Exceeding 40 PSI without a seated bead is dangerous.
Step 6: Reinstall the Wheel
Pick up the wheel assembly, align the center hub hole and lug bolt patterns with the vehicle wheel studs, and push the wheel straight back onto the hub. Thread your factory lug nuts onto the studs by hand in a clockwise direction to ensure they thread cleanly without cross-threading. Lower the vehicle slowly by turning your floor jack release valve counterclockwise until the tire bears the vehicle weight and the jack stands can be removed. Use your torque wrench in a star pattern to tighten every lug nut to the manufacturer’s precise factory specification, typically ranging from 80 to 120 lb-ft for standard passenger cars.
- You’ll know it worked when: All lug nuts are torqued precisely to factory specification in a star pattern, the vehicle sits level on all four tires, and a final spray of soapy water over the new valve stem shows zero escaping bubbles.
- Common Mistake: Tightening lug nuts in a circular sequence rather than a star pattern, which can warp the brake rotor or cause uneven wheel clamping force.
Common Mistakes and How to Fix Them
- Air Hisses Immediately Around the Stem Base: This occurs when the rubber collar of the stem did not pull fully through the rim hole groove. To fix this, deflate the tire completely, break the bead near the stem, apply more soapy water, and use your puller tool to pop the stem completely home.
- Air Leaks Directly Out of the Top Opening: The Schrader valve core is loose, damaged, or contaminated with dirt. Use your valve core tool to tighten it another half-turn clockwise. If it continues to hiss, unscrew the core entirely and screw in a brand-new replacement core.
- The Bead Refuses to Pop Into Place: A dry tire bead or tight cold rubber can fail to slide up the rim flange. Deflate the tire fully, apply extra soap and water around the entire circumference of both tire beads, and try reinflating. For stubborn tires, wrap a heavy ratchet strap tightly around the center tread circumference and ratchet it down to force the sidewalls outward toward the rim lips while inflating.
- Overtightening Metal Clamp-In Stems: If you are using a metal aftermarket valve stem, overtightening the small retaining nut on the outside can crush the internal rubber sealing washer. Tighten metal stem nuts to only 2 to 4 lb-ft of torque; snug is sufficient, and overzealous wrenching causes immediate leaks.
Variations: Different Tools and Situations
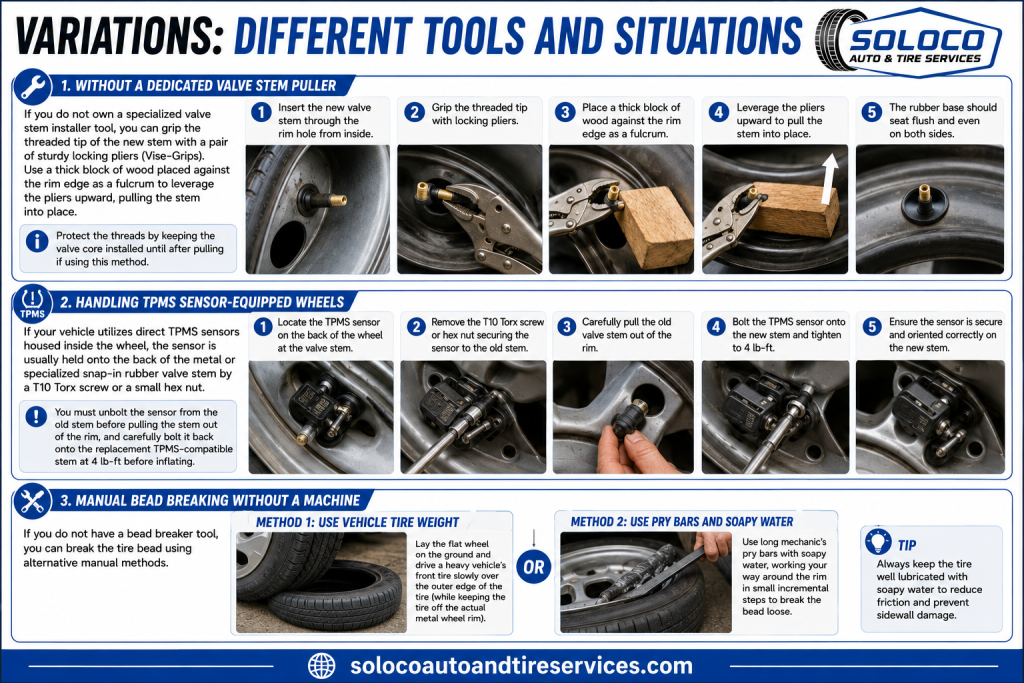
- Without a Dedicated Valve Stem Puller: If you do not own a specialized valve stem installer tool, you can grip the threaded tip of the new stem with a pair of sturdy locking pliers (Vise-Grips). Use a thick block of wood placed against the rim edge as a fulcrum to leverage the pliers upward, pulling the stem into place. Protect the threads by keeping the valve core installed until after pulling if using this method.
- Handling TPMS Sensor-Equipped Wheels: If your vehicle utilizes direct TPMS sensors housed inside the wheel, the sensor is usually held onto the back of the metal or specialized snap-in rubber valve stem by a T10 Torx screw or a small hex nut. You must unbolt the sensor from the old stem before pulling the stem out of the rim, and carefully bolt it back onto the replacement TPMS-compatible stem at 4 lb-ft before inflating.
- Manual Bead Breaking Without a Machine: If you do not have a bead breaker tool, you can break the tire bead by laying the flat wheel on the ground and driving a heavy vehicle’s front tire slowly over the outer edge of the tire (while keeping the tire off the actual metal wheel rim). Alternatively, use long mechanic’s pry bars with soapy water, working your way around the rim in small incremental steps.
Frequently Asked Questions
Can I replace a valve stem without taking the tire completely off the wheel?
Yes. You do not need to remove the tire from the rim entirely. You only need to break the outer bead away from the rim lip on one side and push it down into the drop center of the wheel. This creates enough working clearance to reach inside and cut out the old rubber stem and pull the new one through.
Are rubber snap-in valve stems and metal bolt-in stems interchangeable?
They are generally interchangeable in terms of hole diameter (standard TR413 and TR414 holes are roughly 0.453 inches in diameter). However, metal clamp-in stems are strongly recommended for high-speed driving, heavy-duty applications, or wheels subjected to high centrifugal forces, while rubber snap-in stems are standard for everyday passenger cars.
How do I know if my tire valve stem needs replacement?
Inspect the rubber body of the valve stem under bright light while flexing it gently with your finger. If you notice dry rot, deep surface cracking, rubber splitting near the base, or if a soapy water test produces a stream of bubbles around the stem body, it has degraded and must be replaced immediately.
What should I do if my tire loses air after a new stem installation?
Spray the entire wheel assembly—including the valve core, the base of the stem, and the outer rim-to-tire contact edge—with your soapy water mixture. If bubbles form at the stem base, it was pulled in crooked. If bubbles form around the rim edge, the bead did not seal cleanly or corrosion on the aluminum rim lip is allowing air to bleed out slowly.


