You can safely drive on a properly plugged tire for up to 25,000 miles or until the remaining tread wears out, provided the repair was made within the center tread area. Accomplished in seven precise steps within 20 to 30 minutes with beginner-to-intermediate skill, success depends entirely on matching the original puncture angle and using a high-quality vulcanizing rubber cement.
Before You Start
- Total Time Required: 20 to 30 minutes.
- Difficulty Level: Beginner to Intermediate.
- Estimated Cost: $10 to $25 for a complete tire repair kit and portable inflator.
- Safe Driving Distance: Up to 25,000 miles (tread life limit).
- Maximum Safe Speed: Match your tire speed rating (up to 86 mph / 140 km/h under normal conditions).
- Required Tools and Materials:
- Tire Repair Kit: 1 T-handle spiral reamer and 1 T-handle split-eyelet insertion tool.
- Tire Repair Plugs: 1 or more butyl rubber sticky strings.
- Rubber Cement: 1 tube of vulcanizing fluid.
- Pliers or Side Cutters: 1 pair.
- Chalk or Tire Crayon: 1 piece.
- Utility Knife or Razor Blade: 1 sharp blade.
- Portable Air Compressor / Tire Inflator: 1 unit with an active digital PSI gauge.
- Soapy Water Solution: 1 spray bottle containing 4 parts water mixed with 1 part liquid dish soap.
- Vehicle Safety Gear: Wheel chocks, lug wrench, and a hydraulic jack (optional, as many repairs can be done with the wheel on the car by turning the steering wheel).
- Prerequisites and Conditions: The puncture must reside strictly within the center three-quarters of the tire tread. Any puncture located on the shoulder or sidewall makes the tire instantly unrepairable and dangerous.
Step-by-Step Tire Plugging Execution
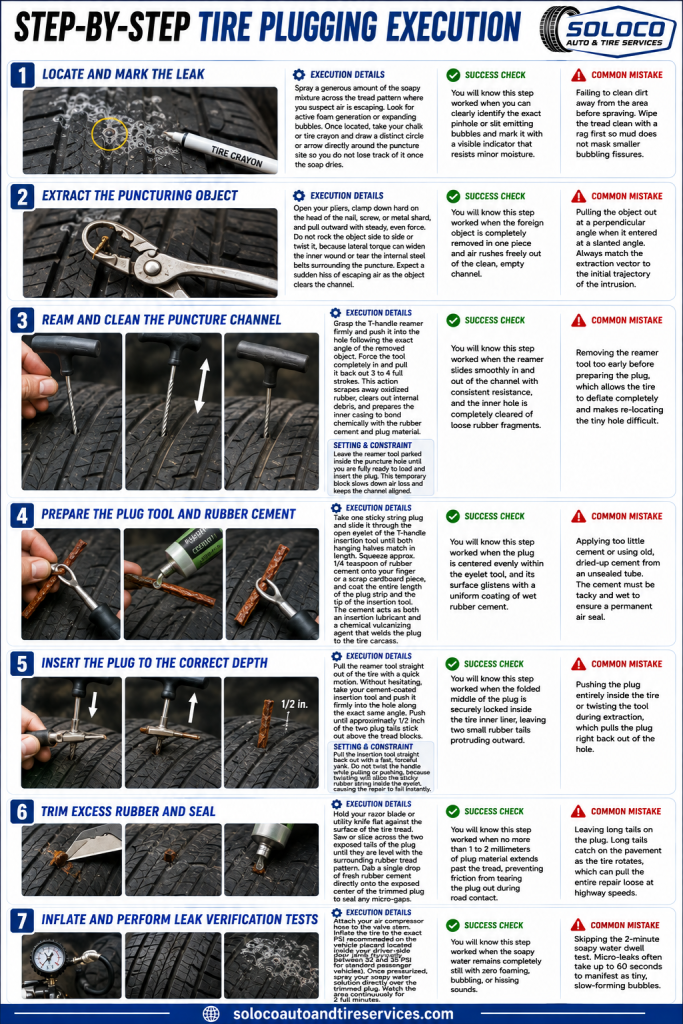
Step 1: Locate and Mark the Leak
- Spray the entire suspected tread area liberally with your soapy water solution and watch closely for growing clusters of persistent air bubbles to find the breach.
- Execution Details: Spray a generous amount of the soapy mixture across the tread pattern where you suspect air is escaping. Look for active foam generation or expanding bubbles. Once located, take your chalk or tire crayon and draw a distinct circle or arrow directly around the puncture site so you do not lose track of it once the soap dries.
- Success Check: You will know this step worked when you can clearly identify the exact pinhole or slit emitting bubbles and mark it with a visible indicator that resists minor moisture.
- Common Mistake: Failing to clean dirt away from the area before spraying. Wipe the tread clean with a rag first so mud does not mask smaller bubbling fissures.
Step 2: Extract the Puncturing Object
- Grip the foreign object firmly with your pliers and pull it straight out at the exact angle it entered the tire carcass.
- Execution Details: Open your pliers, clamp down hard on the head of the nail, screw, or metal shard, and pull outward with steady, even force. Do not rock the object side to side or twist it, because lateral torque can widen the inner wound or tear the internal steel belts surrounding the puncture. Expect a sudden hiss of escaping air as the object clears the channel.
- Success Check: You will know this step worked when the foreign object is completely removed in one piece and air rushes freely out of the clean, empty channel.
- Common Mistake: Pulling the object out at a perpendicular angle when it entered at a slanted angle. Always match the extraction vector to the initial trajectory of the intrusion.
Step 3: Ream and Clean the Puncture Channel
- Insert the T-handle spiral reamer tool directly into the hole, pushing and twisting it up and down 3 to 4 times to scour the inner rubber channel.
- Execution Details: Grasp the T-handle reamer firmly and push it into the hole following the exact angle of the removed object. Force the tool completely in and pull it back out 3 to 4 full strokes. This action scrapes away oxidized rubber, clears out internal debris, and prepares the inner casing to bond chemically with the rubber cement and plug material.
- Setting and Constraint: Leave the reamer tool parked inside the puncture hole until you are fully ready to load and insert the plug. This temporary block slows down air loss and keeps the channel aligned.
- Success Check: You will know this step worked when the reamer slides smoothly in and out of the channel with consistent resistance, and the inner hole is completely cleared of loose rubber fragments.
- Common Mistake: Removing the reamer tool too early before preparing the plug, which allows the tire to deflate completely and makes re-locating the tiny hole difficult.
Step 4: Prepare the Plug Tool and Rubber Cement
- Thread one butyl rubber plug strip halfway through the eyelet of the insertion tool and coat both the tool tip and the plug with rubber cement.
- Execution Details: Take one sticky string plug and slide it through the open eyelet of the T-handle insertion tool until both hanging halves match in length. Squeeze approximately 1/4 teaspoon of rubber cement onto your finger or a scrap cardboard piece, and coat the entire length of the plug strip and the tip of the insertion tool. The cement acts as both an insertion lubricant and a chemical vulcanizing agent that welds the plug to the tire carcass.
- Success Check: You will know this step worked when the plug is centered evenly within the eyelet tool, and its surface glistens with a uniform coating of wet rubber cement.
- Common Mistake: Applying too little cement or using old, dried-up cement from an unsealed tube. The cement must be tacky and wet to ensure a permanent air seal.
Step 5: Insert the Plug to the Correct Depth
- Pull the reamer out swiftly and immediately push the loaded insertion tool straight into the puncture hole until only about 1/2 inch of the plug ends remain visible.
- Execution Details: Pull the reamer tool straight out of the tire with a quick motion. Without hesitating, take your cement-coated insertion tool and push it firmly into the hole along the exact same angle. Push until approximately 1/2 inch of the two plug tails stick out above the tread blocks.
- Setting and Constraint: Pull the insertion tool straight back out with a fast, forceful yank. Do not twist the handle while pulling or pushing, because twisting will slice the sticky rubber string inside the eyelet, causing the repair to fail instantly.
- Success Check: You will know this step worked when the folded middle of the plug is securely locked inside the tire inner liner, leaving two small rubber tails protruding outward.
- Common Mistake: Pushing the plug entirely inside the tire or twisting the tool during extraction, which pulls the plug right back out of the hole.
Step 6: Trim Excess Rubber and Seal
- Slice off the protruding excess rubber plug flush with the surrounding tread blocks using a sharp utility knife or razor blade, then apply a final drop of rubber cement over the cut surface.
- Execution Details: Hold your razor blade or utility knife flat against the surface of the tire tread. Saw or slice across the two exposed tails of the plug until they are level with the surrounding rubber tread pattern. Dab a single drop of fresh rubber cement directly onto the exposed center of the trimmed plug to seal any micro-gaps.
- Success Check: You will know this step worked when no more than 1 to 2 millimeters of plug material extends past the tread, preventing friction from tearing the plug out during road contact.
- Common Mistake: Leaving long tails on the plug. Long tails catch on the pavement as the tire rotates, which can pull the entire repair loose at highway speeds.
Step 7: Inflate and Perform Leak Verification Tests
- Connect your portable air compressor, inflate the tire to factory specifications, and spray the repair area with soapy water to confirm zero air leaks.
- Execution Details: Attach your air compressor hose to the valve stem. Inflate the tire to the exact PSI recommended on the vehicle placard located inside your driver-side door jamb (typically between 32 and 35 PSI for standard passenger vehicles). Once pressurized, spray your soapy water solution directly over the trimmed plug. Watch the area continuously for 2 full minutes.
- Success Check: You will know this step worked when the soapy water remains completely still with zero foaming, bubbling, or hissing sounds.
- Common Mistake: Skipping the 2-minute soapy water dwell test. Micro-leaks often take up to 60 seconds to manifest as tiny, slow-forming bubbles.
Common Mistakes and How to Fix Them
| Symptom | Probable Cause | Corrective Action |
| Persistent bubbling around the plug perimeter | Insufficient rubber cement or inadequate reaming. | Pull the old plug out, re-ream the hole with fresh cement, and insert a new plug strip. |
| Plug pops out completely during initial inflation | The hole was wider than 1/4 inch or the insertion depth was insufficient. | Do not re-plug. Install your spare tire and drive to a professional shop for a permanent inner patch-plug combination. |
| Tire loses 2 to 3 PSI every 24 hours | Air is escaping along the internal steel belts due to an off-angle ream. | Dismount the tire from the rim and have a professional tire technician apply an internal vulcanized patch over the puncture site. |
| Plug pulls out when trimming excess rubber | The cement had not yet begun to bond, or the plug was not pushed deep enough. | Insert a fresh plug, push it deeper into the carcass, and let the cement cure for 10 minutes before trimming. |
Variations and Alternative Scenarios
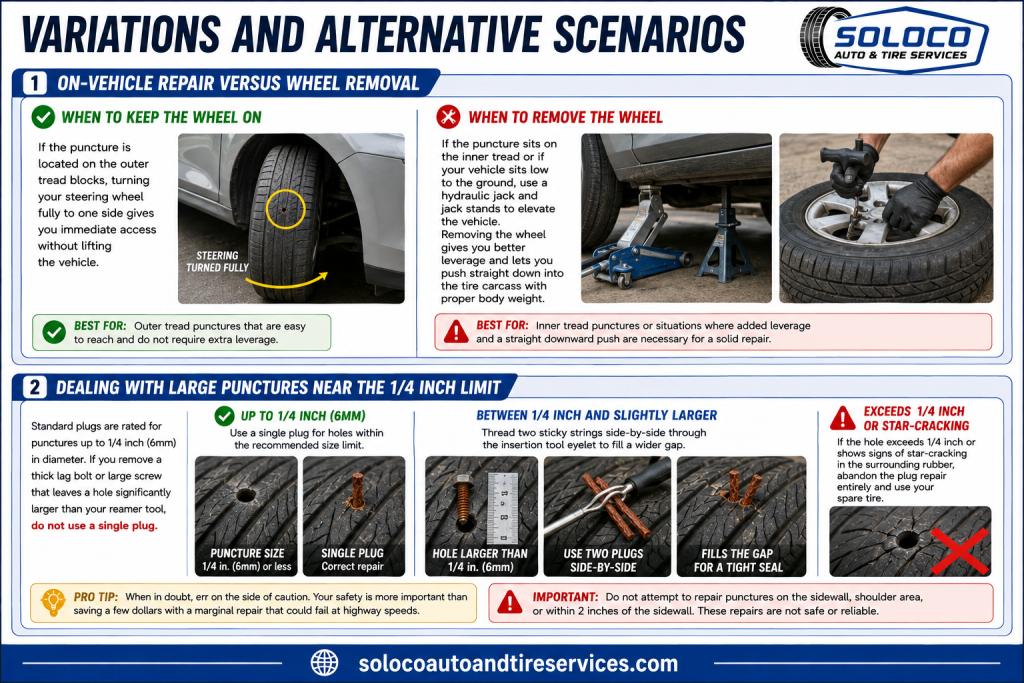
On-Vehicle Repair Versus Wheel Removal
- When to keep the wheel on: If the puncture is located on the outer tread blocks, turning your steering wheel fully to one side gives you immediate access without lifting the vehicle.
- When to remove the wheel: If the puncture sits on the inner tread or if your vehicle sits low to the ground, use a hydraulic jack and jack stands to elevate the vehicle. Removing the wheel gives you better leverage and lets you push straight down into the tire carcass with proper body weight.
Dealing with Large Punctures Near the 1/4 Inch Limit
- Standard plugs are rated for punctures up to 1/4 inch (6mm) in diameter. If you remove a thick lag bolt or large screw that leaves a hole significantly larger than your reamer tool, do not use a single plug. Most heavy-duty kits allow you to thread two sticky strings side-by-side through the insertion tool eyelet to fill a wider gap. However, if the hole exceeds 1/4 inch or shows signs of star-cracking in the surrounding rubber, abandon the plug repair entirely and use your spare tire.
How Long Does It Take and What Does It Cost
- Time Investment: A first-time DIYer will spend about 25 to 30 minutes from setup to final inflation. Experienced practitioners can complete the entire process in under 15 minutes.
- Financial Cost: Standard tire repair kits containing plugs, insertion tools, reamers, and cement cost between $8 and $15 at any auto parts store. A portable digital air compressor adds another $15 to $30 if you do not already own one. Professional repair shops typically charge between $20 and $40 to plug a tire if you prefer not to do it yourself.
Frequently Asked Questions
Can you drive on a plugged tire on the highway?
Yes, you can drive on a properly plugged tire at highway speeds up to the maximum speed rating of the tire, provided the puncture is in the center tread and the repair was executed correctly with no air leaks detected during the soapy water test.
Is a plugged tire considered permanent by safety organizations?
Major tire manufacturers and safety groups like the U.S. Tire Manufacturers Association consider an external plug alone to be a temporary repair. While a plug can last the 25,000-mile remaining life of the tread, safety standards recommend having a professional install an internal vulcanized patch-plug combination for long-term peace of mind.
What happens if you try to plug a tire sidewall?
Attempting to plug a tire shoulder or sidewall will lead to a sudden, catastrophic tire blowout. Sidewalls flex continuously under vehicle weight and contain no heavy steel belts to anchor a rubber plug, making structural repairs in this area impossible.
How long should you wait before driving after plugging a tire?
You can drive immediately after inflating the tire and verifying that no air bubbles form in the soapy water solution. The rubber cement vulcanizes and cures as you drive and generate friction heat against the road surface.
Can a run-flat tire be plugged?
Run-flat tires can be plugged using the exact same exterior string method as standard tires, provided the puncture is in the tread and the tire was not driven on while completely deflated. Driving on a zero-pressure run-flat ruins its internal sidewall support structure, requiring full replacement.


