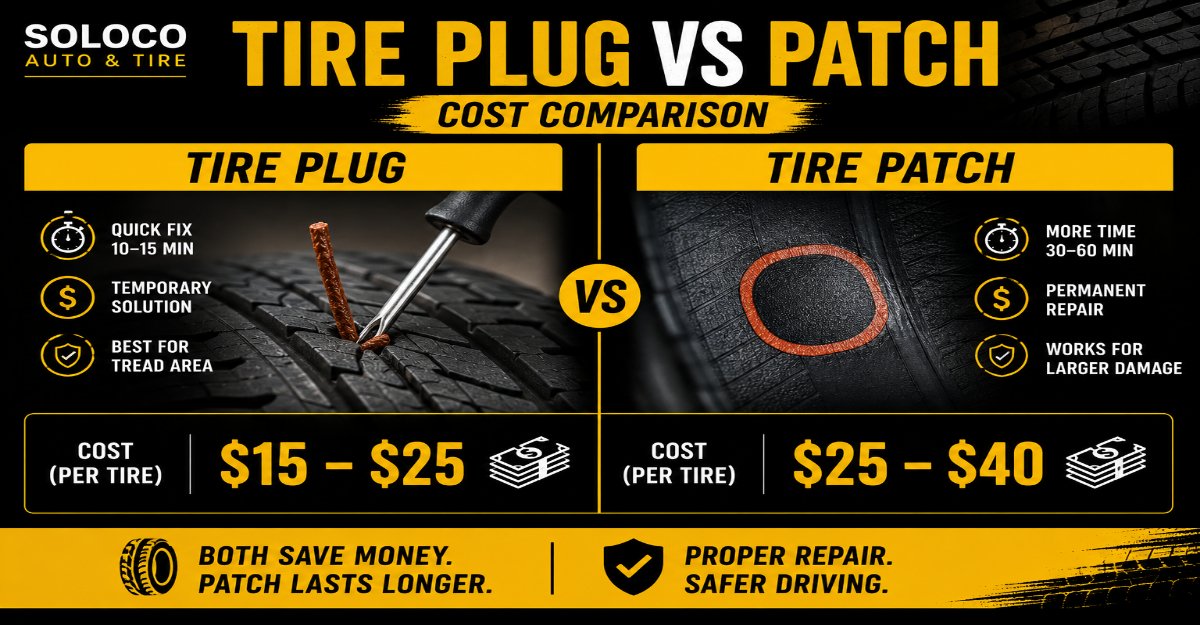
A DIY tire plug is the cheapest immediate roadside option at $5 to $25, while a professional in-shop plug-patch combination is the industry gold standard costing $20 to $45. Selecting the right puncture repair method requires balancing upfront material expenses against long-term structural integrity, blowout risks, and remaining tire tread lifespan.
Key Facts At a Glance
- DIY Tire Plug Kit Cost: $5 to $25 for universal string plug sets with a T-handle insertion tool.
- Professional Plug-Patch Cost: $20 to $45 for a combined internal patch and rubber stem installation.
- Road-Hazard Warranty Coverage: $0 (Free) at major retailers if the certificate was purchased with the tire.
- Emergency Lifespan: Temporary string plugs last from a few hundred miles to several months; professional combo repairs last the entire life of the tire tread.
- Regulatory Standard: The U.S. Tire Manufacturers Association (USTMA) mandates that repairs must be combined patch-and-plug units applied exclusively to the inner liner.
Direct Cost and Financial Comparison Matrix
Evaluating the true financial impact of a tire repair goes beyond the initial retail price of a kit or a single shop visit. Hidden expenses include wheel balancing fees, low-profile surcharges, mobile service dispatches, and the risk of premature tire failure.
| Repair Option | Upfront Material or DIY Cost | Professional Shop Price | Required Installation Time | Expected Lifespan | Secondary Fees & Surcharges |
|---|---|---|---|---|---|
| DIY String Plug | $5 to $25 (Kit) | $15 to $25 | 10 to 15 minutes | Temporary (Hundreds of miles) | Replacement air compressor ($20 to $50) |
| Internal Flat Patch | $5 to $15 (Kit) | $20 to $35 | 20 to 30 minutes | Semi-permanent | Requires tire mounting machine |
| Combo Plug-Patch | N/A (Shop equipment required) | $20 to $45 | 30 to 45 minutes | Life of the tire tread | $10 to $30 for low-profile or 18-inch wheels |
| Mobile Roadside Service | N/A | $50 to $120 | 20 to 40 minutes | Varies by method used | Emergency call-out fee or towing surcharge |
| Specialty Run-Flat Repair | N/A | $40 to $75 | 30 to 50 minutes | Usually unrepairable | Manufacturer strict replacement mandate |
Core Mechanics and Structural Anatomy
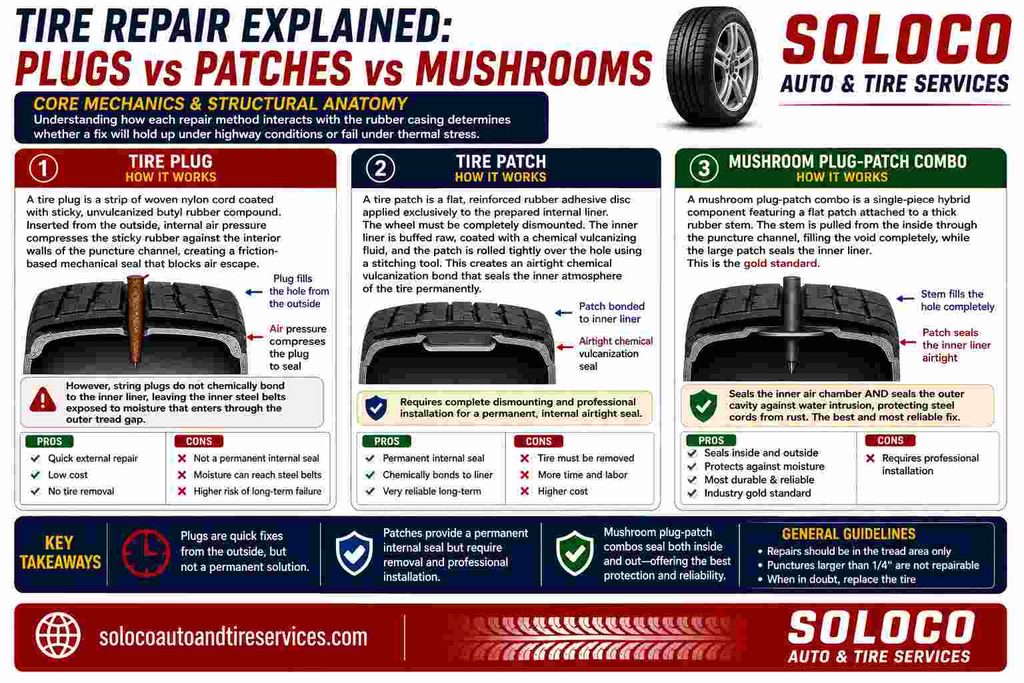
Understanding how each repair method interacts with the rubber casing determines whether a fix will hold up under highway conditions or fail under thermal stress.
What is a Tire Plug and How Does it Work?
A tire plug consists of a strip of woven nylon cord coated with a sticky, unvulcanized butyl rubber compound. When inserted into a puncture from the outside, the natural internal air pressure of the tire compresses the sticky rubber against the interior walls of the puncture channel.
This creates a friction-based mechanical seal that blocks air escape. However, string plugs do not chemically bond to the inner liner, leaving the inner steel belts exposed to moisture that enters through the outer tread gap.
What is a Tire Patch and How Does it Work?
A tire patch is a flat, reinforced rubber adhesive disc applied exclusively to the prepared internal liner of the tire. The wheel must be completely dismounted from the rim using a tire changing machine.
The inner liner is buffed raw to remove surface mold release agents, coated with a chemical vulcanizing fluid, and the patch is rolled tightly over the hole using a stitching tool. This creates an airtight chemical vulcanization bond that seals the inner atmosphere of the tire permanently.
What is a Mushroom Plug-Patch Combo?
A mushroom plug-patch combo is a single-piece hybrid component featuring a flat rubber patch attached to a thick rubber stem. The stem is pulled from the inside through the puncture channel, filling the physical void completely, while the large patch seals the inner liner.
This represents the gold standard because it seals the inner air chamber and seals the outer cavity against water intrusion, protecting internal steel cords from rust.
Step-by-Step Installation Protocols
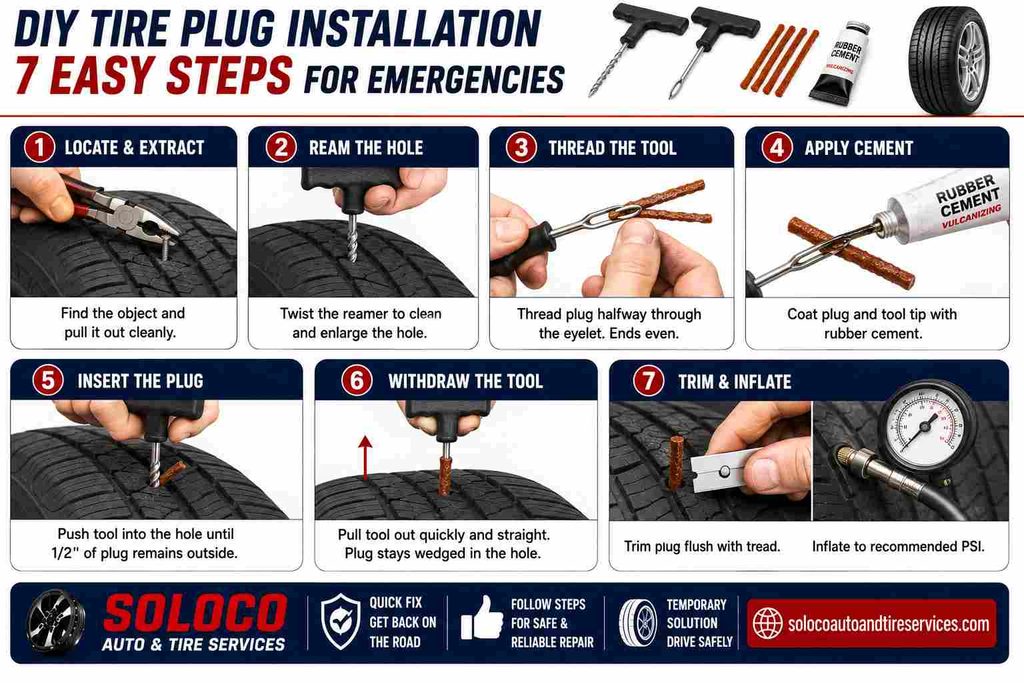
Proper execution separates a permanent repair from a dangerous roadside failure.
How to Install a DIY Tire Plug in an Emergency
- Locate and Extract: Find the embedded nail, screw, or debris and extract it cleanly using sturdy pliers without twisting or bending the object.
- Ream the Hole: Push a T-handle spiral reamer tool directly into the puncture channel, twisting it back and forth to clean out rubber debris and score the inner walls.
- Thread the Tool: Thread a sticky butyl rubber string halfway through the open eyelet of the plug insertion tool until both sides match in length.
- Apply Cement: Coat the exterior of the rubber string and the tip of the tool generously with vulcanizing rubber cement to lubricate insertion.
- Insert the Plug: Push the insertion tool straight into the puncture channel with steady pressure until about one-half inch of the plug remains visible above the tread block.
- Withdraw the Tool: Pull the T-handle straight out with a swift, singular motion without twisting. The eyelet will release the string, leaving it wedged inside the hole.
- Trim and Inflate: Use a sharp razor blade to cut off the protruding rubber ends flush with the surrounding tread blocks. Re-inflate the tire to the manufacturer specification printed on the driver-side door jamb.
How Professionals Apply an Internal Plug-Patch Combo
- Dismount the Tire: Deflate the tire completely and separate the rubber bead from the metal rim using a specialized pneumatic tire changing machine.
- Inspect the Interior: Examine the inner liner under high-intensity lighting for structural shredding, rubber powder accumulation, or heat damage caused by driving on an underinflated tire.
- Ream and Buff: Clean the puncture channel from the inside and use a low-speed air buffer with a wire brush wheel to roughen a 2-inch circular area around the inner hole.
- Apply Vulcanizing Fluid: Paint chemical vulcanizing cement over the freshly buffed inner surface and allow it to dry for 3 to 5 minutes until completely tacky.
- Stitch the Patch: Pull the rubber stem through the puncture channel from the inside, peel the plastic backing off the patch, and press it firmly against the liner. Roll over the entire patch using a metal stitching wheel from the center outward to eliminate trapped air bubbles.
- Remount and Balance: Mount the tire back onto the wheel rim, inflate it to pressure, and place the assembly on a dynamic wheel balancing machine to prevent high-speed vibration.
Safety Limits: When a Tire Cannot Be Repaired
Attempting to repair a tire that violates safety standards creates an immediate risk of sudden tread separation or catastrophic blowout at highway speeds. A tire must be replaced rather than repaired under the following strict parameters:
- Puncture Size Thresholds: The outer puncture diameter exceeds 1/4 inch (6mm). Holes larger than this compromise the structural integrity of the internal body plies.
- Puncture Location Restrictions: The puncture occurs on the tire shoulder, outer tread block transition zone, or sidewall. Only the flat center-tread area can safely receive a repair.
- Tread Depth Minimums: The remaining usable tread depth across the main circumferential grooves measures 4/32-inch or less. Repairing a worn tire is economically inefficient.
- Proximity to Prior Repairs: A new puncture overlaps or sits closer than 16 inches to an existing internal repair or plug.
- Run-Flat Structural Damage: A run-flat tire driven at zero pressure for more than a mile suffers irreversible internal sidewall fatigue, rendering any patch unsafe.
Critical Failure Modes and Troubleshooting
Recognizing installation errors prevents premature air leaks and catastrophic tire degradation on the road.
Mistake 1: Twisting the Plug Tool During Removal
Rotating the T-handle insertion tool while pulling it out of the tire slices the rubber string in half or dislodges it entirely, creating an instant micro-leak channel.
- Recovery Fix: Always pull the insertion tool straight out with a swift, linear motion. Test the repair by spraying soapy water over the area to check for escaping air bubbles.
Mistake 2: Skipping the Inner Liner Buffing Step
Attempting to stick an internal patch over a smooth, oily, or dirty inner liner without mechanical buffing prevents chemical vulcanization bonding.
- Recovery Fix: Grind the inner liner down using a low-speed mechanical abrasive wheel until the shiny surface turns into a dull, grey, high-friction texture before applying cement.
Mistake 3: Over-Reaming the Puncture Channel
Aggressively forcing a large spiral reamer through a tiny pinhole nail puncture splits apart the internal steel body cords, permanently ruining the structural casing.
- Recovery Fix: Match the reamer size to the puncture width. If the reamer easily drops through the hole without resistance, the puncture is too large for a standard plug and requires full tire replacement.
Which Repair Option Should You Choose?
Selecting the correct repair path depends entirely on your current location, driving habits, and equipment availability.
For Daily Commuters and Family Drivers
Drivers navigating high-speed interstate corridors with passengers should avoid relying on temporary roadside string plugs for long-term transport. Pay the $20 to $45 fee at a certified service center for an internal plug-patch combination. This guarantees total structural reliability, preserves speed ratings, and protects steel belts from water corrosion for the remaining life of the tread.
For Road Trippers and Rural Drivers
Motorists traveling through remote areas out of cellular service range should store a heavy-duty T-handle plug kit and a 12-volt portable air compressor in the trunk. Treat a roadside plug strictly as an emergency measure to drive safely to the nearest professional tire garage at reduced speeds.
For Performance and Track Day Vehicle Owners
High-performance, low-profile tires mounted on exotic or sports vehicles experience immense cornering heat and heavy sidewall stress. Standard string plugs fail rapidly under these conditions. Take the vehicle to a specialized performance shop for a certified mushroom combo patch or replace the tire entirely if the puncture sits near the outer shoulder blocks.
Frequently Asked Questions
Can I drive long-term on a tire plug?
No. A standard string tire plug is engineered strictly as a temporary emergency fix to get your vehicle to a repair shop. Driving thousands of miles on an external plug risks gradual air loss, moisture intrusion into the steel belts, and unexpected separation at high highway speeds.
Does a tire patch ruin the speed rating of a tire?
Properly installed internal plug-patch combinations performed by certified technicians generally maintain the structural integrity of the tire. However, some tire manufacturers void high-speed ratings (such as V, W, or Y ratings) after any puncture repair due to the thermal dynamics of sustained high-speed driving.
Why do some tire shops refuse to plug tires?
Shops often refuse to plug tires from the outside because liability regulations require an internal inspection. If a tire was driven while flat, the inner liner may be structurally compromised or scorched, making an external plug unsafe and illegal under regional transport safety codes.
Will a tire plug deflate slowly over time?
Yes, temporary exterior plugs frequently develop micro-leaks over weeks or months as temperature fluctuations cause the rubber compound to expand and contract. Regular monthly tire pressure checks using a digital gauge are required to monitor the stability of any roadside plug.


