Using a portable 2-in-1 jump starter and tire inflator unit allows you to resolve a dead car battery and a flat tire in under 15 minutes. This complete process requires following 13 sequential steps across two core phases, with total execution time taking 12 to 18 minutes depending on tire pressure deficit. Success depends entirely on maintaining correct polarity during jump-starting and strict adherence to cold tire pressure specifications.
Before You Start
- Time Required: 12 to 18 minutes total
- Difficulty Level: Beginner
- Typical Cost: $80 to $180 (for a quality 12V portable lithium-ion jump starter and compressor unit)
- Tools and Materials Checklist:
- Portable 2-in-1 jump starter and tire inflator unit (charged to at least 75% battery capacity)
- Heavy-duty jumper cable clamps (attached or plug-in)
- Standard Schrader valve air hose (integrated)
- Vehicle owner’s manual or driver door jamb placard
- Safety glasses and mechanics gloves (recommended)
- Prerequisite Conditions: Vehicle parked on a flat, level surface with the emergency parking brake firmly engaged.
Part 1: How to Use the Tire Inflator Component
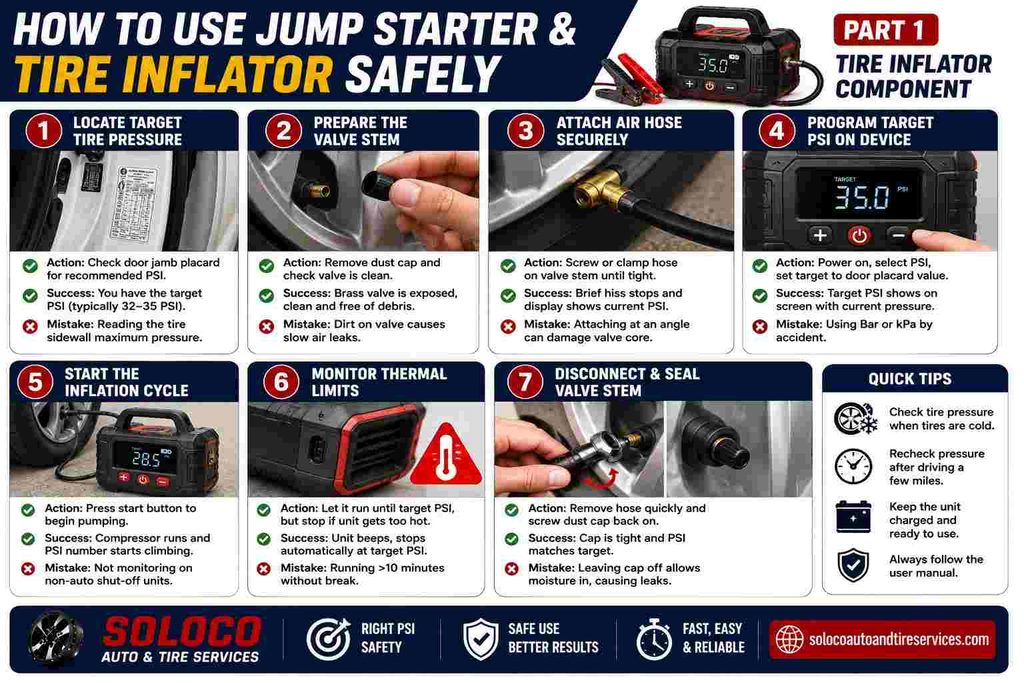
Step 1: Locate the target tire pressure specification
Check the vehicle placard sticker located on the driver side door pillar to find the manufacturer recommended cold tire pressure.
- Action: Open the driver door, look at the metal or paper placard affixed to the door jamb, and note the numerical PSI value specified for front and rear tires.
- Success Check: You know this step worked when you have written down or memorized the exact target PSI (typically between 32 and 35 PSI for standard passenger cars).
- Common Mistake: Reading the maximum pressure printed on the tire sidewall instead of the door placard. The sidewall number is the structural maximum limit of the tire, not the safe operating pressure for your vehicle.
Step 2: Prepare the tire valve stem
Remove debris and moisture from the tire valve stem before connecting your inflation equipment.
- Action: Unscrew the plastic dust cap counterclockwise from the target tire valve stem and store it in your pocket or a clean surface where it cannot be lost. Inspect the brass pin inside the valve for debris.
- Success Check: You know this step worked when the brass Schrader valve is fully exposed, clean, and free of dirt or road salt.
- Common Mistake: Leaving dust and grit on the valve stem, which gets pushed directly into the valve core during hose attachment and causes a slow air leak.
Step 3: Attach the air hose securely
Connect the inflator hose to the valve stem without losing pressure.
- Action: Screw the threaded brass chuck or push the quick-clamp lever of the inflator hose straight onto the tire valve stem clockwise until tight.
- Success Check: You know this step worked when you hear a brief hiss of escaping air that immediately stops once the seal engages, and the unit display wakes up to show the current tire pressure.
- Common Mistake: Pushing the hose chuck on at a slight angle, which bends the pin inside the valve core and lets all the air out of your tire instead of inflating it.
Step 4: Program the target PSI on the device
Set the internal digital controller to stop pumping automatically at the exact required pressure.
- Action: Power on the portable 2-in-1 unit using its main power switch, select the PSI unit of measurement if required, and use the plus and minus buttons to adjust the target display value to match the number found in Step 1.
- Success Check: You know this step worked when the digital screen displays your target PSI flashing or solid, alongside the current baseline pressure of the flat tire.
- Common Mistake: Leaving the unit set to bar or kPa by accident, which causes the machine to stop prematurely or over-inflate the tire dangerously.
Step 5: Start the inflation cycle
Execute the automated pumping process and monitor the mechanical operation.
- Action: Press the main start or power trigger button on the device to engage the internal air compressor motor.
- Success Check: You know this step worked when the compressor motor hums steadily, the air hose vibrates slightly, and the real-time pressure number on the digital screen begins climbing incrementally.
- Common Mistake: Assuming the machine will run indefinitely. Quality units feature auto shut-off, but cheap analog units require you to watch the gauge constantly.
Step 6: Monitor thermal limits during inflation
Manage the internal temperature of the portable compressor to prevent thermal overload.
- Action: Allow the machine to run continuously until it reaches your target PSI (usually 3 to 5 minutes for a low tire), but shut the unit off immediately if the outer plastic housing becomes uncomfortably hot to the touch.
- Success Check: You know this step worked when the unit hits the exact target PSI, sounds an audible beep, and automatically cuts power to the compressor motor.
- Common Mistake: Running a compact lithium-ion inflator continuously for more than 10 minutes without a break, which melts internal plastic piston seals and permanently ruins the compressor.
Step 7: Disconnect and seal the valve stem
Remove the inflation hardware quickly and seal the tire against moisture.
- Action: Unscrew or unclamp the hose chuck rapidly from the valve stem in a counterclockwise motion, and screw the plastic dust cap back onto the valve stem immediately.
- Success Check: You know this step worked when the hose is detached with minimal air loss, the dust cap is hand-tightened securely, and a secondary pocket pressure gauge confirms the tire holds the correct PSI.
- Common Mistake: Leaving the dust cap off, allowing moisture and road grime to enter the valve core and create slow leaks over the following weeks.
Part 2: How to Use the Jump Starter Component
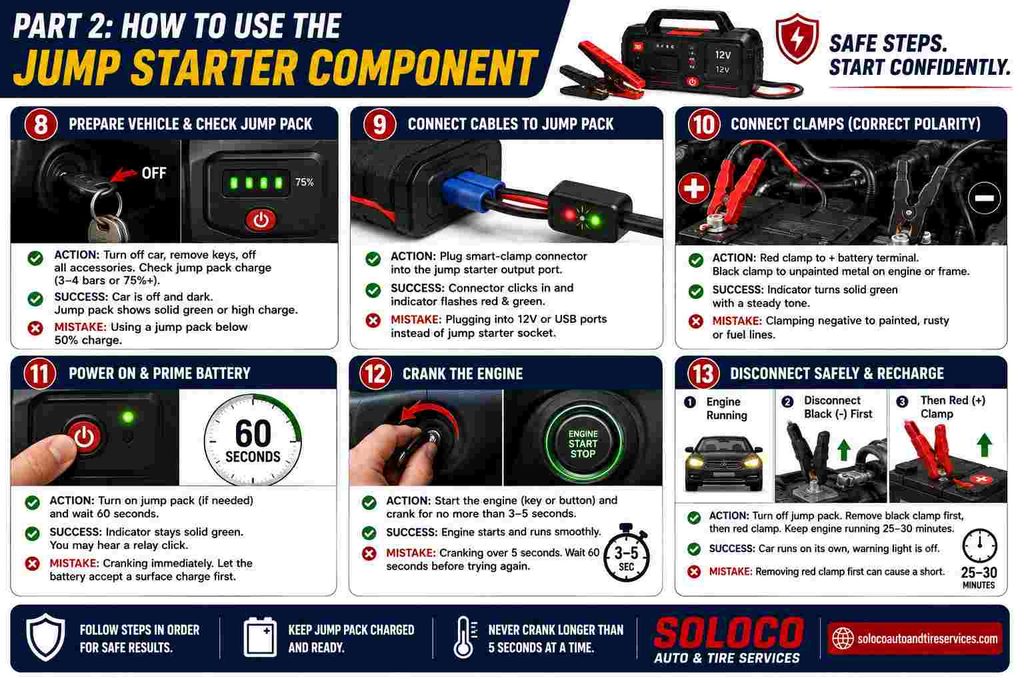
Step 8: Prepare the vehicle and verify jump pack charge
Isolate the dead vehicle electrical system and confirm your portable power source has sufficient reserve capacity.
- Action: Turn off the dead car ignition, pull out the keys, switch off all accessories, headlights, radio, and climate control fans. Check the LED indicator lights on your portable jump pack to ensure it shows at least 3 to 4 solid bars or 75 percent charge.
- Success Check: You know this step worked when the vehicle interior is completely dark and silent, and the jump pack battery indicator displays a solid green or high charge level.
- Common Mistake: Attempting to jump-start a vehicle with a jump pack charged below 50 percent, which causes the internal lithium cells to drop voltage instantly under load and triggers internal safety lockouts.
Step 9: Connect jumper cables to the jump pack
Establish the primary electrical link between the portable power source and its heavy-duty cables.
- Action: Plug the blue or black smart-clamp connector plug of the heavy-duty jumper cables firmly into the designated output port on the side of the portable jump starter unit.
- Success Check: You know this step worked when the connector clicks securely into place, and the indicator box on the cable junction block flashes alternating red and green lights, indicating it is ready for terminal connection.
- Common Mistake: Plugging the cables into the 12V DC output port or USB ports instead of the high-current jump starter socket.
Step 10: Connect battery clamps with correct polarity
Attach the positive and negative clamps to the vehicle electrical architecture safely.
- Action: Connect the RED positive clamp to the positive terminal of the vehicle battery (marked with a plus sign or red cover). Next, connect the BLACK negative clamp to an unpainted metal surface on the engine block or structural frame chassis, well away from the battery.
- Success Check: You know this step worked when the indicator light on the smart-clamp block turns solid green and emits a steady confirmation tone.
- Common Mistake: Clamping the negative cable directly to painted brackets, rusty bolts, or fuel lines, which creates high electrical resistance and stops current from flowing to the starter motor.
Step 11: Power on and prime the dead battery
Allow the lithium jump pack to transfer a surface charge into the dead lead-acid battery cells.
- Action: Turn on the master power switch of the portable jump starter if it requires manual activation, and wait exactly 60 seconds without turning the car key.
- Success Check: You know this step worked when the smart-clamp indicator light remains solid green and you hear a faint relay click from the vehicle engine compartment.
- Common Mistake: Cranking the engine immediately without waiting, which forces all the starting current through the dead battery rather than letting it accept a surface charge first.
Step 12: Crank the engine
Engage the starter motor to bring the vehicle engine back to life.
- Action: Insert your key into the ignition, turn it to the start position (or press the engine start button), and crank the engine continuously for no more than 3 to 5 seconds.
- Success Check: You know this step worked when the starter motor spins with robust power and the engine fires up smoothly.
- Common Mistake: Cranking the engine for longer than 5 seconds at a time, which overheats the jumper cables and drains the portable lithium battery pack. If the car does not start, wait 60 seconds before trying again.
Step 13: Disconnect safely and recharge the alternator
Remove the jump equipment in reverse order and restore the vehicle’s electrical storage reserve.
- Action: Leave the jumped vehicle running. Turn off the jump pack power switch. Disconnect the BLACK negative clamp first, then disconnect the RED positive clamp. Keep the engine running uninterrupted for at least 25 to 30 minutes.
- Success Check: You know this step worked when all cables are safely stowed, the car remains running smoothly on its own alternator power, and the dashboard battery warning light turns off.
- Common Mistake: Disconnecting the red positive clamp first while the black negative clamp is still attached, which risks creating an electrical short circuit if the clamp touches vehicle metal.
Common Mistakes and How to Fix Them
- Inflating Hot Tires: Driving friction heats tires and inflates internal pressure readings by 3 to 5 PSI. Always inflate tires when they are “cold” (the vehicle has been parked for at least 3 hours). If you must inflate warm tires, set your target pressure 3 to 4 PSI higher than the door placard, then re-check and adjust the next morning.
- Reversing Polarity on Terminals: Hooking red to negative and black to positive can damage vehicle electronics. Modern jump packs feature reverse-polarity protection blocks that prevent current flow. If your pack flashes a solid red light and sounds a warning alarm, immediately disconnect both clamps and swap their positions.
- Deeply Discharged Battery Override: If your car battery is completely dead (below 2 volts), the jump pack safety chips may refuse to send power because they detect no voltage. Locate the manual “Boost” or “Override” button on your jump pack, press it for 3 seconds until the indicator light turns solid green, and immediately crank the engine within 30 seconds.
- Alternator Failure Masking: If the car starts successfully while connected to the jump pack, but dies immediately after you disconnect the cables, your vehicle alternator is failing and cannot generate electricity. Do not attempt another jump; have the vehicle towed to a mechanic for alternator replacement.
Variations: Handling Alternate Situations
- Cold Weather Performance Drops: Sub-freezing temperatures reduce lithium-ion battery efficiency by up to 40 percent. If you are using your 2-in-1 unit in winter weather below freezing, store the unit inside your home or cabin glovebox where it stays warm rather than leaving it in a freezing trunk.
- Large Displacement V8 or Diesel Engines: Compact 2-in-1 units rated for 4-cylinder cars lack the peak amperage required for large V8 gasoline or heavy-duty diesel engines. If your vehicle has a displacement over 5.0 liters, ensure your jump pack is rated for at least 2000 to 3000 peak amps, or connect directly to the starter relay terminals if battery access is restricted.
- Vehicles Without Accessible Unpainted Engine Grounds: Some modern European luxury cars enclose the engine in plastic covers and feature remote battery posts in the trunk. In these cases, look for the dedicated factory-stamped grounding stud on the inner fender wall specified in your vehicle owner’s manual rather than arbitrary frame bolts.
How Long Does It Take and What Does It Cost
- Time Investment: 3 to 5 minutes to inflate a low tire; 5 to 7 minutes to execute a safe jump start. Total procedure time ranges from 12 to 18 minutes.
- Financial Cost: Quality portable 2-in-1 lithium jump starter and tire inflator combo units range from $80 to $180. Hiring a mobile roadside assistance service for a single jump start or tire fill typically costs $75 to $150, making a personal unit pay for itself on the first use.
Frequently Asked Questions
Can I use a tire inflator to pump up a totally flat tire?
Yes, a portable tire inflator can fully reinflate a completely flat tire, but it will take longer (typically 8 to 12 minutes) and put heavy thermal stress on the internal compressor motor. Rest the device for 10 minutes halfway through the inflation cycle to prevent permanent thermal damage to the internal piston seals.
What should I do if my jump starter gets hot during use?
A warm outer housing is normal during high-amp engine cranking, but if the casing becomes excessively hot or smells like burning plastic, stop immediately. Disconnect the clamps and let the jump pack cool down in a shaded area for at least 15 minutes before making any further attempts to start the vehicle.
Do I need to recharge my 2-in-1 jump pack after every use?
Yes, you must recharge your portable unit via its USB-C or wall charger immediately after using either the inflator or the jump starter function. Lithium-ion batteries self-discharge over time and drop below operational thresholds within 3 to 6 months if left uncharged in a vehicle trunk.
Can a jump starter damage my car computer?
Traditional jumper cables connected to another running car can create voltage spikes that damage sensitive electronic control units. Modern portable lithium-ion jump starters feature built-in microprocessor surge protection that filters voltage spikes, making them completely safe for modern computerized vehicles when connected with correct polarity.
How often should I check the pressure in my tires?
You should check your vehicle tire pressure at least once every month and before taking any long road trips. Temperature fluctuations change tire pressure by approximately 1 PSI for every 10 degree Fahrenheit shift in ambient outdoor weather, making monthly adjustments critical for fuel economy and safety.


