Changing a tire without a rim—meaning mounting a bare tire onto an existing wheel—is a demanding mechanical procedure requiring manual tire irons, chemical lubrication, and significant physical effort.
Completing this task takes 45 to 60 minutes per tire for a prepared DIYer following an 8-step workflow involving bead breaking, leveraging, valve replacement, and bead seating, where proper technique prevents rim damage and tire failure.
Before You Start
- Time Required: 45 to 60 minutes per wheel
- Difficulty Level: Advanced / High Physical Exertion
- Cost: 20 to 50 USD (assuming you own basic hand tools, plus cost of new tires and valve stems)
- Required Tools & Materials:
- New Tire (1 per wheel)
- Valve Stem Tool (1 piece)
- New Rubber or Metal Valve Stem (1 piece per wheel)
- Bead Breaker Tool or heavy-duty slide hammer (1 unit)
- Tire Irons or Spoons: 2 to 3 pieces, minimum 24 inches long with tapered tips
- Rim Protectors: 2 to 4 plastic snap-on shields
- Tire Lubricant: 1 pint of dedicated vegetable-based tire mounting paste or thick soapy water solution in a spray bottle
- Air Compressor: Minimum 90 PSI output capability with high-volume delivery
- Tire Pressure Gauge: 1 dial or digital unit
- Wheel Weights: Clip-on (for steel wheels) or adhesive tape weights (for aluminum alloy wheels)
- Utility Knife and Wire Brush
- Prerequisite Conditions: Perform this work outdoors or in a well-ventilated garage on a flat, clean concrete floor. Wear heavy work gloves and safety glasses.
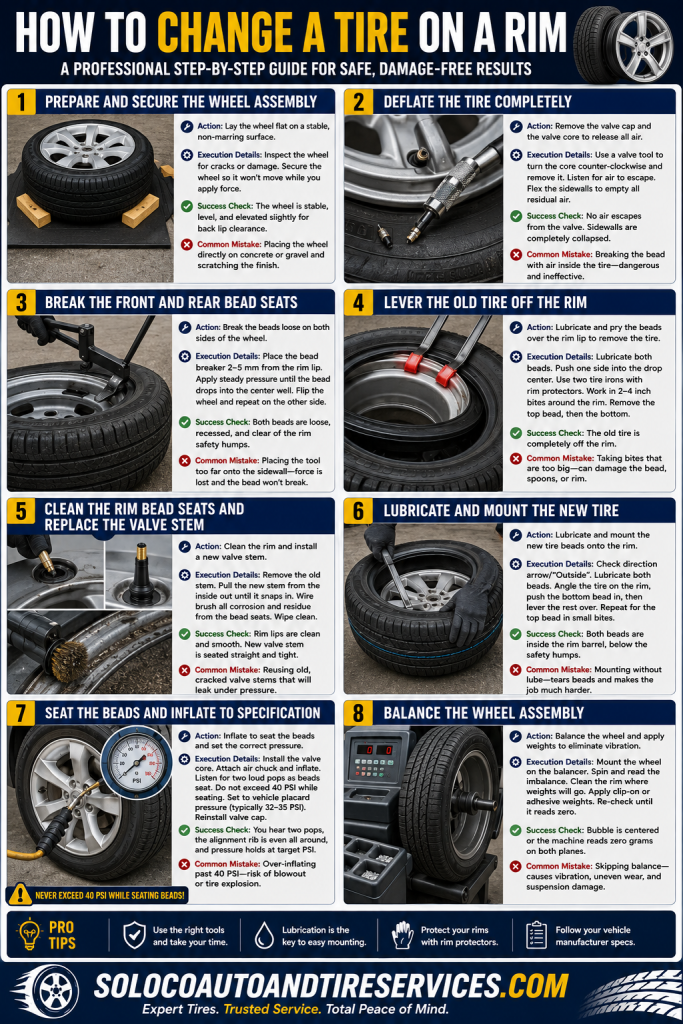
Step 1: Prepare and Secure the Wheel Assembly
- Action: Lay the wheel flat on a stable, non-marring surface such as a thick rubber mat, a piece of scrap plywood, or an old sacrificial tire to protect the face of the rim from scratches and impact damage.
- Execution Details: Inspect the wheel for pre-existing structural cracks, deep gouges, or severe corrosion. Position yourself over the wheel so you can use your body weight effectively during subsequent leverage tasks. If the wheel tends to slide across the floor while you apply force, place wooden wedges around the perimeter or have an assistant step on the tire tread.
- Success Check: You will know this step worked when the wheel sits completely stable, level, and elevated slightly off the concrete, allowing clearance for the back lip of the rim.
- Common Mistake: Placing a painted or polished aluminum wheel directly onto bare concrete or gravel, which ruins the cosmetic finish before the job even begins.
Step 2: Deflate the Tire Completely
- Action: Unscrew the plastic valve cap and remove the internal valve core entirely using a valve stem tool to let all pressurized air escape.
- Execution Details: Insert the tip of the valve stem tool into the center of the valve stem, engage the slots of the valve core, and turn counter-clockwise for 3 to 4 full rotations until the core is loose. Pull the core out straight. Cover the opening with a rag if pressure remains high. Listen for the hiss of escaping air until all compressed nitrogen or atmospheric air empties from the casing. Flex the rubber tire sidewalls inward with your hands to break any residual air pockets.
- Success Check: You will know this step worked when pressing the Schrader valve opening yields zero escaping air and the tire sidewalls collapse completely flat against each other.
- Common Mistake: Attempting to break the tire bead while air remains inside the chamber, which creates extreme resistance and potential explosive hazards.
Step 3: Break the Front and Rear Bead Seats
- Action: Separate the rubber tire beads from the inner metal rim seats on both sides of the wheel using a dedicated bead breaker tool or a heavy-duty slide hammer.
- Execution Details: Position the foot or pressing plate of your bead breaker tool directly on the sidewall rubber, exactly 2 to 5 millimeters away from the outer metal rim lip. Apply slow, steady downward mechanical leverage or strike the slide hammer until the rubber bead unseats and drops down into the center well of the wheel. You will hear a distinct crunching or popping sound as the bead releases its factory seal. Flip the wheel over and repeat this exact process on the back side of the rim around the entire 360-degree circumference.
- Success Check: You will know this step worked when both the front and rear tire beads are completely loose, recessed, and free of the metal safety humps on the rim.
- Common Mistake: Placing the bead breaker tool too far onto the center of the sidewall rubber, which absorbs the force without transferring it to the critical rim-to-bead interface zone.
Step 4: Lever the Old Tire Off the Rim
- Action: Lubricate both rim flanges heavily and pry the tire beads over the top lip of the wheel using two or three long tire irons.
- Execution Details: Spray a generous amount of tire lubricant or thick soapy water all around the exposed gap between the tire bead and the rim lip. Push one section of the top tire bead completely down into the deep center well on one side of the rim. This slack is mandatory because tire cords do not stretch. On the opposite side of the wheel, insert two tire irons between the top bead and the rim lip, spacing them roughly 6 to 8 inches apart. Snap plastic rim protectors onto the rim edge directly beneath your lever points if you are working with aluminum alloy wheels. Pry upward simultaneously on both tire irons to pull a 3 to 4-inch section of the bead up and over the rim flange. Leave the first iron in place, remove the second, and walk it around the circumference in 3-inch bites until the entire top bead is free. Reach inside the cavity, grab the bottom bead, angle it upward, and repeat the prying process to lift the bottom bead completely off the rim.
- Success Check: You will know this step worked when the old tire is entirely separated from the metal wheel and set aside.
- Common Mistake: Taking bites larger than 3 to 4 inches with the tire irons, which binds the steel bead wire, bends your tools, or tears the rubber casing.
Step 5: Clean the Rim Bead Seats and Replace the Valve Stem
- Action: Clean all corrosion from the rim sealing surfaces with a wire brush and install a fresh valve stem from the inside out.
- Execution Details: Use a utility knife to slice the old rubber valve stem in half from the inside of the rim, then push the remaining base out through the valve hole. Insert a new rubber snap-in valve stem from the interior side of the rim hole. Thread a valve stem puller tool onto the threaded tip, or use heavy-duty pliers protected by a rag, and pull firmly outward until the rubber base pops cleanly and securely into the valve hole with a sharp snap. Next, take a wire brush attached to a power drill or a manual hand brush and scrub away all rust, rubber residue, and oxidation from the inner rim lips where the new tire will seal. Wipe the surface clean with a lint-free shop towel.
- Success Check: You will know this step worked when the rim sealing flanges are smooth to the touch, free of flaky white aluminum oxidation or rust scale, and the new valve stem is firmly seated without tilting.
- Common Mistake: Reusing old, dry-rotted valve stems that crack under high pressure weeks after installation, causing slow leaks.
Step 6: Lubricate and Mount the New Tire
- Action: Apply extensive tire lubricant to both beads of the new tire and lever them over the rim lip while observing directional arrows.
- Execution Details: Examine the new tire sidewall for a directional rotation arrow or an “Outside” designation to ensure correct vehicle orientation. Coat both the top and bottom tire beads entirely with a thick layer of tire mounting paste or soapy water using a brush. Place the new tire over the top of the rim at a 45-degree angle, pushing the bottom bead down into the center well so that half of the bead slips underneath the top rim lip by hand. Insert two tire irons under the remaining section of the bottom bead and pry it completely over the rim edge. Next, position the top bead against the upper rim lip, push one section into the drop center, and use your tire spoons to take small 2-inch bites, working your way around the circumference until the entire top bead slips down into the rim cavity.
- Success Check: You will know this step worked when both the top and bottom beads of the new tire rest inside the barrel of the rim between the safety humps.
- Common Mistake: Dry mounting the tire without lubricant, which causes extreme friction that tears the rubber bead or bends your tire spoons.
Step 7: Seat the Beads and Inflate to Specification
- Action: Reinstall the valve core, apply high-volume compressed air to seat the tire beads onto the rim flanges, and adjust to the correct vehicle placard pressure.
- Execution Details: Reinstall the inner valve core into the valve stem using the valve stem tool and tighten it snugly. Attach your air compressor chuck directly to the valve stem. Open the regulator to deliver high-volume airflow. As air enters the sealed chamber, the tire sidewalls will expand outward toward the rim edges. Listen closely for two distinct, loud metallic “pops” or snaps as the rubber beads jump over the safety humps and lock tightly against the outer rim lips. Monitor the pressure gauge continuously; never exceed 40 PSI while attempting to seat stubborn beads. Once both beads are fully seated, release or add air until the pressure matches the exact vehicle manufacturer specification listed on the door jamb placard, typically 32 to 35 PSI for standard passenger cars. Screw the plastic valve cap back onto the stem.
- Success Check: You will know this step worked when you hear the two distinct bead pops, visual inspection confirms the raised alignment rib on the tire sidewall runs concentric and equidistant to the rim edge all the way around, and the pressure holds steady at the target PSI.
- Common Mistake: Over-inflating past 40 PSI to force a stubborn bead into place, which risks a catastrophic sidewall blowout or tire explosion.
Step 8: Balance the Wheel Assembly
- Action: Mount the newly assembled wheel and tire onto a dynamic or manual bubble balancer and apply counterbalance weights to eliminate high-speed vibrations.
- Execution Details: Place the wheel onto the cone and shaft of your balance machine. If using a manual bubble balancer, observe the central bubble indicator; if using a spin balancer, run a spin cycle to measure static and dynamic imbalance values in ounces or grams. The machine will indicate a heavy spot on one side of the assembly. Clean the corresponding inner or outer rim surface with a fast-evaporating solvent cleaner. Peel the backing off adhesive lead or steel tape weights matching the required weight value, or hammer clip-on weights onto the outer rim flange if using steel wheels. Re-spin or check the bubble level to verify that the assembly reads zero imbalance.
- Success Check: You will know this step worked when the bubble rests dead center or the balancer reads zero grams of imbalance on both planes.
- Common Mistake: Skipping the balancing step, which leads to severe steering wheel vibrations, uneven tread wear, and premature suspension component wear at highway speeds.
Common Mistakes and How to Fix Them
- Dry Mounting the Tire: Forgetting to apply lubricant or using petroleum-based products like WD-40 or engine oil, which degrades rubber and causes slip failure.
- Recovery: Deflate the tire, break the bead, clean off petroleum residue with brake cleaner, and reapply an approved vegetable-based tire mounting paste.
- Ignoring the Drop Center: Trying to pry the bead over the rim lip without pushing the opposite side of the tire down into the deep center well of the wheel.
- Recovery: Stop prying immediately to avoid bending your tools or tearing the bead. Push the opposing side deep into the well to create slack before continuing your lever bites.
- Dangerous Bead Seating Over-Inflation: Pumping air past 40 PSI when a bead refuses to seat.
- Recovery: Immediately stop inflation, disconnect the air chuck, remove the valve core to let air escape, inspect for damage, re-lubricate the rim flange, wrap a heavy-duty ratchet strap around the center tread to squeeze the sidewalls outward, and re-attempt inflation at lower pressures.
- Incorrect Rotation Direction: Mounting a directional or asymmetric tire backward on the rim.
- Recovery: Deflate the tire completely, break the beads on both sides, lever the tire off the rim, flip it to match the directional arrow on the sidewall, remount, and re-inflate.
Variations Based on Equipment and Wheel Types
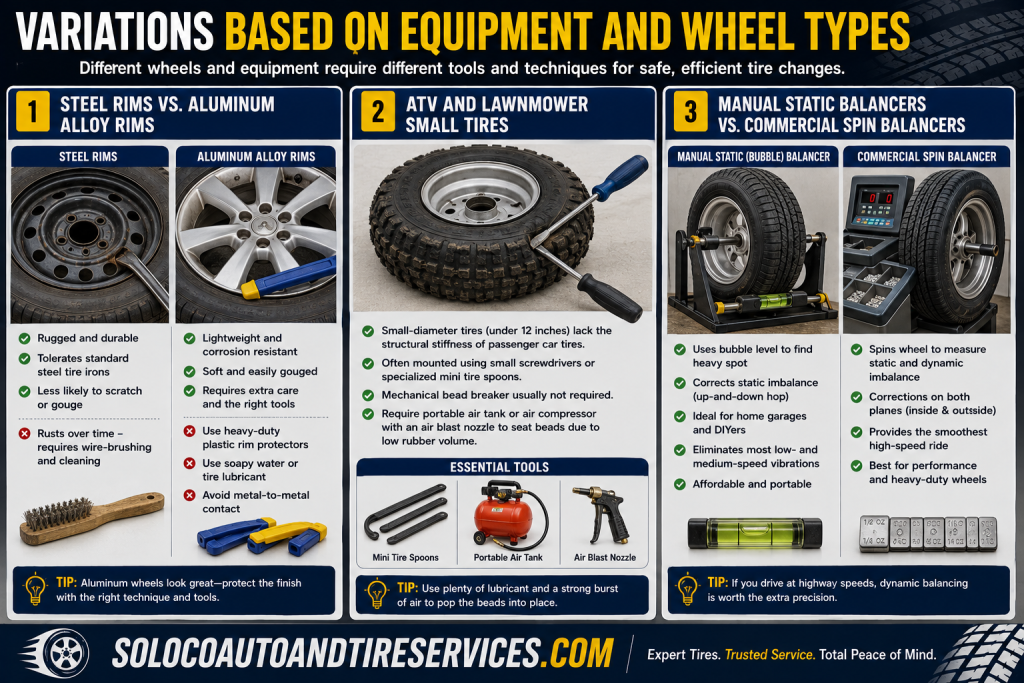
- Steel Rims vs. Aluminum Alloy Rims: Steel wheels are rugged and tolerate standard steel tire irons easily without surface degradation, but they rust and require wire-brushing. Aluminum alloy rims are soft and easily gouged; you must use heavy-duty plastic rim protectors and soapy water to avoid scratching the polished or painted clear-coat finish.
- ATV and Lawnmower Small Tires: Small-diameter tires (under 12 inches) lack the structural stiffness of passenger car tires. You can often mount them using small screwdrivers or specialized mini tire spoons without a mechanical bead breaker, but they require a portable air tank or an air compressor equipped with an air blast nozzle to seat beads due to their low rubber volume.
- Manual Static Balancers vs. Commercial Spin Balancers: Home mechanics without access to commercial dynamic spin balancers can achieve smooth results using a tabletop bubble balancer. While it only corrects static imbalance (up-and-down hop), it successfully eliminates most low- and medium-speed highway vibrations.
How Long Does It Take and What Does It Cost?
- Time Investment: An experienced DIYer requires 45 to 60 minutes per tire. A first-timer working with manual tools should budget 90 minutes to 2 hours per tire due to the physical effort required to break stubborn beads and master the lever technique.
- Financial Cost: Performing this task at home costs zero labor fees. Purchasing a basic kit consisting of two 24-inch tire irons, a valve stem tool, rim protectors, and a tub of tire mounting paste ranges from 30 to 60 USD. Professional shop mounting and balancing typically costs 20 to 40 USD per tire, meaning DIY tool investments pay for themselves within a single set of four tires.
Frequently Asked Questions
Can I change a tire without rims using regular hand tools?
Yes, you can change a tire without a rim using basic manual tools, provided you have at least two long tire irons (minimum 24 inches), a bead breaker tool, a reliable air compressor capable of delivering 90 PSI, and a generous supply of tire lubricant. Power tools are helpful but optional.
Why won’t my tire bead seal against the rim during inflation?
A tire bead fails to seal when there is insufficient air delivery volume, excessive gap clearance due to a narrow tire profile, or heavy corrosion on the rim flange. To fix this, remove the valve core to maximize airflow speed, apply a heavier layer of mounting paste, and wrap a ratchet strap around the center tread circumference to force the sidewalls outward.
Is it safe to use dish soap instead of professional tire lubricant?
Dish soap mixed with water works as an emergency lubricant substitute for mounting tires, but it is not ideal. Dish soap contains water and salt residues that promote rust on steel rims over time and lack the slip polymers found in professional vegetable-based tire mounting pastes, which dry tacky to prevent tire slip after inflation.
How do I prevent scratching my aluminum rims while using tire irons?
Prevent rim scratches by snapping thick plastic rim protectors over the metal flange directly underneath every spot where you insert your tire irons. Ensure your tire spoons have smooth, polished, rounded tips with no sharp burrs, and take small 2-inch bites rather than aggressive pulls.
What is the safest maximum pressure to use when seating a tire bead?
Never exceed 40 PSI of air pressure while attempting to seat stubborn tire beads. If a bead does not pop into place by 40 PSI, stop inflation immediately, release the air, inspect the assembly, re-lubricate the sealing surfaces, and correct the mechanical seating alignment before trying again.


