Freeing a heavily corroded or galvanic-welded wheel requires a precise sequence of chemical penetration, controlled mechanical shock, and rigorous safety protocols. You can accomplish this in 25 to 45 minutes across 8 systematic steps using basic garage tools, provided you prioritize vehicle stability above all else.
Before You Start
- Time Required: 25–45 minutes
- Difficulty Level: Intermediate (Physical / Mechanical)
- Typical Cost: $0 (if tools are owned) to $25 (for penetrating oil, wire brush, and anti-seize)
- Tools and Materials:
- Floor jack (rated for vehicle weight): 1
- Jack stands (matching vehicle capacity): 2
- Lug wrench or breaker bar with socket: 1
- Penetrating oil (WD-40 Specialist or PB Blaster): 1 can
- Dead blow hammer or heavy rubber mallet (3-4 lbs): 1
- Anti-seize lubricant tube: 1
- Wire brush: 1
- Safety glasses and mechanic gloves: 1 pair each
- Wheel chocks: 2
- Optional spare open-ended lug nuts: 2-3
- Prerequisite Conditions: Park on level, hard concrete pavement. Never attempt this on asphalt on a hot day or on a sloped grade.
Phase 1: Vehicle Securing and Initial Loosening
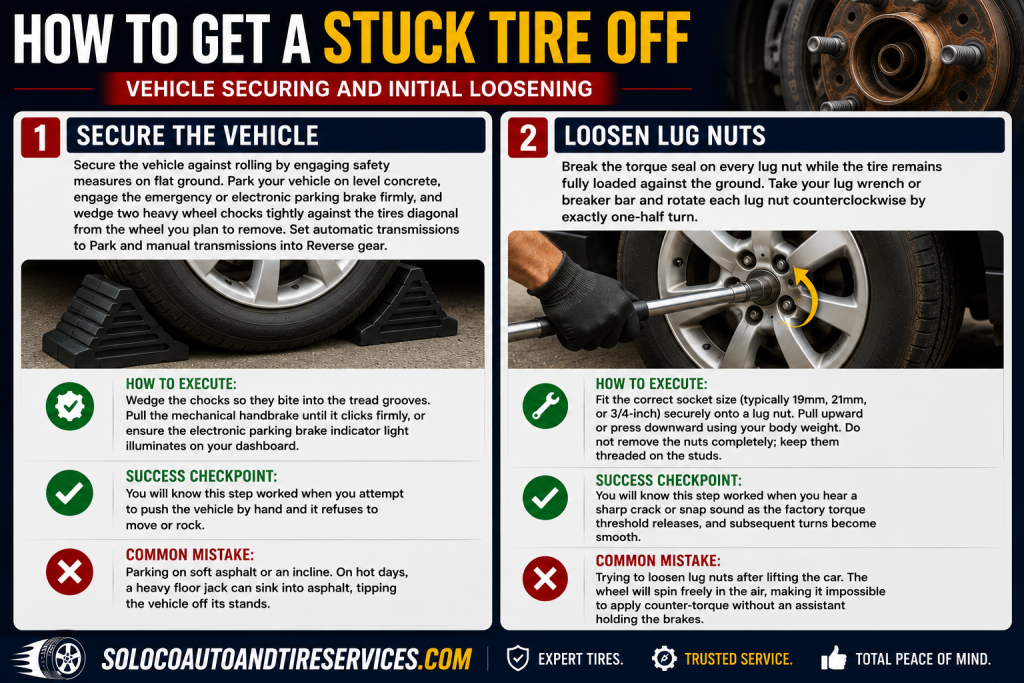
Step 1: Secure the Vehicle
Secure the vehicle against rolling by engaging safety measures on flat ground. Park your vehicle on level concrete, engage the emergency or electronic parking brake firmly, and wedge two heavy wheel chocks tightly against the tires diagonal from the wheel you plan to remove. Set automatic transmissions to Park and manual transmissions into Reverse gear.
- How to execute: Wedge the chocks so they bite into the tread grooves. Pull the mechanical handbrake until it clicks firmly, or ensure the electronic parking brake indicator light illuminates on your dashboard.
- Success Checkpoint: You will know this step worked when you attempt to push the vehicle by hand and it refuses to move or rock.
- Common Mistake: Parking on soft asphalt or an incline. On hot days, a heavy floor jack can sink into asphalt, tipping the vehicle off its stands.
Step 2: Loosen Lug Nuts
Break the torque seal on every lug nut while the tire remains fully loaded against the ground. Take your lug wrench or breaker bar and rotate each lug nut counterclockwise by exactly one-half turn.
- How to execute: Fit the correct socket size (typically 19mm, 21mm, or 3/4-inch) securely onto a lug nut. Pull upward or press downward using your body weight. Do not remove the nuts completely; keep them threaded on the studs.
- Success Checkpoint: You will know this step worked when you hear a sharp crack or snap sound as the factory torque threshold releases, and subsequent turns become smooth.
- Common Mistake: Trying to loosen lug nuts after lifting the car. The wheel will spin freely in the air, making it impossible to apply counter-torque without an assistant holding the brakes.
Phase 2: Elevation and Safety Setup
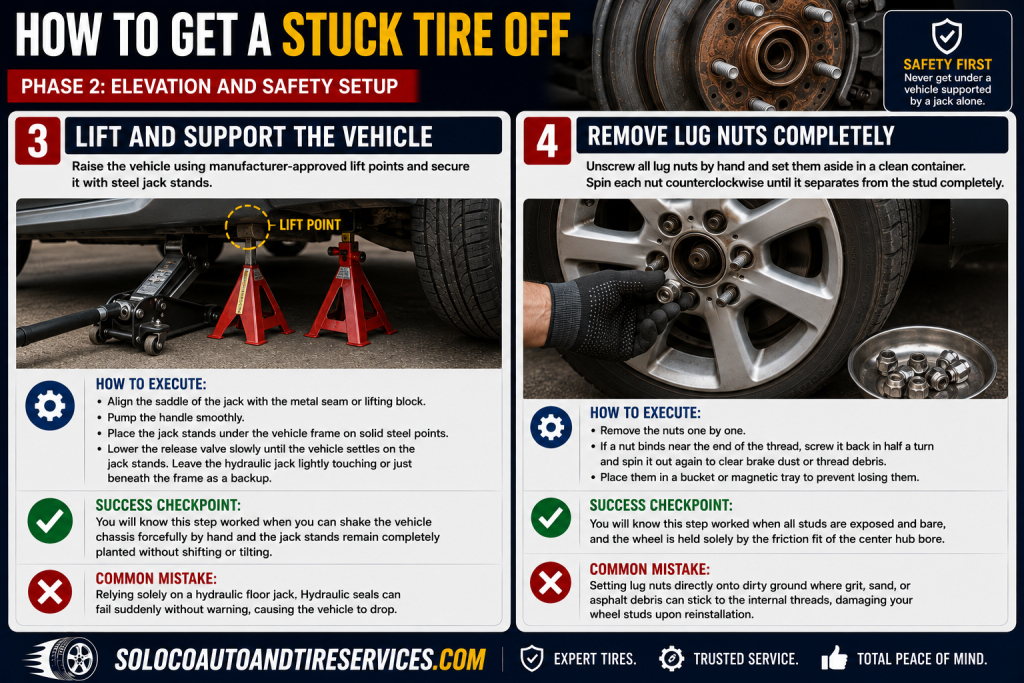
Step 3: Lift and Support the Vehicle
Raise the vehicle using manufacturer-approved lift points and secure it with steel jack stands. Position your hydraulic floor jack beneath the designated reinforced pinch weld or subframe junction specified in your owner manual. Pump the jack until the tire clears the ground by 2 inches, slide the jack stands into position under matching frame points, and slowly lower the vehicle until the stands bear 100 percent of the weight.
- How to execute: Align the saddle of the jack with the metal seam or lifting block. Pump the handle smoothly. Place the jack stands underneath the vehicle frame, ensuring the weight rests on solid steel rather than plastic side skirts. Lower the release valve on the floor jack gradually until the vehicle settles securely onto the jack stands. Leave the hydraulic jack lightly touching or just beneath the frame as a secondary backup.
- Success Checkpoint: You will know this step worked when you can shake the vehicle chassis forcefully by hand and the jack stands remain completely planted without shifting or tilting.
- Common Mistake: Relying solely on a hydraulic floor jack. Hydraulic seals can fail suddenly without warning, causing the vehicle to drop.
Step 4: Remove Lug Nuts Completely
Unscrew all lug nuts by hand and set them aside in a clean container. Spin each nut counterclockwise until it separates from the threaded stud completely.
- How to execute: Remove the nuts one by one. If a nut binds near the end of the thread, screw it back in half a turn and spin it out again to clear brake dust or thread debris. Place them in a bucket or magnetic tray to prevent losing them.
- Success Checkpoint: You will know this step worked when all studs are exposed and bare, and the wheel is held solely by the friction fit of the center hub bore.
- Common Mistake: Setting lug nuts directly onto dirty ground where grit, sand, or asphalt debris can stick to the internal threads, damaging your wheel studs upon reinstallation.
Phase 3: Chemical Penetration
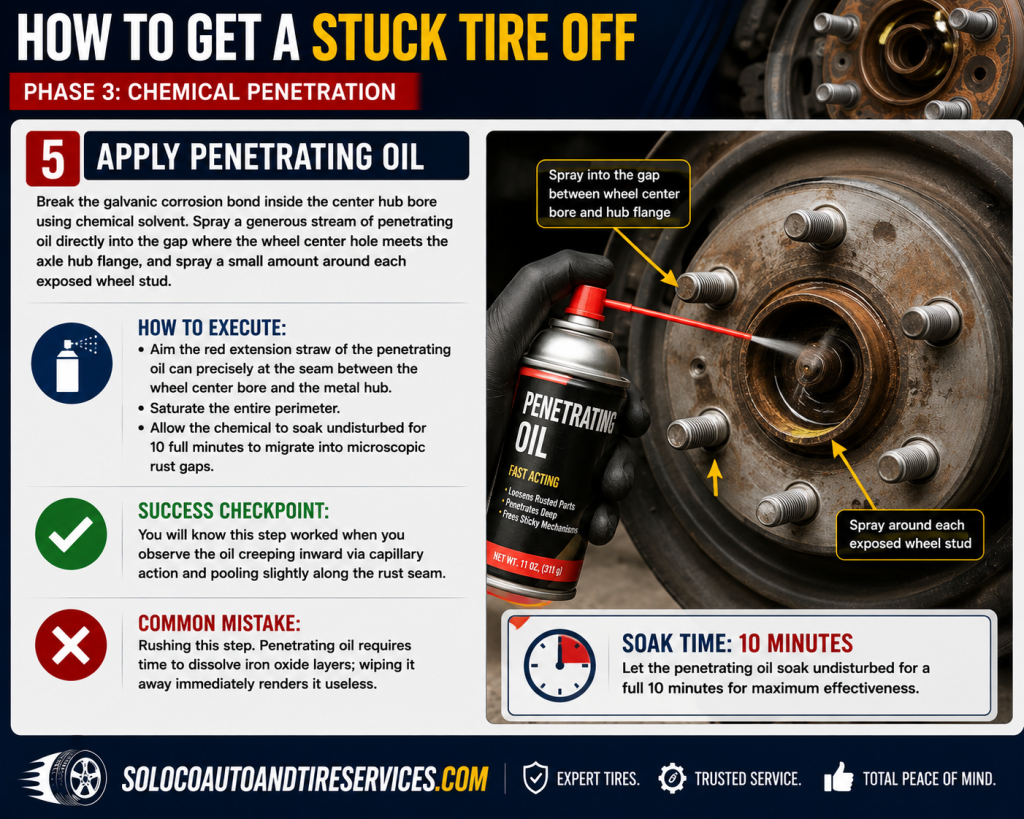
Step 5: Apply Penetrating Oil
Break the galvanic corrosion bond inside the center hub bore using chemical solvent. Spray a generous stream of penetrating oil directly into the gap where the wheel center hole meets the axle hub flange, and spray a small amount around each exposed wheel stud.
- How to execute: Aim the red extension straw of the penetrating oil can precisely at the seam between the wheel center bore and the metal hub. Saturate the entire perimeter. Allow the chemical to soak undisturbed for 10 full minutes to migrate into microscopic rust gaps.
- Success Checkpoint: You will know this step worked when you observe the oil creeping inward via capillary action and pooling slightly along the rust seam.
- Common Mistake: Rushing this step. Penetrating oil requires time to dissolve iron oxide layers; wiping it away immediately renders it useless.
Phase 4: Mechanical Extraction Techniques
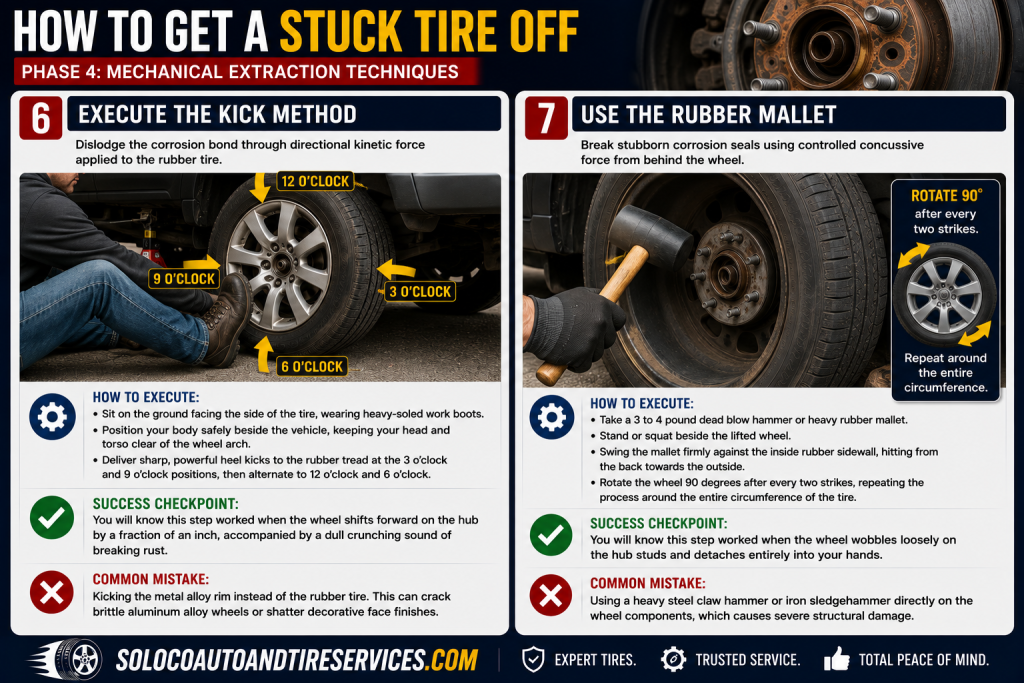
Step 6: Execute the Kick Method
Dislodge the corrosion bond through directional kinetic force applied to the rubber tire. Sit directly on the ground facing the side of the tire, put on heavy-soled work boots, and strike the outer tread edge firmly with your heel using alternating left and right side impacts.
- How to execute: Position your body safely beside the vehicle, keeping your head and torso clear of the wheel arch. Deliver sharp, powerful heel kicks to the rubber tread at the 3 o’clock and 9 o’clock positions, then alternate to 12 o’clock and 6 o’clock.
- Success Checkpoint: You will know this step worked when the wheel shifts forward on the hub by a fraction of an inch, accompanied by a dull crunching sound of breaking rust.
- Common Mistake: Kicking the metal alloy rim instead of the rubber tire. This can crack brittle aluminum alloy wheels or shatter decorative face finishes.
Step 7: Use the Rubber Mallet
Break stubborn corrosion seals using controlled concussive force from behind the wheel. Take a 3 to 4 pound dead blow hammer or heavy rubber mallet, reach behind the tire, and strike the inner sidewall or the back lip of the wheel outward.
- How to execute: Stand or squat beside the lifted wheel. Swing the mallet firmly against the inside rubber sidewall, hitting from the back towards the outside. Rotate the wheel 90 degrees after every two strikes, repeating the process around the entire circumference of the tire.
- Success Checkpoint: You will know this step worked when the wheel wobbles loosely on the hub studs and detaches entirely into your hands.
- Common Mistake: Using a heavy steel claw hammer or iron sledgehammer directly on the wheel components, which causes severe structural damage.
Phase 5: Cleaning, Prep, and Reassembly
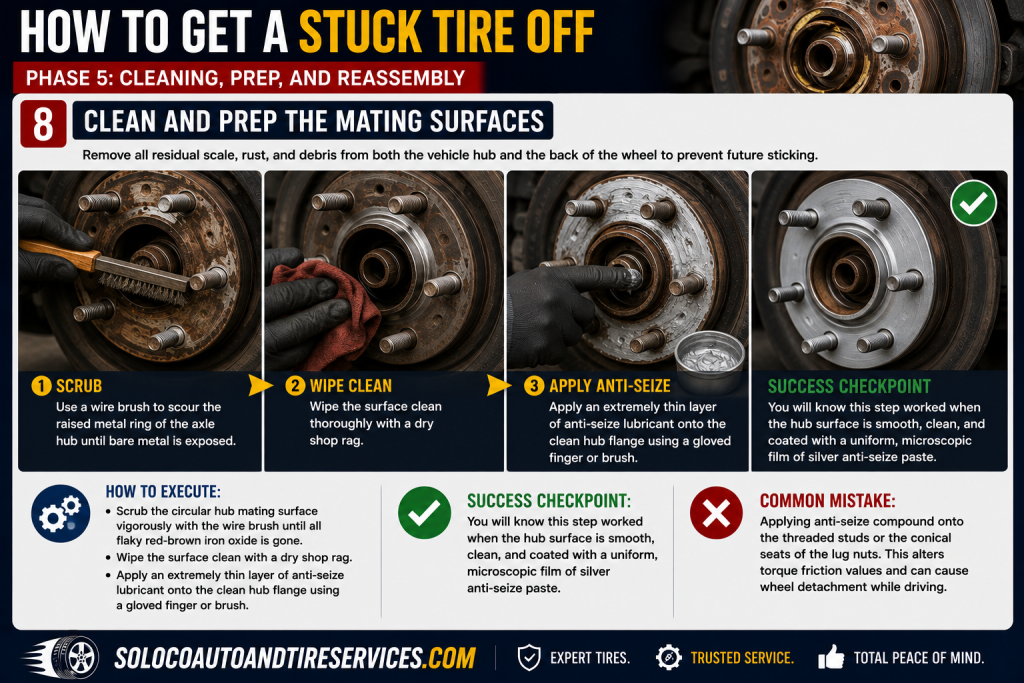
Step 8: Clean and Prep the Mating Surfaces
Remove all residual scale, rust, and debris from both the vehicle hub and the back of the wheel to prevent future sticking. Put on safety glasses and a wire brush to scour the raised metal ring of the axle hub until bare metal is exposed.
- How to execute: Scrub the circular hub mating surface vigorously with the wire brush until all flaky red-brown iron oxide is gone. Wipe the surface clean with a dry shop rag. Apply an extremely thin layer of anti-seize lubricant onto the clean hub flange using a gloved finger or brush.
- Success Checkpoint: You will know this step worked when the hub surface is smooth, clean, and coated with a uniform, microscopic film of silver anti-seize paste.
- Common Mistake: Applying anti-seize compound onto the threaded studs or the conical seats of the lug nuts. This alters torque friction values and can cause wheel detachment while driving.
Common Mistakes and How to Fix Them
- Mistake 1: The wheel remains locked despite hours of kicking and hammering.
- Recovery: Switch immediately to the Loose Lug Nut Roll Trick. Thread two old or open-ended lug nuts back onto opposite studs by hand, leaving exactly a 1/16-inch gap between the flat face of the nut and the wheel. Carefully lower the vehicle back down until the tires touch the ground. Start the engine, drive forward and backward slowly for 5 feet at a maximum speed of 2 mph, and apply the brakes firmly. The massive shearing weight of the vehicle breaking against those loose gaps will instantly crack the rust seal. Immediately re-lift the vehicle on jack stands to remove the nuts and wheel.
- Mistake 2: Penetrating oil fails to break through severe multi-year rust bonds.
- Recovery: Use a propane or butane micro-torch. Carefully direct flame heat at the center steel hub flange area for 2 minutes. The metal hub will expand slightly faster than the wheel bore, breaking the rust weld. Warning: Keep open flames away from the rubber tire sidewall, brake calipers, and rubber brake lines.
- Mistake 3: Stripping wheel studs during reinstallation due to oil contamination.
- Recovery: If anti-seize or penetrating oil drips onto the threaded studs, spray the studs thoroughly with non-chlorinated brake cleaner and scrub them with a wire toothbrush until completely dry and degreased. Never torque lubricated wheel studs.
Variations Based on Situations and Tools
- Field Breakdown on the Highway Roadside: If you are stranded without a rubber mallet or penetrating oil, use the spare tire itself as a battering ram. Remove all lug nuts, lift your full-size spare tire off the trunk floor, hold it horizontally by its tread, and swing it outward like a pendulum to strike the stuck mounted tire on its outer tread face.
- Alloy Wheels vs. Steel Wheels: Steel wheels can tolerate slightly more mechanical shock, but modern aluminum alloy wheels have soft material properties. Always cushion impacts by placing a block of wood between a hammer and a stubborn steel rim if rubber mallets prove ineffective.
- Severely Corroded Trailer Wheels: Trailer wheels exposed to saltwater boat ramps rust much faster than passenger cars. Soak the center hub overnight with specialized rust dissolver gel rather than light spray oils, as gel clings vertically to the hub face without running off.
How Long Does It Take and What Does It Cost?
- Time Investment: Expect the process to take 25 to 45 minutes for a standard stuck wheel. If you must resort to the loose-lug-nut rolling technique or apply heat treatment, add an extra 15 minutes.
- Financial Cost: Total expenditures range from $0 to $25. If you already own a jack, jack stands, and a lug wrench, buying a can of PB Blaster ($6), a wire brush ($3), and an anti-seize packet ($5) keeps total costs under $15.
Frequently Asked Questions
Can I use WD-40 classic formula to unstick a rusted tire?
Standard WD-40 is primarily a water dispersant and light lubricant, making it less effective for heavy corrosion. Specialized penetrating catalysts like PB Blaster, WD-40 Specialist Penetrant, or Kano Kroil possess superior surface tension properties designed specifically to wick into micro-gaps between rusted metals.
Why do wheels get stuck on the hub in the first place?
Wheels stick due to galvanic corrosion. This electrochemical reaction occurs when two dissimilar metals—typically an aluminum alloy wheel pressing against a steel or cast-iron vehicle axle hub—react in the presence of moisture and road salt, fusing the two components together like a weld.
Is it safe to drive with loose lug nuts to break a stuck wheel?
Driving with loose lug nuts is dangerous and should only be performed as a last-resort emergency method. Keep the vehicle speed under 2 mph, restrict the distance to less than 10 feet in a straight line on flat pavement, and ensure a 1/16-inch safety gap so the wheel cannot detach completely.
How do I prevent my wheels from getting stuck the next time I take them off?
Prevent future sticking by thoroughly cleaning both the vehicle hub mating surface and the inner wheel bore with a wire brush during every tire rotation or seasonal changeover. Apply a thin, uniform film of copper or nickel anti-seize paste to the flat hub face before mounting the wheel back on.
What torque specification should I use when putting the wheel back on?
Always consult your vehicle’s factory service manual for exact torque specifications, which typically range from 80 to 100 ft-lbs for standard passenger cars and up to 140 ft-lbs for heavy-duty trucks. Always tighten lug nuts in a star or criss-cross pattern using a calibrated torque wrench.


