Proper tire inflation maximizes fuel efficiency, extends tread life, and protects your safety on the road. This 7-step guide teaches you how to use portable air pump for car tire inflation accurately in 10 to 15 minutes, with zero prior experience required. Success depends entirely on setting your target pressure using the vehicle door placard rather than the maximum limit stamped on the tire sidewall.
Before You Start
- Time Required: 10 to 15 minutes total.
- Difficulty Level: Beginner.
- Typical Cost: 30 to 60 USD for a quality 12V portable air pump, or zero if using existing equipment.
- Tools and Materials Checklist:
- Portable 12V DC or rechargeable lithium-ion battery air pump (Quantity: 1).
- Car tire pressure gauge with digital or analog dial readout (Quantity: 1, optional if pump has an integrated digital display).
- Car owner’s manual or driver door jamb placard (Quantity: 1).
- 12V auxiliary power outlet (cigarette lighter port) or fully charged pump internal battery.
- Prerequisite Conditions: Park on a flat, dry, level concrete or asphalt surface away from moving traffic. Tires must be cold, meaning the car has been driven less than 1 mile or has sat parked for at least 3 hours.
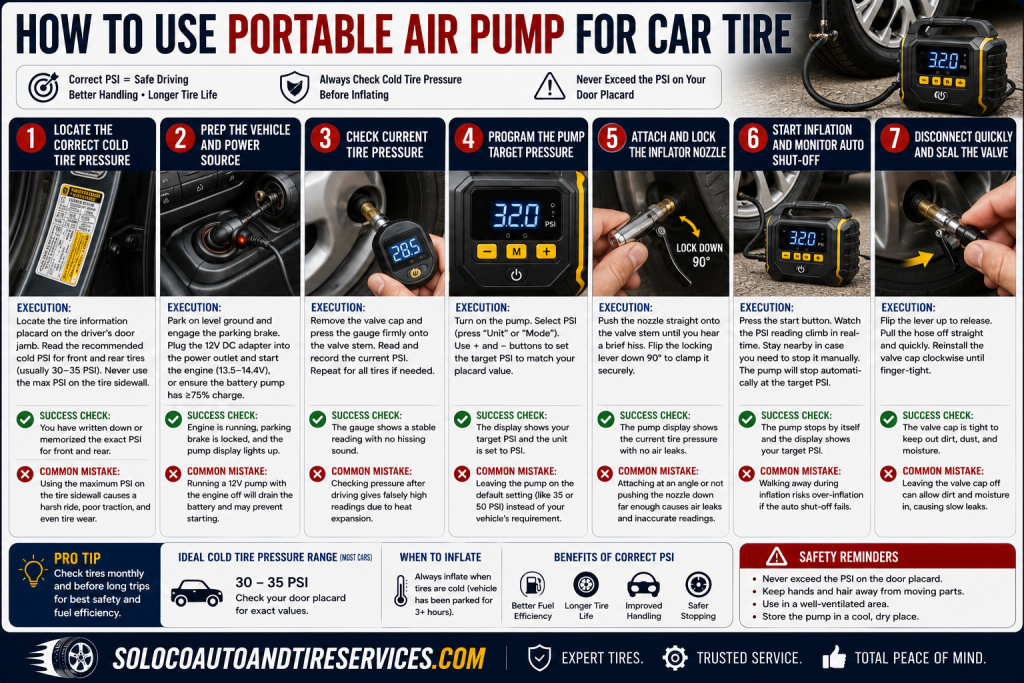
Step 1: Locate the Correct Cold Tire Pressure
Open the driver’s side door and read the tire information placard on the door jamb to find your vehicle manufacturer’s exact recommended PSI.
- Execution: Locate the yellow and white placard affixed to the B-pillar or edge of the driver’s door frame. Read the designated cold inflation pressures for the front and rear tires, which typically fall between 30 and 35 PSI for standard passenger vehicles. Never look at or use the maximum PSI rating printed on the tire sidewall, as that number represents the absolute structural limit of the rubber casing rather than the optimal operating pressure for your specific car model.
- Success Check: You will know this step worked when you have written down or memorized the exact PSI numbers for both front and rear axles.
- Common Mistake: Using the maximum PSI printed on the tire sidewall results in an overly stiff, bouncy ride, reduced traction, and premature center tread wear.
Step 2: Prep the Vehicle and Power Source
Park on a flat, level surface, engage the parking brake fully, and connect your portable pump to a stable power source.
- Execution: Pull the emergency or electronic parking brake firmly to prevent vehicle movement. If your portable pump runs on 12V DC power, plug the power cord adapter firmly into the vehicle center console auxiliary power outlet. Start the car engine to supply a steady 13.5 to 14.4 volts from the alternator, preventing the vehicle battery from draining during operation. If your pump uses an internal rechargeable lithium battery, ensure the battery indicator shows at least 75% charge capacity.
- Success Check: You will know this step worked when the car engine is running smoothly, the parking brake is locked, and the portable air pump display panel lights up with an active numerical readout.
- Common Mistake: Running a 12V compressor pump off a car battery while the engine is turned off will quickly drain the battery, leaving the vehicle unable to start.
Step 3: Check Current Tire Pressure
Remove the plastic valve stem cap and measure your starting baseline pressure using a reliable pressure gauge.
- Execution: Unscrew the small plastic valve stem cap counterclockwise from the target tire valve stem and store it safely in your palm or pocket. Press your digital or dial pressure gauge straight onto the metal valve stem firmly and squarely until the hissing sound stops completely. Read the digital display or analog needle position to record the exact cold PSI measurement. Repeat this across all four tires if you are performing a comprehensive seasonal adjustment.
- Success Check: You will know this step worked when the gauge provides a stable, repeatable numerical reading without any continuous hissing sound indicating air escape.
- Common Mistake: Checking tire pressure immediately after driving generates false high readings because friction heats the internal air and causes it to expand.
Step 4: Program the Pump Target Pressure
Turn on the portable air pump and configure the digital control interface to match your target placard PSI.
- Execution: Power on the portable air pump using its main power switch. Press the unit conversion button, often labeled as “Unit” or “Mode”, until the display screen shows PSI units rather than Bar, KPA, or Kg/cm squared. Tap the plus and minus buttons to adjust the target numerical display until it matches the exact placard PSI you recorded in Step 1.
- Success Check: You will know this step worked when the pump display reads the exact target PSI value with the unit indicator locked firmly on PSI.
- Common Mistake: Leaving the pump set to default factory settings (often 35 or 50 PSI) without adjusting it to match your specific vehicle placard requirements.
Step 5: Attach and Lock the Inflator Nozzle
Connect the pump hose nozzle securely to the tire valve stem and lock it in place to establish an airtight seal.
- Execution: Align the end of the pump hose nozzle straight with the tire valve stem threads to prevent cross-threading. Push the nozzle straight onto the stem until you hear a brief hiss of air. Immediately flip the quick-clip locking lever downward through a full 90-degree arc toward the hose to clamp the internal rubber gasket tightly against the valve core.
- Success Check: You will know this step worked when the pump display switches from zero to show your tire’s current actual pressure, and no hissing sound or air leakage is audible around the nozzle connection.
- Common Mistake: Pushing the nozzle on at a crooked angle or failing to push it down far enough before locking the lever, which causes air to leak and prevents the pressure from registering.
Step 6: Start Inflation and Monitor Auto Shut-Off
Press the start button on the inflator and let the unit automatically pump air until it hits your programmed target.
- Execution: Press the primary power or start button located on the pump housing or digital interface. Listen to the internal electric motor engage and watch the digital pressure readout climb steadily upward in real time. Keep your hand near the power switch to manually abort the cycle if any unusual mechanical binding or abnormal vibration occurs. Allow the pump to run until it reaches your exact target PSI, at which point the internal pressure sensor will trigger an automatic shut-off.
- Success Check: You will know this step worked when the pump motor stops running automatically and the screen displays your target PSI value solidly.
- Common Mistake: Walking away from the vehicle during inflation without monitoring the pump, which risks over-inflation if the automatic shut-off feature malfunctions.
Step 7: Disconnect Quickly and Seal the Valve
Release the locking mechanism, remove the hose from the valve stem, and reinstall the protective valve cap tightly.
- Execution: Flip the pump nozzle locking lever upward quickly through 90 degrees to release the clamp. Pull the hose straight off the valve stem in one swift motion to minimize any escape of air. Screw the plastic valve stem cap back onto the metal threads clockwise until it is finger-tight. Repeat this final disconnect procedure for any other tires you serviced.
- Success Check: You will know this step worked when the valve cap is screwed down tightly, preventing dirt and moisture from entering the valve core.
- Common Mistake: Leaving the protective plastic valve stem cap off, which exposes the delicate internal valve core to road salt, dust, and moisture that can cause slow air leaks.
Common Mistakes and How to Fix Them
- Inflating Hot Tires: Checking and inflating tires immediately after highway driving results in artificially high pressure readings due to heat expansion. Fix: Wait at least 3 hours after driving before checking pressure, or deflate tires slightly later once they cool down completely to your target placard specs.
- Overheating the Small Air Pump: Running compact portable compressors continuously for more than 10 to 15 minutes can melt internal plastic gears and burn out the electric motor winding. Fix: Allow the pump to rest and cool down for 10 minutes after every 8 minutes of continuous operation when inflating multiple low tires.
- Cross-Threading the Nozzle: Forcing the hose nozzle onto valve stem threads at an angle strips the brass threads and ruins the air chuck. Fix: Unscrew the nozzle completely, inspect the threads for damage, align the nozzle straight, and turn gently until it seats properly.
- Ignoring Faulty TPMS Warnings After Inflation: Correcting tire pressure does not always clear dashboard warning lights immediately on modern vehicles. Fix: Drive the car above 25 miles per hour for 10 to 15 minutes to reset the wheel speed sensors, or execute a manual TPMS calibration via your dashboard infotainment menu.
Variations
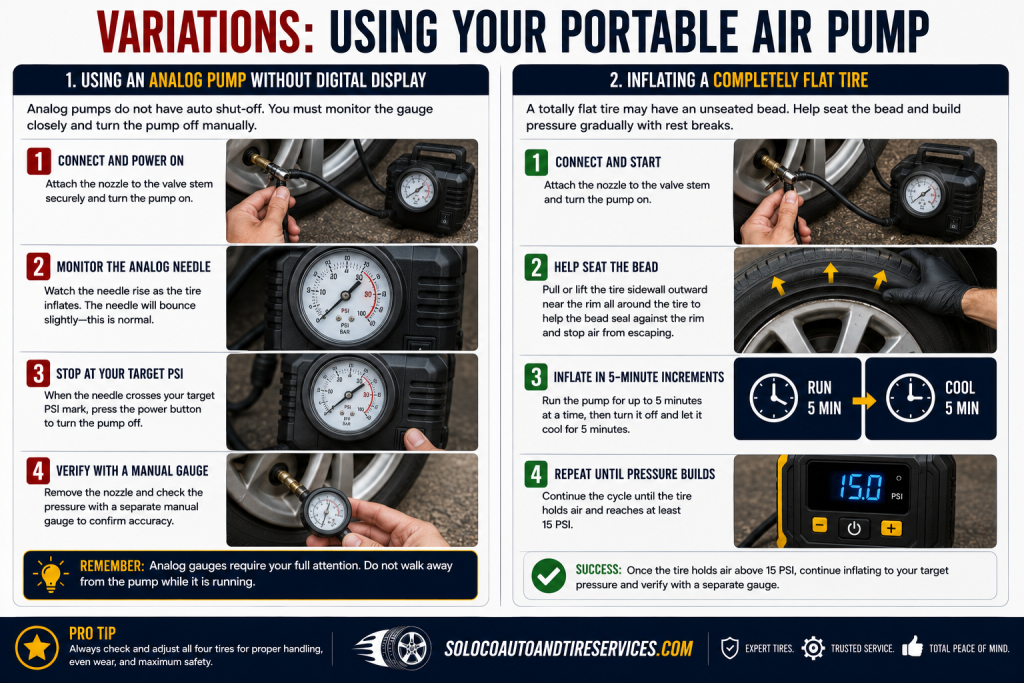
Using an Analog Pump Without Digital Display
If your portable air pump features an analog dial gauge instead of a digital screen with auto shut-off, you cannot program a target PSI. Instead, monitor the bouncing analog needle continuously while the pump runs. Watch the needle cross your target PSI mark on the dial face, press the power button to turn the pump off manually, and check the pressure with a standalone manual gauge to verify accuracy.
Inflating a Completely Flat Tire
If a tire has zero PSI due to a bead leak or total deflation, standard portable pumps may struggle to seal the tire bead against the wheel rim. In this scenario, connect the pump nozzle, start inflation, and gently pull or lift the tire sidewall outward near the rim to help seat the rubber bead and stop air from escaping out the sides. Run the pump in 5-minute increments with mandatory cooling breaks until pressure registers above 15 PSI.
How Long Does It Take / What Does It Cost
- Time Investment: Expect to spend 2 minutes per tire for a standard top-off adjustment (adding 3 to 5 PSI). Expect 6 to 10 minutes per tire if the tire is significantly deflated or low.
- Financial Cost: Basic 12V plug-in portable air pumps cost between 25 and 45 USD. Premium rechargeable lithium-ion cordless air pumps with digital preset controls range from 50 to 90 USD. Using air compressor stations at public gas stations typically costs 1.50 to 2.50 USD per session if you choose not to buy a portable unit.
Frequently Asked Questions
Can I use a portable air pump on a bicycle or sports ball?
Yes, most portable car tire air pumps include accessory needle adapters and tapered plastic nozzles stored in a compartment on the back or bottom of the unit. Attach the needle or tapered adapter to the rubber hose chuck to inflate bicycle tires with Presta or Schrader valves, sports balls, pool floats, and air mattresses safely.
Why does my portable pump shut off instantly after starting?
Your portable pump shuts off instantly if the target PSI setting on the digital display is set lower than the actual pressure currently inside your tire. Portable compressors feature safety shut-offs to prevent accidental deflation. To fix this, use the plus button to increase your target pressure setting above the tire’s current pressure before pressing start.
Should I let air out of my tires if they read high in the summer?
Do not release air from your tires simply because summer ambient temperatures caused the pressure to rise slightly above placard specs. Tire pressure naturally fluctuates about 1 PSI for every 10 degrees Fahrenheit change in outdoor temperature. Releasing air during a hot afternoon will leave your tires dangerously under-inflated when morning temperatures drop.
How often should I check my car tire pressure?
You should check your car tire pressure at least once a month and before any long-distance road trips. Tires naturally lose about 1 to 2 PSI per month through normal permeation of air molecules through the rubber casing, as well as dropping faster during seasonal weather transitions from warm to cold autumn months.
What should I do if my portable pump blows a car fuse?
If plugging your pump into the car 12V auxiliary outlet causes the power to cut out completely, you have blown the vehicle fuse protecting that circuit due to excessive initial electrical draw. Locate your car owner’s manual to find the fuse box diagram, pull the blown fuse using needle-nose pliers or a fuse puller, and replace it with a new fuse matching the exact same amperage rating.


