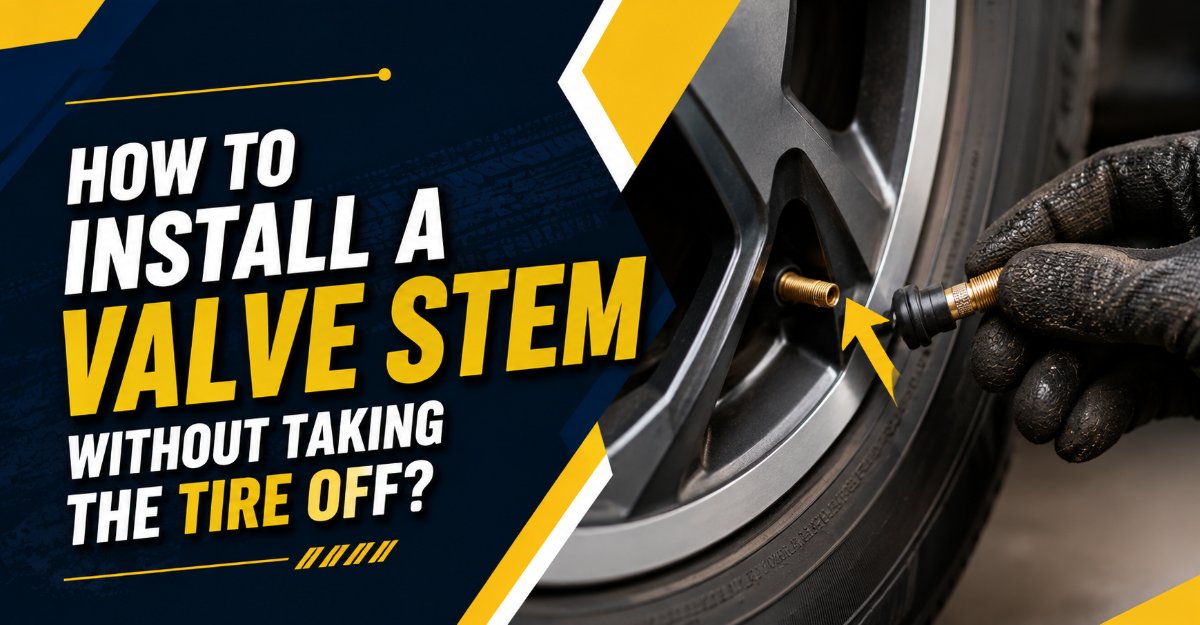
Replacing a broken or leaking tire valve stem without dismounting the tire from the wheel is a fast, highly efficient repair that can be completed in 10 to 12 minutes using a specialized external valve insertion tool kit. This comprehensive procedure outlines how to deflate the tire, extract the old stem, compress and seat a new rubber snap-in valve, and safely reinflate the wheel assembly without breaking the tire bead. Success relies heavily on correct lubrication, precise tool alignment, and verifying internal rim clearance before applying mechanical force.
Before You Start
- Total Time Required: 10 to 12 minutes per wheel.
- Difficulty Level: Intermediate mechanical DIY.
- Estimated Cost: 15 to 25 USD for an external valve stem insertion kit and replacement stems.
- Required Tools and Materials:
- Rubber Snap-In Valve Stem: 1 unit (Standard TR413 size, matching your wheel hole diameter of 0.453 inches).
- External Valve Stem Replacement Kit: 1 kit (includes hook tool, tapered compression cone, and steel plunger rod).
- Valve Core Removal Tool: 1 unit.
- Rubber-Friendly Lubricant: 2 to 3 drops of silicone spray or liquid dish soap.
- Air Compressor: 1 unit with a standard chuck attachment.
- Safety Glasses and Mechanics Gloves: 1 pair each.
- Round Wire Bore Brush: 1 unit (0.25-inch diameter for cleaning rim corrosion).
- Spray bottle filled with soapy water: 1 unit for leak testing.
- Prerequisite Conditions: The tire must be completely free of air pressure. You must verify that your wheel does not utilize an integrated bolt-on TPMS sensor directly positioned behind the valve hole.
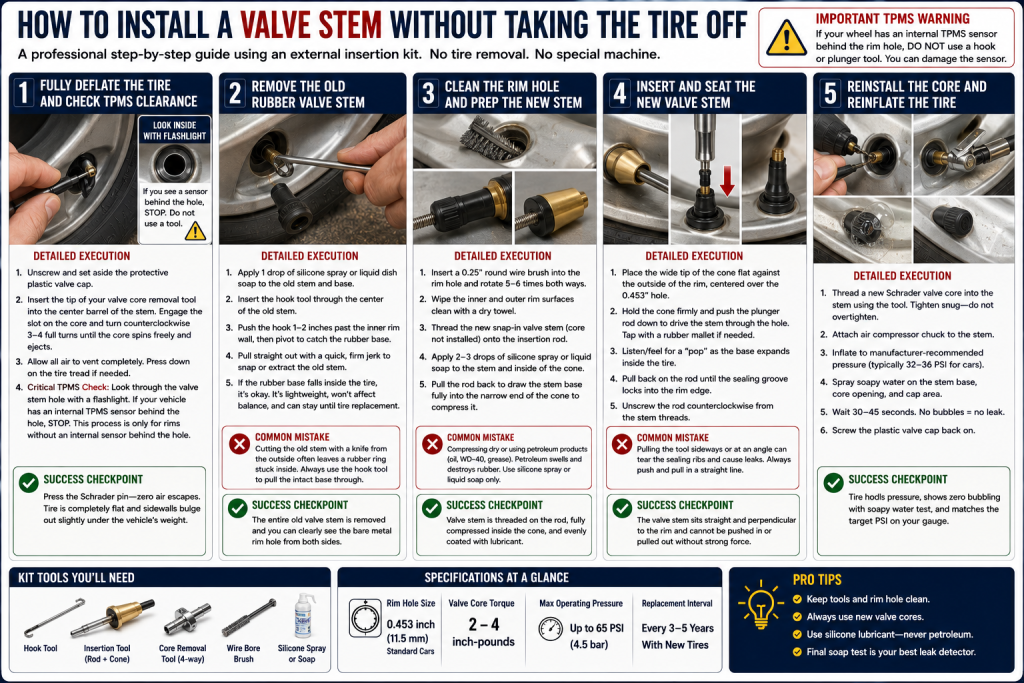
Step 1: Fully Deflate the Tire and Check TPMS Clearance
Remove the plastic valve cap, insert the valve core removal tool into the stem, and turn counterclockwise to completely unscrew and extract the inner Schrader valve core, allowing all compressed air to escape until the tire is completely flat.
Detailed Execution
- Unscrew and set aside the protective plastic valve cap.
- Insert the tip of your valve core removal tool straight into the center barrel of the valve stem. Engage the slot on the core, and rotate counterclockwise for 3 to 4 full turns until the core spins freely and ejects.
- Allow all air to vent completely from the tire. Press down lightly on the tire tread with your foot if necessary to accelerate deflation.
- Critical TPMS Check: Look through the valve stem hole using a flashlight. If your vehicle uses an internal clamp-in or snap-in TPMS sensor module positioned directly behind the rim hole, stop immediately. Pushing a metal hook tool or plunger rod into a wheel with an internal sensor will fracture the electronic housing. This procedure only applies to standard uninhibited rims or wheels where the sensor is offset from the valve hole.
Success Checkpoint
You will know this step is complete when pressing the Schrader valve pin yields zero escaping air and the tire sidewalls bulge outward slightly under the unsuppressed weight of the vehicle.
Step 2: Remove the Old Rubber Valve Stem
Spray a drop of silicone lubricant onto the base of the old stem, insert the hook tool through the center of the rim hole, catch the internal rubber shoulder, and pull firmly outward to snap or extract the old stem.
Detailed Execution
- Apply 1 drop of silicone spray or liquid dish soap directly into the opening of the old valve stem and around its outer base where it contacts the metal rim.
- Take the specialized steel hook tool from your external valve stem insertion kit. Push the pointed hook directly through the center hole of the old deteriorated valve stem.
- Push the hook 1 to 2 inches past the inner rim wall, then pivot the tool handle so the sharp metal hook catches the fat interior rubber base of the stem from the inside.
- Grip the tool handle firmly with both hands and pull straight outward with a quick, decisive jerk. The old rubber stem will shear or pull cleanly out of the 0.453-inch rim hole.
- If the rubber base detaches and falls inside the tire cavity, do not panic. A small loose piece of rubber inside a tire is lightweight, will not cause wheel imbalance, and can remain safely inside until the tire is eventually replaced.
Common Mistake
Trying to cut the old stem from the outside with a utility knife often leaves a stubborn rubber ring stuck inside the rim well. Always use the hook tool to pull the intact base through.
Success Checkpoint
You will know this step is complete when the entire old valve stem is out of your hand and you can clearly see the bare metal rim hole from both sides.
Step 3: Clean the Rim Hole and Prep the New Stem
Thoroughly scrub the rim hole with a wire brush to remove corrosion, then lubricate and compress the new rubber valve stem inside the installation funnel.
Detailed Execution
- Insert a 0.25-inch round wire bore brush into the rim hole and rotate it 5 to 6 times in both directions. This removes aluminum oxidation, dirt, and rubber residue that would otherwise prevent the new stem from forming an airtight seal.
- Wipe the inner and outer rim surfaces clean with a dry shop towel.
- Thread the new rubber snap-in valve stem (ensuring the internal Schrader core is not installed yet) onto the threaded tip of the insertion kit rod.
- Apply 2 to 3 liberal drops of silicone spray or liquid dish soap to the rubber body of the new valve stem and the inner walls of the tapered brass or plastic compression cone.
- Pull the insertion rod backward to draw the fat base of the rubber valve stem entirely into the narrow end of the tapered cone. This mechanical compression reduces the outer diameter of the rubber shoulder so it can pass through the small rim hole.
Common Mistake
Attempting to compress the valve stem dry or using petroleum-based lubricants such as motor oil, WD-40, or grease. Petroleum causes natural rubber to swell, degrade, and rupture within weeks. Stick strictly to silicone spray or pure liquid soap.
Success Checkpoint
You will know this step is complete when the valve stem is securely threaded onto the rod, completely enclosed and compressed inside the narrow taper of the cone, and coated evenly with lubricant.
Step 4: Insert and Seat the New Valve Stem
Press the loaded compression cone flat against the outside of the rim hole, drive the plunger rod downward to push the compressed rubber base through, and pull back to lock the sealing groove into place.
Detailed Execution
- Position the wide tip of the compression cone flat against the exterior face of the wheel rim, centering the tapered exit hole directly over the 0.453-inch rim opening.
- Hold the cone firmly against the wheel with one hand. With your other hand, push down forcefully on the steel plunger rod to drive the compressed rubber stem through the rim hole. If resistance is high, tap the top of the plunger rod lightly with a rubber mallet or dead blow hammer.
- Listen and feel for a distinct physical “pop” or tactile snap as the compressed rubber base clears the inner rim wall and expands inside the tire cavity.
- Pull back gently and steadily on the insertion rod until you feel the molded sealing groove of the valve stem lock securely into the edge of the rim hole.
- Unscrew the insertion rod counterclockwise from the valve stem threads.
Common Mistake
Pulling the insertion tool sideways or at an acute angle during extraction. This can tear the delicate sealing ribs of the new rubber stem, causing an unfixable leak. Always pull and push in strict axial alignment with the hole.
Success Checkpoint
You will know this step is complete when the valve stem sits completely straight, perpendicular to the rim surface, and cannot be pushed inward or pulled outward without substantial mechanical force.
Step 5: Reinstall the Core and Reinflate the Tire
Thread a new Schrader valve core into the stem, attach your air compressor chuck, and inflate the tire to the manufacturer-specified pressure while performing a final soapy water leak test.
Detailed Execution
- Take a clean Schrader valve core and thread it clockwise into the barrel of the newly installed valve stem using your core removal tool until snug. Do not overtighten, or you will strip the brass threads.
- Connect your air compressor hose chuck directly to the new valve stem.
- Inflate the tire back up to its correct manufacturer-recommended operating pressure, typically ranging from 32 to 36 PSI for standard passenger cars, checking the driver-side door placard for exact specifications.
- Spray the exterior base of the valve stem, the valve core opening, and the cap area liberally with your soapy water mixture.
- Observe the areas for 30 to 45 seconds to ensure no expanding foam bubbles appear, which would indicate a micro-leak.
- Screw the protective plastic valve cap back onto the stem.
Success Checkpoint
You will know the entire process is successful when the tire holds stable air pressure, shows zero bubbling during the soapy water test, and matches the target PSI on your pressure gauge.
Common Mistakes and How to Fix Them
- Air Leaks from the Base of the New Stem: If soapy water bubbles form around the bottom of the stem, the rubber shoulder failed to snap fully into the rim groove, or underlying corrosion is preventing a flush seal. Fix this by using a standard valve stem puller tool to tug the stem outward until it clicks. If bubbling persists, deflate the tire, remove the stem, and re-clean the rim hole with a wire brush.
- The Valve Stem Tears During Insertion: Tearing usually happens due to lack of lubrication or trying to force an incorrect size through the rim. Pull out the ruined stem, verify your rim hole diameter is standard 0.453 inches, coat the new replacement heavily in silicone, and retry.
- The Core Was Left Inside During Compression: Trying to compress a rubber stem that still has its internal valve core installed makes it physically impossible to draw the rubber base down into the tapered cone. Always unscrew and remove the inner core before loading the insertion tool.
Variations for Different Scenarios
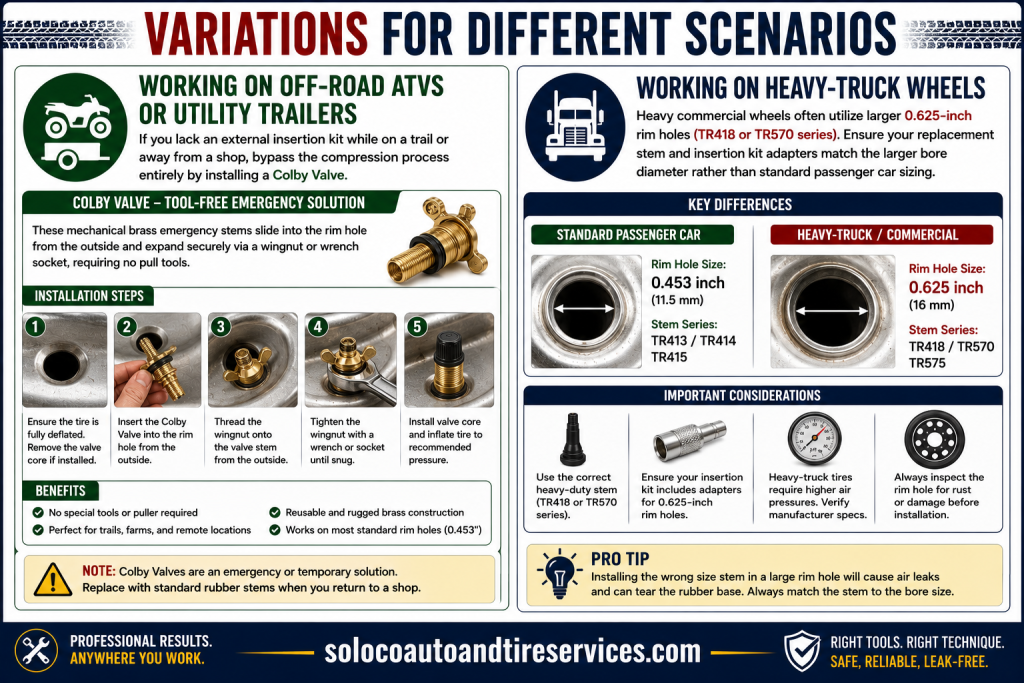
- Working on Off-Road ATVs or Utility Trailers: If you lack an external insertion kit while on a trail or away from a shop, bypass the compression process entirely by installing a Colby Valve. These mechanical brass emergency stems slide into the rim hole from the outside and expand securely via a wingnut or wrench socket, requiring no pull tools.
- Working on Heavy-Truck Wheels: Heavy commercial wheels often utilize larger 0.625-inch rim holes (TR418 or TR570 series). Ensure your replacement stem and insertion kit adapters match the larger bore diameter rather than standard passenger car sizing.
Frequently Asked Questions
Can I reuse an old valve stem if I take it out?
No, you cannot reuse a rubber snap-in valve stem. The rubber body permanently deforms and compresses during initial installation, and the internal sealing ribs degrade over time due to weather exposure and ozone. Always install a brand-new rubber valve stem during a repair.
Does this method work on aluminum and steel rims?
Yes, this external insertion method works equally well on both aluminum alloy and stamped steel wheels. The primary requirement is that the rim hole diameter measures the standard 0.453 inches and is free from deep structural pitting or heavy corrosion around the inner mating surface.
What happens if the old valve stem falls inside the tire?
If the rubber base shears off and drops into the tire cavity during extraction, it will do no mechanical harm. The loose piece of rubber is too light to affect wheel balancing, puncture the inner liner, or interfere with TPMS sensors, and it can remain safely inside until the tire is eventually replaced.
Do I need to rebalance my tires after replacing a valve stem?
No, replacing a standard rubber valve stem does not change the weight distribution of the wheel assembly enough to require dynamic rebalancing. The weight of a standard rubber TR413 stem is negligible and matches the weight of the component you removed.


