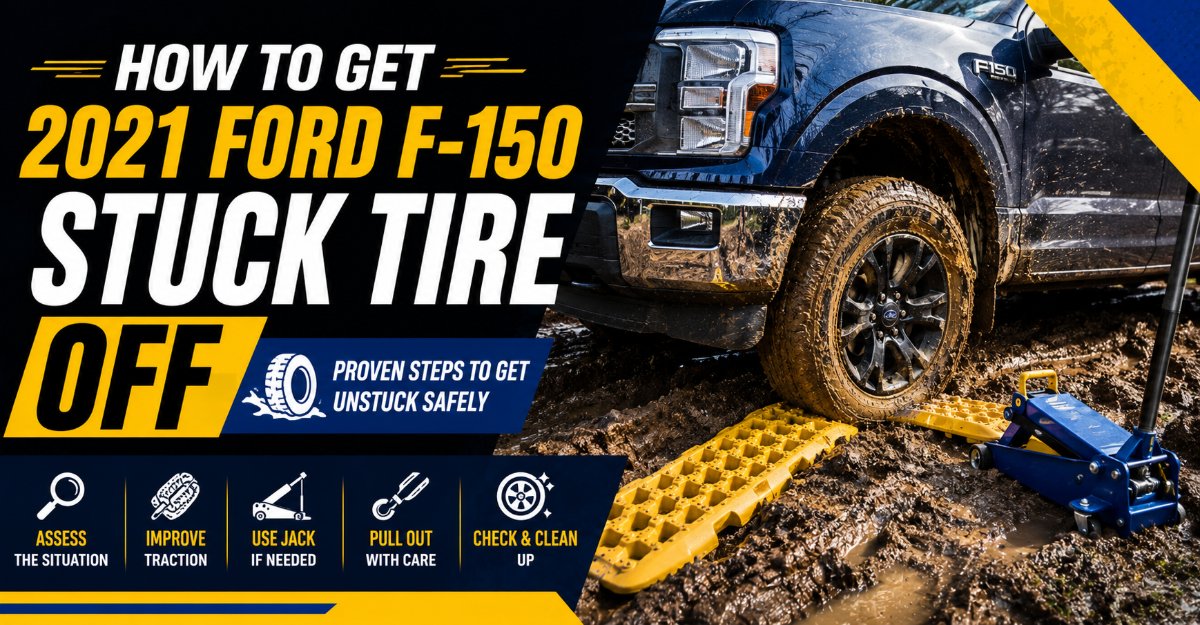
Removing a stuck wheel from a 2021 Ford F-150 requires safely elevating the truck, loosening the lug nuts, and breaking the severe galvanic corrosion bond holding the aluminum wheel to the steel hub. By following this ten-step process over 45 minutes, you will remove the stuck tire without damaging your rims, suspension, or safety components.
Before You Start
- Time Required: 45 to 60 minutes
- Difficulty Level: Intermediate
- Cost: $0 to $30 (depending on whether you already own penetrating oil, a wire brush, and a mallet)
- Tools and Materials:
- Hydraulic Floor Jack: 1 unit (minimum 3-ton capacity)
- Jack Stands: 2 units (minimum 3-ton capacity)
- Wheel Chocks: 2 units
- Breaker Bar or Lug Wrench: 1 unit with a 21mm or 13/16-inch deep socket
- Torque Wrench: 1 unit capable of reaching 150 lb-ft
- Penetrating Oil: 1 can of PB Blaster or WD-40 Specialist
- Dead Blow Mallet or Heavy Hammer: 1 unit (3 to 4 lbs)
- Scrap Wood Block: 1 piece of 2×4 lumber, roughly 12 inches long
- Wire Brush: 1 unit with steel bristles
- Anti-Seize Lubricant: 1 small tube (nickel or copper grade)
- Prerequisite Conditions: Park your 2021 Ford F-150 on flat, level, hard-paved asphalt or concrete. Never attempt this task on dirt, gravel, or an incline.
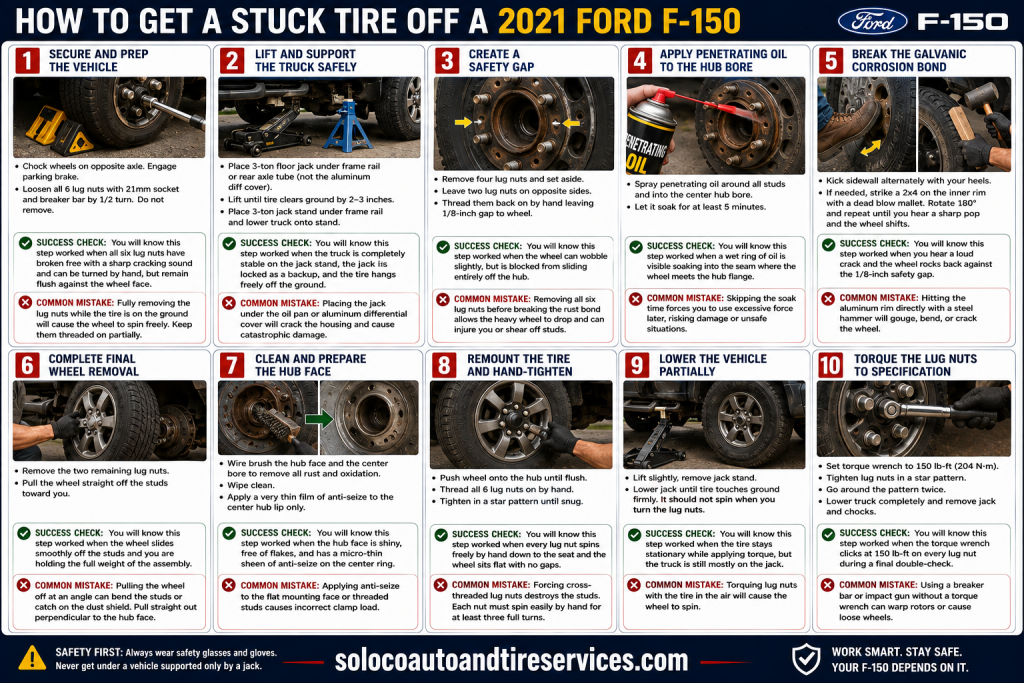
Step 1: Secure and Prep the Vehicle
Secure the truck against rolling and break the initial tension on the lug nuts while the weight of the vehicle is still planted firmly on the ground. Chock the wheels on the axle opposite the flat tire using your 2nd and 3rd wheel chocks placed snugly against the front and back of a single tire. Engage the electronic parking brake completely by pulling the dashboard switch upward until the indicator light illuminates steady red. Take your 21mm deep socket and breaker bar, fit it over each lug nut on the stuck wheel, and turn counterclockwise by exactly one half-turn to crack them loose. Do not remove the lug nuts completely at this stage.
- Success Check: You will know this step worked when all six lug nuts have broken free with a sharp cracking sound and can be turned by hand, but remain flush against the wheel face.
- Common Mistake: Fully removing the lug nuts while the tire is still on the ground will cause the wheel to spin freely when you try to apply torque to individual nuts. Keep them threaded on partially.
Step 2: Lift and Support the Truck Safely
Lift the corner of the vehicle using a robust hydraulic floor jack and lock it into place with a certified jack stand to create a safe workspace. Position your 3-ton hydraulic floor jack under the designated front frame rail jacking point or the rear axle tube, making sure to avoid the vulnerable stamped aluminum rear differential cover. Pump the jack handle upward to lift the truck until the stuck tire clears the ground completely by 2 to 3 inches. Slide your 3-ton jack stand underneath the frame rail near the factory jacking notch, and lower the hydraulic jack slowly until the weight of the truck rests securely on the jack stand.
- Success Check: You will know this step worked when the truck is completely stable on the jack stand, the hydraulic jack is locked as a secondary safety backup, and the stuck tire hangs freely off the ground.
- Common Mistake: Placing the floor jack under the thin sheet metal oil pan or the aluminum rear differential housing will crack the casing and cause catastrophic structural or fluid failure. Always verify you are contacting solid frame steel or heavy-duty axle tubing.
Step 3: Create a Safety Gap
Create a physical retention barrier using two remaining lug nuts to prevent the heavy aluminum wheel from breaking loose suddenly and injuring you. Remove four out of the six lug nuts completely by hand and set them aside. Leave two lug nuts on opposite sides of the wheel pattern. Thread these two remaining nuts back onto the studs by hand until there is exactly a 1/8-inch gap between the flat face of the nut and the surface of the wheel.
- Success Check: You will know this step worked when the wheel can wobble slightly back and forth on the studs, but is blocked from sliding entirely off the hub assembly.
- Common Mistake: Removing all six lug nuts before breaking the rust bond allows the heavy 2021 F-150 wheel to drop instantly, crush your toes, or shear off your wheel studs.
Step 4: Apply Penetrating Oil to the Hub Bore
Penetrate the microscopic gaps between the steel hub lip and the aluminum wheel bore to dissolve the oxidation bond. Spray your penetrating oil generously into the circular gaps surrounding all six wheel studs and directly into the center hub bore where the center circle of the wheel meets the axle flange. Allow the chemical formulation to sit undisturbed for 5 minutes so it can wick deep into the threaded and mated surfaces.
- Success Check: You will know this step worked when you can visually see a thin wet ring of penetrating oil soaking into the seam where the wheel meets the hub flange.
- Common Mistake: Skipping the soak time forces you to use excessive physical violence against the tire, increasing the risk of knocking the truck off its jack stands. Give the chemicals time to work.
Step 5: Break the Galvanic Corrosion Bond
Break the electrochemical weld holding the aluminum alloy wheel to the steel hub using controlled directional impact forces. Sit flat on the ground facing the side of the tire. Alternately strike the left and right outer rubber sidewall of the tire firmly with the heel of your boot. If the tire does not budge after several hard kicks, place your scrap 2×4 wood block flat against the inner rim lip behind the tire. Strike the wood block sharply and repeatedly with your heavy dead blow mallet or 4 lb hammer from underneath the vehicle. Rotate the tire 180 degrees and repeat the process around the rim until you hear a sharp metallic pop and the wheel shifts backward to rest against your safety lug nuts.
- Success Check: You will know this step worked when you hear a loud cracking sound and the wheel visibly rocks or slides back against the 1/8-inch safety gap you left on the studs.
- Common Mistake: Hitting the aluminum alloy wheel rim directly with a raw steel hammer will gouge, bend, or crack the wheel permanently. Always use a rubber dead blow mallet or a wood buffer block.
Step 6: Complete Final Wheel Removal
Slide the loosened wheel completely off the hub assembly now that the corrosion bond has been successfully shattered. Remove the two remaining safety lug nuts completely by hand and set them down in a clean container. Grasp the tire firmly with both hands at the 9 o’clock and 3 o’clock positions. Pull the wheel straight off the hub studs toward you, keeping the weight balanced so it does not scrape against the threaded studs.
- Success Check: You will know this step worked when the wheel slides smoothly off the threaded studs and you are holding the full weight of the assembly.
- Common Mistake: Pulling the heavy truck tire off at an angle can bend the delicate threaded studs or catch on the brake dust shield. Pull straight out perpendicular to the hub face.
Step 7: Clean and Prepare the Hub Face
Scrub away the powdery white aluminum oxide and rust accumulation from the mating surfaces to prevent future bonding issues. Take your wire brush and scrub the flat face of the vehicle hub and the outer lip of the center bore until all white crust, scale, and debris are completely removed. Wipe the area clean with a dry shop towel. Apply a very thin, paper-thin film of anti-seize lubricant exclusively to the outer circumference of the center hub lip.
- Success Check: You will know this step worked when the steel hub face is shiny, free of flaky texture, and coated with a micro-thin sheen of anti-seize lubricant on the center register ring.
- Common Mistake: Applying anti-seize lubricant to the flat wheel mounting face or the threaded lug studs causes incorrect clamp loading. Keep lubricants strictly away from the studs and flat mounting pads.
Step 8: Remount the Tire and Hand-Tighten
Mount the tire back onto the vehicle and secure it hand-tight to center the wheel on the hub assembly. Lift the tire, align the holes with the six wheel studs, and push it straight back onto the hub until it sits flush against the brake rotor. Thread all six lug nuts back onto the studs by hand. Spin each nut clockwise until it is snug, following a star pattern across the 6-lug layout to ensure the wheel centers itself evenly on the hub register.
- Success Check: You will know this step worked when every lug nut spins freely by hand all the way down to the wheel seat, and the wheel sits completely flat against the brake rotor face without any gaps.
- Common Mistake: Forcing cross-threaded lug nuts on by hand or pneumatic impact wrench destroys the stud threads. Every nut must spin easily by hand for at least three full rotations.
Step 9: Lower the Vehicle Partially
Lower the truck partially off the jack stands so the tire bears enough weight to prevent rotation while you apply final torque. Use your floor jack to lift the vehicle slightly off the jack stand, pull the jack stand out from underneath the frame rail, and lower the hydraulic floor jack until the tire touches the pavement firmly. The tire should support just enough weight to keep it from spinning when you turn the lug wrench, but the majority of the truck’s weight should still rest on the hydraulic jack.
- Success Check: You will know this step worked when the tire remains stationary while you apply turning pressure to the lug nuts without the wheel spinning freely in the air.
- Common Mistake: Trying to torque lug nuts while the tire is completely suspended in the air causes the wheel to spin continuously, making it impossible to reach proper tension.
Step 10: Torque the Lug Nuts to Specification
Tighten all six lug nuts to the exact factory specification using a calibrated torque wrench in a strict star sequence. Set your torque wrench to 150 lb-ft (204 N·m) as specified by Ford for the 2021 F-150. Tighten the lug nuts in a crisscross star pattern across the six studs. Go around the star pattern twice to ensure every single lug nut maintains the identical clamping force. Once torqued, lower the vehicle completely to the ground and remove the floor jack and wheel chocks.
- Success Check: You will know this step worked when your torque wrench clicks firmly at 150 lb-ft on every single lug nut during a double-check sweep of the star pattern.
- Common Mistake: Estimating tightness using a standard breaker bar or impact gun without a torque wrench can warp brake rotors or cause loose wheels. Always use a calibrated torque wrench.
Common Mistakes and How to Fix Them
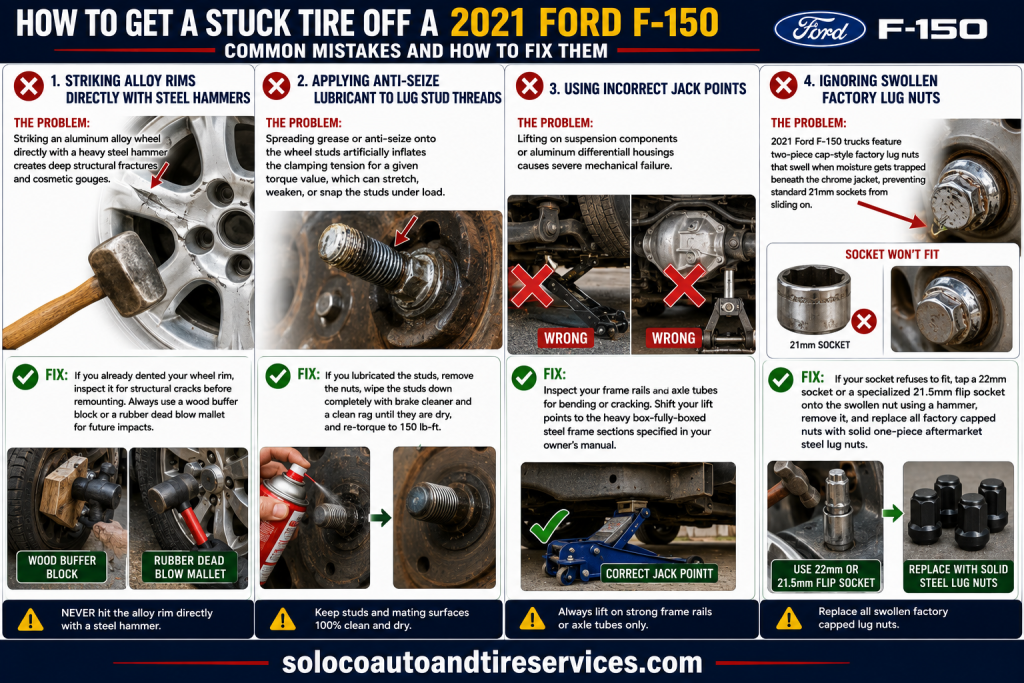
- Striking Alloy Rims Directly with Steel Hammers: Striking an aluminum alloy wheel directly with a heavy steel hammer creates deep structural fractures and cosmetic gouges. Fix: If you already dented your wheel rim, inspect it for structural cracks before remounting. Always use a wood buffer block or a rubber dead blow mallet for future impacts.
- Applying Anti-Seize Lubricant to Lug Stud Threads: Spreading grease or anti-seize onto the wheel studs artificially inflates the clamping tension for a given torque value, which can stretch, weaken, or snap the studs under load. Fix: If you lubricated the studs, remove the nuts, wipe the studs down completely with brake cleaner and a clean rag until they are dry, and re-torque to 150 lb-ft.
- Using Incorrect Jack Points: Lifting on suspension components or aluminum differential housings causes severe mechanical failure. Fix: Inspect your frame rails and axle tubes for bending or cracking. Shift your lift points to the heavy box-fully-boxed steel frame sections specified in your owner’s manual.
- Ignoring Swollen Factory Lug Nuts: 2021 Ford F-150 trucks feature two-piece cap-style factory lug nuts that swell when moisture gets trapped beneath the chrome jacket, preventing standard 21mm sockets from sliding on. Fix: If your socket refuses to fit, tap a 22mm socket or a specialized 21.5mm flip socket onto the swollen nut using a hammer, remove it, and replace all factory capped nuts with solid one-piece aftermarket steel lug nuts.
Variations
- What If You Are Working Without a Floor Jack (Emergency Roadside Kit)? If you are stranded on the side of the road with only the factory bottle jack and emergency scissor handle, the process remains the same, but stability is lower. Never crawl underneath the truck to strike the wheel with a mallet. Instead, rely entirely on kicking the outer rubber sidewall of the tire with your heel while keeping the factory bottle jack fully stable on a hard surface or a small plastic base plate.
- What If Kicking and Mallets Fail Completely? If extreme corrosion completely welds the wheel despite heavy striking, use the Loosened Lug Nut Weight Method: Thread all six lug nuts back onto the studs, but back them off by exactly one full turn from the wheel face. Lower the truck fully back onto the pavement. Start the engine, shift into drive, roll forward at 1 to 2 mph for 10 feet, and apply the brakes firmly. Shift into reverse, roll backward 10 feet, and tap the brakes firmly. The immense rolling mass of the F-150 will shear the rust bond loose against the loose nuts. Immediately lift the truck back up on the jack to finish removing the wheel.
How Long Does It Take and What Does It Cost
- Time Investment: Expect the job to take 45 to 60 minutes if the corrosion bond is stubborn and requires chemical soaking and multiple rotation strikes.
- Financial Cost: If you already own a basic socket set, jack, and jack stands, the cost is $0. Purchasing a can of penetrating oil, a wire brush, and a tube of anti-seize lubricant runs approximately $15 to $25 total at any local auto parts store.
Frequently Asked Questions
Why do 2021 Ford F-150 wheels get stuck so tightly?
2021 Ford F-150 wheels get stuck due to galvanic corrosion. The aluminum alloy of the wheel rim reacts chemically with the iron and steel of the vehicle hub flange when moisture and road salt bridge the two dissimilar metals, fusing them together like a solid weld over time.
Can I drive my F-150 with the lug nuts loosened to break the rust bond?
Yes, but only at walking speeds of 1 to 2 mph for a distance of under 10 feet in a controlled driveway or empty parking lot. Leaving the lug nuts backed off by one full turn provides a safe physical stop so the wheel pops loose without flying off the vehicle.
What is the exact torque specification for a 2021 Ford F-150?
The factory-specified torque setting for a 2021 Ford F-150 is exactly 150 lb-ft (204 N·m). You must use a calibrated torque wrench and tighten the six lug nuts in a crisscross star pattern to ensure uniform clamping pressure and avoid warped brake rotors.
Should I put anti-seize on my F-150 wheel studs?
No, you should never apply anti-seize lubricant or oil to your wheel stud threads. Lubricant changes the friction coefficient and causes over-torquing, which can stretch or snap your studs. Apply anti-seize only to the outer circle of the center hub lip where the wheel bore meets the flange.


