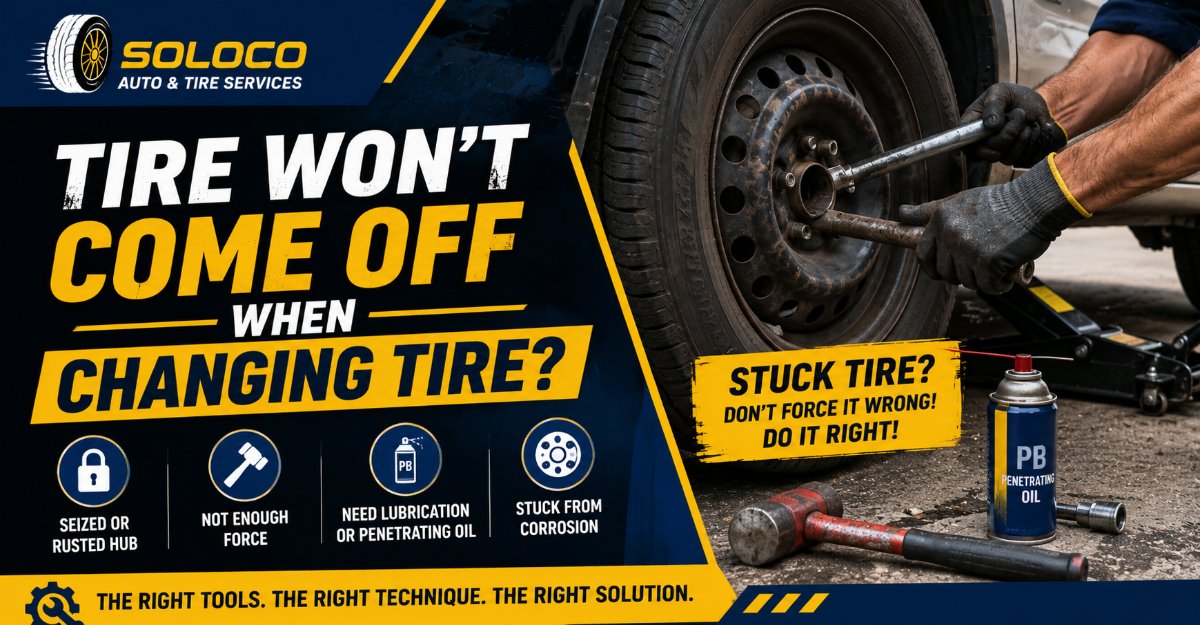
When a tire refuses to come off after all lug nuts are fully removed, the wheel rim has fundamentally bonded to the brake rotor or drum assembly through chemical oxidation and tight mechanical tolerances. This definitive guide covers the exact metallurgical causes of stuck wheels, a rigorous step-by-step removal procedure, tool comparisons, and preventative maintenance protocols to ensure you can safely resolve the issue whether you are in your home garage or stranded on the roadside.
Key Facts At a Glance
- Primary Cause: Galvanic corrosion between the steel wheel hub and the aluminum wheel center bore creates an expansive metal oxide bond.
- Safety Buffer: Threading two to three lug nuts back onto the studs with a quarter-inch gap prevents the wheel from violently detaching.
- Primary Mechanical Solution: Alternating physical impacts with a dead blow mallet around the tire sidewall breaks the interfacial bond.
- Emergency Method: The loosened-nut roll uses vehicle weight and brake torque to fracture heavy corrosion seals safely.
- Prevention Standard: Applying a thin film of nickel or marine-grade anti-seize to the hub mating surface stops future bonding.
What Causes a Wheel to Stick to the Hub?
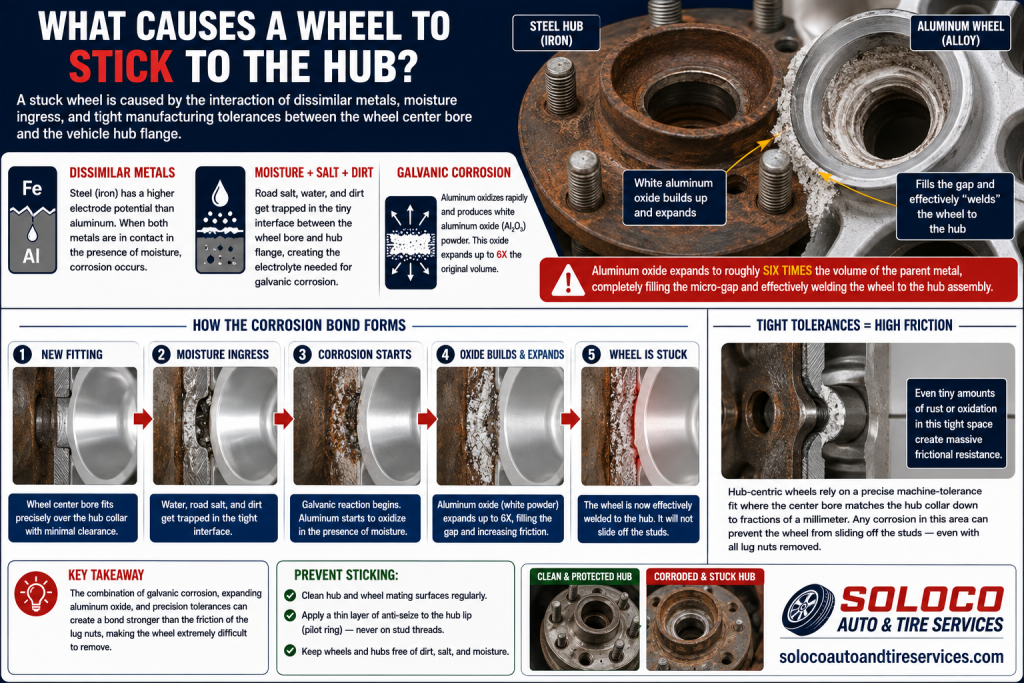
A stuck wheel is caused by the interaction of dissimilar metals, moisture ingress, and tight manufacturing tolerances between the wheel center bore and the vehicle hub flange. Modern vehicle hubs are predominantly manufactured from forged steel or cast iron, while aftermarket and factory wheels are almost exclusively cast or forged aluminum alloy.
When moisture, road salt, and dirt infiltrate the microscopic gap between these two dissimilar metals, an electrochemical reaction occurs known as galvanic corrosion. Steel has a higher electrode potential than aluminum, causing the aluminum wheel bore to oxidize rapidly in the presence of an electrolyte solution like salty road moisture. This chemical oxidation produces white aluminum oxide powder. Aluminum oxide expands to roughly six times the volume of the parent metal, completely filling the micro-gap and effectively welding the wheel to the hub assembly with high shear strength.
Furthermore, hub-centric wheels rely on a precise machine-tolerance fit where the center bore of the wheel matches the raised collar of the hub down to fractions of a millimeter. Even minor amounts of rust within this tight space create massive frictional resistance, preventing the wheel from sliding off the studs even when every lug nut has been removed.
Before You Start: Safety and Preparation Protocols
Attempting to remove a stuck wheel introduces significant kinetic and gravitational hazards that can result in severe personal injury or vehicle damage. Before applying any physical force or chemical treatments to a stubborn wheel, you must establish a stable working environment.
Park the vehicle on level, hard-paved concrete or asphalt, never on soft gravel or an incline. Engage the electronic or mechanical parking brake fully, and block the wheels remaining on the ground with wheel chocks. Raise the vehicle using a hydraulic floor jack placed strictly at the manufacturer-designated pinch weld or frame lift point, and immediately lower the chassis onto rated structural steel jack stands. Never rely on a hydraulic floor jack or an emergency scissor jack as the sole support mechanism while striking, kicking, or applying rotational torque to the vehicle.
Finally, thread two or three lug nuts back onto the wheel studs by hand, leaving approximately a quarter-inch gap between the nut face and the wheel mounting surface. This vital safety measure acts as a physical retention stop, ensuring that when the multi-hundred-pound corrosion bond suddenly fractures, the wheel cannot fly off the hub and injure you or damage the exterior body panels of the vehicle.
How to Remove a Stuck Wheel Step by Step
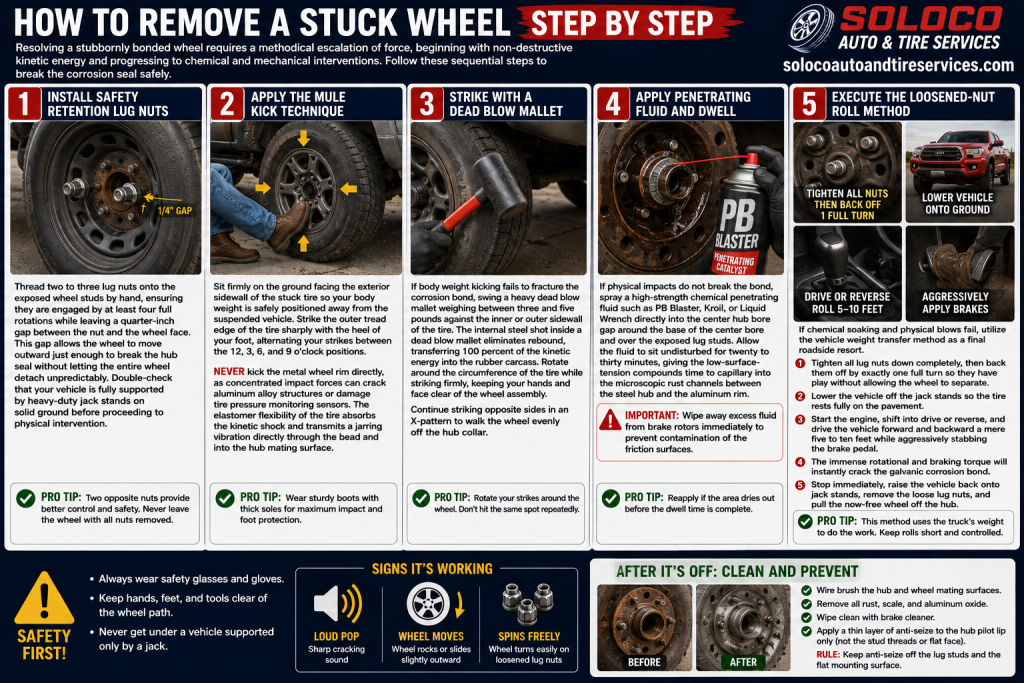
Resolving a stubbornly bonded wheel requires a methodical escalation of force, beginning with non-destructive kinetic energy and progressing to chemical and mechanical interventions. Follow these sequential steps to break the corrosion seal safely.
Step 1: Install Safety Retention Lug Nuts
Thread two to three lug nuts onto the exposed wheel studs by hand, ensuring they are engaged by at least four full rotations while leaving a quarter-inch gap between the nut and the wheel face. This gap allows the wheel to move outward just enough to break the hub seal without letting the entire wheel detach unpredictably. Double-check that your vehicle is fully supported by heavy-duty jack stands on solid ground before proceeding to physical intervention.
Step 2: Apply the Mule Kick Technique
Sit firmly on the ground facing the exterior sidewall of the stuck tire so your body weight is safely positioned away from the suspended vehicle. Strike the outer tread edge of the tire sharply with the heel of your foot, alternating your strikes between the 12, 3, 6, and 9 o’clock positions. Never kick the metal wheel rim directly, as concentrated impact forces can crack aluminum alloy structures or damage tire pressure monitoring sensors. The elastomer flexibility of the tire absorbs the kinetic shock and transmits a jarring vibration directly through the bead and into the hub mating surface.
Step 3: Strike with a Dead Blow Mallet
If body weight kicking fails to fracture the corrosion bond, swing a heavy dead blow mallet weighing between three and five pounds against the inner or outer sidewall of the tire. The internal steel shot inside a dead blow mallet eliminates rebound, transferring 100 percent of the kinetic energy into the rubber carcass. Rotate around the circumference of the tire while striking firmly, keeping your hands and face clear of the wheel assembly. Continue striking opposite sides in an X-pattern to walk the wheel evenly off the hub collar.
Step 4: Apply Penetrating Fluid and Dwell
If physical impacts do not break the bond, spray a high-strength chemical penetrating fluid such as PB Blaster, Kroil, or Liquid Wrench directly into the center hub bore gap around the base of the center bore and over the exposed lug studs. Allow the fluid to sit undisturbed for twenty to thirty minutes, giving the low-surface-tension compounds time to capillary into the microscopic rust channels between the steel hub and the aluminum rim. Wipe away excess fluid from brake rotors immediately to prevent contamination of the friction surfaces.
Step 5: Execute the Loosened-Nut Roll Method
If chemical soaking and physical blows fail, utilize the vehicle weight transfer method as a final roadside resort. Tighten all lug nuts down completely, then back them off by exactly one full turn so they have play without allowing the wheel to separate completely from the hub. Lower the vehicle off the jack stands so the tire rests fully on the pavement. Start the engine, shift into drive or reverse, and drive the vehicle forward and backward a mere five to ten feet while aggressively stabbing the brake pedal. The immense rotational and braking torque will instantly crack the galvanic corrosion bond. Stop immediately, raise the vehicle back onto jack stands, remove the loose lug nuts, and pull the now-free wheel off the hub.
Comparison of Stuck Wheel Removal Methods
Choosing the correct removal technique depends on the severity of the corrosion, available tools, and whether you are in a garage or stranded on the highway.
| Removal Method | Safety Risk | Equipment Required | Time Investment | Best Application Scenario |
| Dead Blow Mallet | Low | 3-5 lb Dead Blow Mallet | 5 to 10 minutes | Standard DIY garage maintenance |
| Penetrating Fluid | Very Low | Chemical Penetrant Spray | 20 to 30 minutes | Moderate to severe rust accumulation |
| Loosened-Nut Roll | Moderate | Factory Lug Wrench / Vehicle | 2 to 5 minutes | Emergency roadside stranded scenarios |
| Wood Block and Sledge | High | 2×4 Wood Block & Sledgehammer | 10 to 15 minutes | Heavy-duty trucks and utility vehicles |
Common Mistakes and How to Avoid Them
Attempting to force a stuck wheel off without proper methodology frequently leads to severe structural damage or physical injury. Avoid these common pitfalls during your wheel removal process.
Never strike an aluminum alloy wheel rim directly with a steel sledgehammer, metal pipe, or crowbar. Cast aluminum is brittle under direct point-load impacts, and a stray hammer blow will easily dent, crack, or structurally compromise the wheel rim, rendering it completely unsafe for highway use. Always strike the rubber tire sidewall or use an intervening block of dense hardwood to distribute impact energy.
Never work on a vehicle supported solely by an emergency mechanical scissor jack. Scissor jacks have small baseplates and are designed strictly for emergency lifting, not for absorbing the violent lateral and vertical forces generated when kicking or hammering a stuck wheel. A vehicle resting on an unsecured jack can easily slip and fall, causing catastrophic crushing injuries.
Avoid spraying penetrating oil indiscriminately onto brake rotors, brake calipers, or brake pads. Petroleum-based lubricants severely compromise friction material coefficients, leading to dangerous brake fade or total braking failure. Clean any overspray immediately using dedicated non-chlorinated brake cleaner before operating the vehicle.
How to Prevent Future Wheel Seizure
Preventing your wheels from seizing to the hub requires proactive maintenance during every seasonal tire rotation or brake service. Once the stuck wheel has been successfully removed, take the time to eliminate existing corrosion and apply preventative barriers.
Scrape away loose rust, scale, and aluminum oxide deposits from the vehicle hub mating face and the wheel center bore using a drill-mounted wire wheel brush, coarse steel wool, or a wire hand brush. Clean the surfaces thoroughly with brake cleaner and wipe them completely dry.
Apply a very thin, uniform film of marine-grade anti-seize lubricant or nickel-based anti-seize compound strictly to the flat mating surface of the center hub bore and the pilot ring collar. Never apply anti-seize compound to the tapered seating surfaces of the lug nuts or the threads of the wheel studs, as altering the friction coefficient on threaded fasteners causes incorrect clamping torque values when tightening the wheel back down, potentially leading to loose lug nuts while driving.
Frequently Asked Questions
Can I drive with loose lug nuts to get a stuck wheel off?
Yes, but only under strictly controlled, low-speed conditions known as the loosened-nut roll method. You must back the lug nuts off by no more than one full turn, keep vehicle speed under five miles per hour, and travel only a few feet while applying firm brake pressure. Driving at higher speeds with loose lug nuts will strip the wheel studs, elongate the bolt holes in the wheel rim, and cause the wheel to detach catastrophically.
Why do aluminum wheels stick to steel hubs worse than steel wheels?
Aluminum and steel are dissimilar metals with different electrochemical potentials. When exposed to moisture and road salt, they form an electrolytic cell that accelerates galvanic corrosion. Steel wheels do not create this specific galvanic reaction with steel hubs, making them significantly less prone to severe chemical bonding compared to aluminum alloy rims.
Is it safe to use a torch to heat a stuck wheel hub?
Using an open flame or torch to heat a stuck wheel hub is extremely dangerous and should be avoided by DIY mechanics. Excessive heat from a propane or oxy-acetylene torch will destroy the metallurgical temper of the steel hub flange, ruin wheel bearing grease seals, damage the wheel speed sensor wiring harness, and compromise the structural integrity of aluminum alloy wheels.
What should I do if none of the physical methods break the wheel loose?
If penetrating fluid, dead blow strikes, and the loosened-nut roll method all fail to release the wheel, the corrosion bond is severe enough to require professional assistance. Contact a mobile roadside assistance service or tow the vehicle to a professional repair facility where mechanics can utilize specialized hydraulic wheel pullers or high-leverage pneumatic separation tools to remove the stuck assembly safely.


