A tire pressure light illuminating after a tire rotation on a Nissan vehicle occurs because the vehicle’s electronic control unit registers a system mismatch where sensor identification codes are mapped to the wrong wheel positions. When technicians move the wheels, the direct tire pressure monitoring system sensors broadcast their radio frequency signals from new corners of the chassis, confusing the onboard computer until a relearn procedure maps the new physical layout.
Key Facts At a Glance
- Root Cause: Direct tire pressure monitoring system sensor identification codes are mapped to incorrect physical corners after wheel relocation.
- Cold Inflation Requirement: All four tires must be inflated precisely to the driver-side door jamb placard pressure before attempting any reset procedure.
- Solid vs. Blinking: A solid dashboard warning light indicates incorrect pressure or unmapped sensor locations, while a flashing light indicates a dead sensor battery or component failure.
- DIY Cost and Time: Most resets cost zero dollars and require between 10 and 30 minutes of driving or dashboard configuration.
- Spare Tire Monitoring: Higher trim Nissan sport utility vehicles monitor the full-sized spare tire, which can trigger warnings if its pressure drops during storage.
What Is a Nissan Tire Pressure Monitoring System and Why Does Rotation Trigger It?
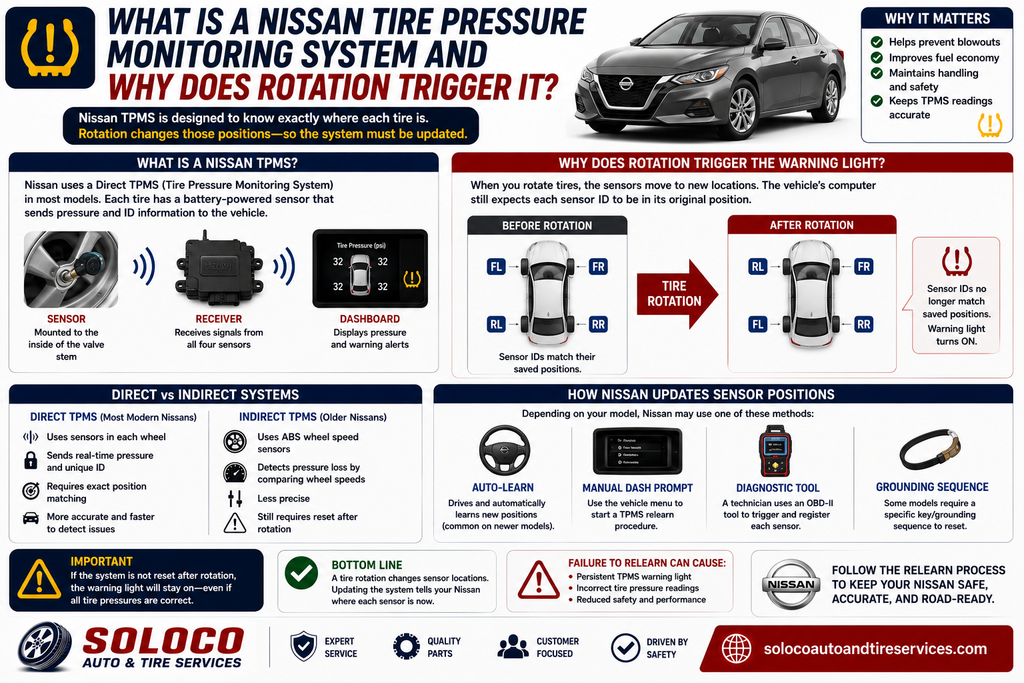
A Nissan tire pressure monitoring system consists of battery-powered radio frequency transmitters mounted to the inner side of each wheel valve stem that constantly broadcast unique identification numbers and pressure values to internal receivers. When you perform a tire rotation, the physical location of each sensor changes relative to the vehicle body controllers. Older vehicles rely on indirect systems that measure wheel speed discrepancies, but modern Nissan cars utilize direct systems that demand exact positional awareness.
If your Nissan features an auto-learning system, the vehicle recognizes the new positions automatically through signal triangulation as you drive. However, many models require manual dashboard prompts, diagnostic tool triggers, or specialized grounding sequences to update the internal memory map. Failing to execute this mapping protocol leaves the warning light illuminated even when tire pressures match factory specifications perfectly.
Before You Start: Essential Pre-Requisite Checks
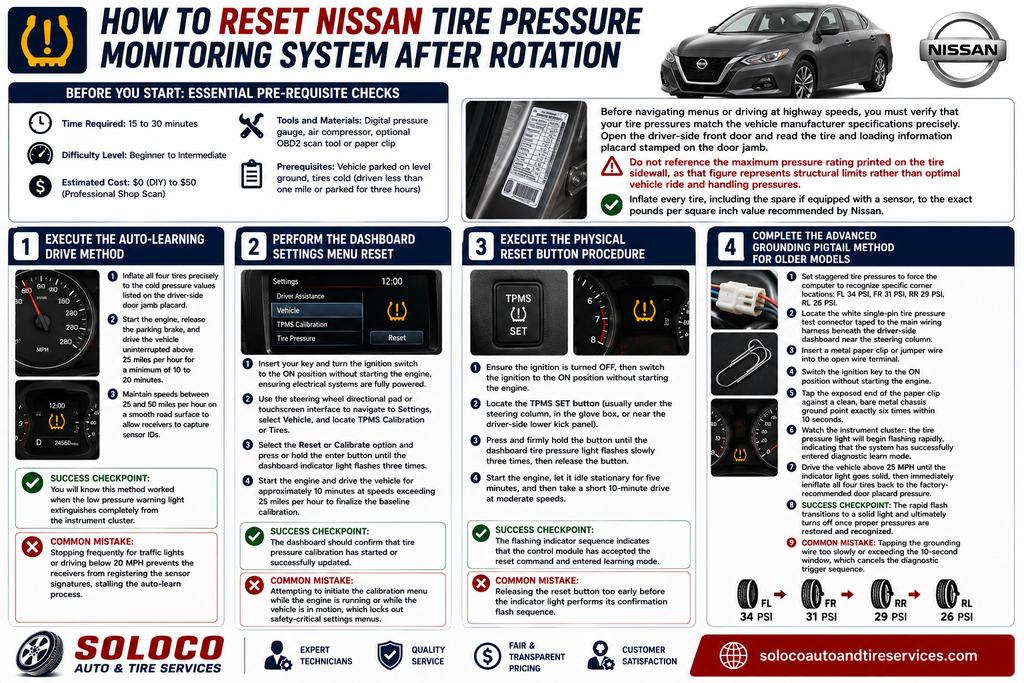
- Time Required: 15 to 30 minutes
- Difficulty Level: Beginner to Intermediate
- Estimated Cost: $0 (DIY) to $50 (Professional Shop Scan)
- Tools and Materials: Digital pressure gauge, air compressor, optional OBD2 scan tool or paper clip
- Prerequisites: Vehicle parked on level ground, tires cold (driven less than one mile or parked for three hours)
Before navigating menus or driving at highway speeds, you must verify that your tire pressures match the vehicle manufacturer specifications precisely. Open the driver-side front door and read the tire and loading information placard stamped on the door jamb. Do not reference the maximum pressure rating printed on the tire sidewall, as that figure represents structural limits rather than optimal vehicle ride and handling pressures. Inflate every tire, including the spare if equipped with a sensor, to the exact pounds per square inch value recommended by Nissan.
Step 1: Execute the Auto-Learning Drive Method
For modern Nissan vehicles equipped with auto-learning direct monitoring architecture, the onboard computer can map new sensor positions dynamically during a sustained drive cycle without manual button prompts.
- Inflate all four tires precisely to the cold pressure values listed on the driver-side door jamb placard.
- Start the engine, release the parking brake, and drive the vehicle uninterrupted above 25 miles per hour for a minimum of 10 to 20 minutes.
- Maintain speeds between 25 and 50 miles per hour on a smooth road surface to allow local wheel well receivers to capture the unique sensor identification codes.
- Success Checkpoint: You will know this method worked when the low pressure warning light extinguishes completely from the instrument cluster.
- Common Mistake: Stopping frequently for traffic lights or driving below 20 miles per hour prevents the receivers from registering the sensor signatures, stalling the automatic learning process.
Step 2: Perform the Dashboard Settings Menu Reset
Many late-model Nissan cars and sport utility vehicles feature digital instrument clusters or infotainment screens that allow direct calibration resets through the user interface settings menu.
- Insert your key and turn the ignition switch to the ON position without starting the engine, ensuring electrical systems are fully powered.
- Use the steering wheel directional pad or touchscreen interface to navigate to Settings, select Vehicle, and locate TPMS Calibration or Tires.
- Select the Reset or Calibrate option and press or hold the enter button until the dashboard indicator light flashes three times.
- Start the engine and drive the vehicle for approximately 10 minutes at speeds exceeding 25 miles per hour to finalize the baseline calibration.
- Success Checkpoint: The dashboard should confirm that tire pressure calibration has started or successfully updated.
- Common Mistake: Attempting to initiate the calibration menu while the engine is running or while the vehicle is in motion, which locks out safety-critical settings menus on most Nissan infotainment systems.
Step 3: Execute the Physical Reset Button Procedure
Older or specific trim levels of Nissan trucks and sedans feature a physical reset button located underneath the dashboard or inside storage compartments to trigger manual relearn routines.
- Ensure the vehicle ignition is turned completely off, then switch the ignition to the ON position without starting the engine.
- Locate the physical tire pressure monitoring system set button, which is typically tucked underneath the steering column, inside the glove box, or near the driver-side lower kick panel.
- Press and firmly hold the physical button until the dashboard tire pressure light flashes slowly three times, then release the button.
- Start the vehicle engine, let it idle stationary for five minutes, and then take a short 10-minute drive at moderate speeds.
- Success Checkpoint: The flashing indicator sequence indicates that the control module has accepted the reset command and entered learning mode.
- Common Mistake: Releasing the reset button too early before the indicator light performs its confirmation flash sequence.
Step 4: Complete the Advanced Grounding Pigtail Method for Older Models
Mid-2000s to early 2010s Nissan vehicles often require an advanced diagnostic grounding sequence using a simple wire or paper clip inserted into a dedicated test harness connector.
- Set staggered tire pressures to force the computer to recognize specific corner locations: Front-Left to 34 PSI, Front-Right to 31 PSI, Rear-Right to 29 PSI, and Rear-Left to 26 PSI.
- Locate the white single-pin tire pressure test connector taped to the main wiring harness beneath the driver-side dashboard near the steering column.
- Insert a metal paper clip or jumper wire into the open wire terminal of the test plug.
- Switch the vehicle ignition key to the ON position without starting the engine.
- Tap the exposed end of the paper clip against a clean, bare metal chassis ground point exactly six times within 10 seconds.
- Watch the instrument cluster: the tire pressure light will begin flashing rapidly, indicating that the system has successfully entered diagnostic learn mode.
- Drive the vehicle above 25 miles per hour until the indicator light goes solid, then immediately reinflate all four tires back to the factory-recommended door placard pressure.
- Success Checkpoint: The rapid flash transitions to a solid light and ultimately turns off once proper pressures are restored and recognized.
- Common Mistake: Tapping the grounding wire too slowly or exceeding the 10-second window, which cancels the diagnostic trigger sequence.
Common Mistakes and How to Fix Them
- Misinterpreting Sidewall Maximums: Mechanics and owners frequently inflate tires to the maximum PSI rating printed on the tire sidewall rather than the vehicle door placard, causing dangerous over-inflation and triggering electronic warnings. Fix this by adjusting pressures strictly to door placard specifications.
- Ignoring the Full-Size Spare: Nissan Pathfinder, Armada, and Titan trucks monitor spare tire pressures. If your spare loses air during storage, rotating tires or resetting the primary four wheels will fail to extinguish the dashboard warning. Check and inflate the spare tire to match factory requirements.
- Confusing Solid and Blinking Indicators: A solid light indicates pressure loss or unlearned sensor positions, whereas a blinking light for 60 seconds at startup indicates hardware failure, such as a depleted sensor battery or broken internal circuit. Reset procedures cannot fix physical hardware faults.
- Damaged Valve Stems During Rotation: Careless bead-breaking machines or abrupt tire spoons can snap delicate aluminum or rubber valve stems during a rotation. Inspect every valve stem base for hairline cracks or air leaks using soapy water if reset attempts fail repeatedly.
Comparison of Nissan TPMS Reset Approaches
| Reset Approach | Time Required | Cost | Technical Complexity | Best Suited For |
| Auto-Learning Drive | 15–20 minutes | $0 | Low | Modern Nissan cars and crossovers |
| Dashboard Settings Menu | 5 minutes | $0 | Low | Modern vehicles with digital clusters |
| Physical Dashboard Button | 5–10 minutes | $0 | Low to Moderate | Older Nissan trucks and select sedans |
| Grounding Pigtail Method | 15–30 minutes | $0 | High | Mid-2000s to 2010s Altima and Maxima |
| Professional OBD2 Scan | 10–15 minutes | $25–$50 | None | Stubborn systems or broken sensors |
Frequently Asked Questions
Will disconnecting the car battery reset the Nissan tire pressure monitoring system?
Disconnecting the vehicle battery will not reset stored tire pressure sensor position maps on a Nissan computer. The electronic control unit stores calibration data and sensor identification numbers in non-volatile memory that retains configuration data even when electrical power is removed entirely. You must complete a dynamic drive cycle, a dashboard menu calibration, or a specialized diagnostic reset procedure to clear position mismatch errors.
Can a generic OBD2 code reader reset a Nissan tire pressure light?
Standard generic engine code readers cannot reset tire pressure warning lights because they only access powertrain control modules. Resetting direct monitoring systems requires specialized diagnostic tools capable of communicating with the body control module or tire pressure control module to reprogram wheel sensor identification numbers and clear location mismatch fault codes.
Why does my tire pressure light turn back on a few days after a successful reset?
A warning light that returns shortly after a successful reset indicates a slow air leak, a failing valve core, or a cracked wheel rim rather than a positional rotation error. Environmental temperature drops can also cause tire pressures to fall below the low-pressure threshold, triggering a new warning even if the system has been properly calibrated.
Do tire shops reset the tire pressure system for free after a rotation?
Most national tire service chains and dealership service centers include tire pressure system calibration as part of a standard tire rotation service package. If you purchased your tires or rotation service from a professional retailer, you can typically request a complimentary diagnostic scan and sensor relearn procedure if your dashboard warning light remains illuminated.
How long do Nissan tire pressure sensor batteries last?
Original equipment manufacturer direct monitoring sensor batteries typically last between five and eight years before internal chemical energy depletes completely. When a sensor battery fails, the dashboard warning light will flash for approximately one minute upon vehicle startup and remain solid thereafter, requiring physical replacement of the sensor unit by a qualified tire technician.


