Evaluating tire health is essential for maintaining vehicle control, preventing catastrophic highway blowouts, and maximizing fuel economy. This comprehensive guide covers a precise six-step inspection process taking approximately 20 minutes total, requiring minimal household tools, and relying on tactile checks that reveal hidden structural wear long before a failure occurs.
Before You Start
- Time Required: 15 to 20 minutes total (about 3 to 4 minutes per tire)
- Difficulty Level: Beginner
- Typical Cost: Free (using household coins) to $15 (if purchasing a dedicated digital tread depth gauge and pressure pen)
- Tools and Materials Checklist:
- One standard US penny (for the 2/32″ critical wear threshold)
- One standard US quarter (for the 4/32″ wet-traction warning threshold)
- One digital or dial tire pressure gauge
- One mechanical tread depth gauge graduated in 32nds of an inch (optional for exact verification)
- One high-intensity LED flashlight
- One piece of white tire chalk or bright adhesive sticky notes
- Prerequisite Conditions: The vehicle must be parked on flat, level asphalt or concrete, with the engine turned off and the handbrake fully engaged. Tires must be cold (driven less than 1 mile or parked for at least 3 hours).
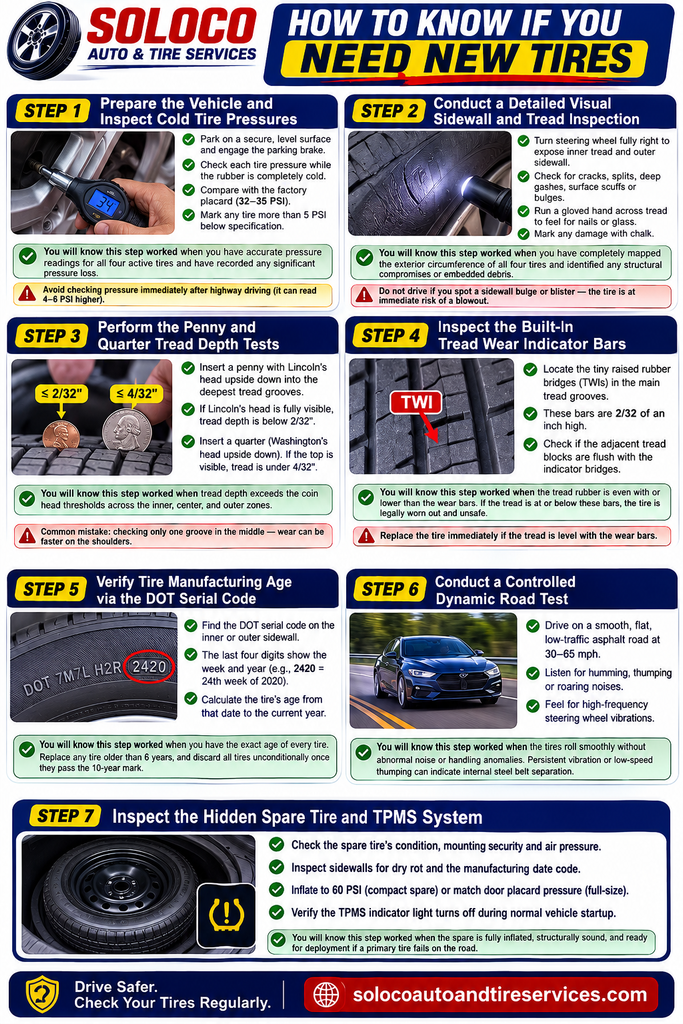
Step 1: Prepare the Vehicle and Inspect Cold Tire Pressures
Park the vehicle on a secure, level surface, engage the mechanical or electronic parking brake firmly, and check each tire pressure while the rubber is completely cold.
Unscrew the valve stem cap on the first tire, press the nozzle of your digital or dial pressure gauge firmly onto the valve stem until the hissing sound stops, and read the digital or analog output. Compare this measurement against the factory placard sticker located on the driver side door jamb, which typically lists recommended pressures between 32 and 35 PSI for standard passenger cars. Use chalk to note any tire reading more than 5 PSI below specification.
You will know this step worked when you have accurate pressure readings for all four active tires and have recorded any significant pressure loss that could indicate a slow bead leak or punctured tread. A common beginner mistake is checking tire pressure immediately after highway driving; friction heats the internal air, artificially inflating pressure readings by 4 to 6 PSI and masking underlying air retention failures.
Step 2: Conduct a Detailed Visual Sidewall and Tread Inspection
Turn your steering wheel fully to the right to expose the inner tread and outer sidewall of your front tires, then use your flashlight to examine every square inch of rubber.
Scan the outer and inner sidewalls meticulously for radial cracks, splits, deep gashes, surface scuffs, or protruding structural bulges, and run a gloved hand across the tread grooves to feel for embedded screws, nails, or sharp shards of glass. Mark any localized damage, cuts, or foreign object entry points immediately using your chalk.
You will know this step worked when you have completely mapped the exterior circumference of all four tires and identified any structural compromises or embedded debris. If you spot a sidewall bulge or blister, do not drive the vehicle; the internal fabric plies have ruptured, and the tire is at immediate risk of a blowout.
Step 3: Perform the Penny and Quarter Tread Depth Tests
Insert a standard US penny and a US quarter into multiple major circumferential tread grooves across the face of each tire to evaluate remaining rubber depth.
Hold the penny with Lincoln’s head upside down and push it straight into the deepest central grooves of the tread; if the top of Abraham Lincoln’s head is completely visible above the rubber, your tread depth is below 2/32 of an inch and you must replace the tire immediately. Next, take a US quarter and insert it with Washington’s head upside down into the same grooves; if the top of George Washington’s head is fully visible, your tread is under 4/32 of an inch, signaling that wet-traction performance is severely degraded and you should plan for replacement before the rainy season.
You will know this step worked when you have confirmed that the tread depth exceeds the coin head thresholds across the inner, center, and outer zones of every tire. A common mistake is checking only one single groove in the middle of the tire; many alignment issues cause accelerated wear on the extreme shoulders while the center groove appears deceptively deep.
Step 4: Inspect the Built-In Tread Wear Indicator Bars
Locate the tiny raised rubber bridges running perpendicular to the tread direction deep inside the main circumferential channels of the tire.
Search for these narrow horizontal rubber strips, known as Tread Wear Indicators (TWIs), which are molded directly into the base of the tread grooves by the manufacturer at a height of exactly 2/32 of an inch. Inspect whether the adjacent outer tread blocks are completely flush with these raised indicator bridges.
You will know this step worked when you have visually and physically verified whether the surrounding tread pattern has worn down level with the wear bars. If the tread rubber is even with or lower than these bars, the tire is legally worn out and unsafe for public roads, requiring immediate replacement.
Step 5: Verify Tire Manufacturing Age via the DOT Serial Code
Examine the inner or outer sidewall of each tire to locate the Department of Transportation serial code beginning with the letters DOT followed by a string of alphanumeric characters.
Locate the final four digits at the tail end of this serial string, where the first two digits represent the manufacturing week and the last two digits represent the manufacturing year; for example, a code ending in “2420” indicates the tire was manufactured during the 24th week of the year 2020. Calculate the total elapsed time from that manufacture date to the current calendar year.
You will know this step worked when you have established the exact age of every tire on the vehicle, including the hidden spare. Replace any tire that is older than 6 years, and discard all tires unconditionally once they pass the 10-year mark, regardless of how much visible tread depth remains, because chemical hardening and structural dry rot compromise safety over time.
Step 6: Conduct a Controlled Dynamic Road Test
Drive the vehicle on a smooth, flat, low-traffic asphalt roadway at speeds ranging from 30 to 65 miles per hour to evaluate dynamic stability and acoustic performance.
Pay close attention to whether the vehicle pulls consistently to one side when you briefly loosen your grip on the steering wheel, listen intently for any rhythmic humming, thumping, or roaring noises that change pitch with vehicle speed, and feel for high-frequency steering wheel vibrations.
You will know this step worked when you have determined whether the tires roll smoothly without introducing abnormal mechanical noise or handling anomalies. A persistent high-frequency vibration or low-speed thumping often indicates internal steel belt separation or severe tire out-of-roundness that balancing weights cannot fix.
Step 7: Inspect the Hidden Spare Tire and TPMS System
Check the condition, mounting security, and air pressure of your vehicle spare tire located in the trunk well or bolted beneath the rear chassis.
Lower or remove the spare tire assembly, inspect its sidewalls for dry rot, check its manufacturing date code, and inflate it to the manufacturer-specified pressure, which for compact temporary spares is typically 60 PSI, while full-size matching spares should match standard door placard pressures. Concurrently, verify that your dashboard Tire Pressure Monitoring System indicator light turns off during normal vehicle startup.
You will know this step worked when you have confirmed that your emergency spare is fully inflated, structurally sound, and ready for deployment should a primary tire fail on the road.
Common Mistakes and How to Fix Them
- Only Checking One Tread Groove: Many vehicle owners check only the middle groove of a tire and assume it is safe. Wear occurs unevenly due to suspension geometry. Fix this by inspecting the inner, middle, and outer circumferential channels independently on every single tire.
- Ignoring Manufacturing Age on Low-Mileage Cars: Tires on garage-kept or low-mileage vehicles often retain deep tread while the rubber compounds degrade internally. Fix this by always checking the four-digit DOT serial code and replacing tires that exceed 6 to 10 years of age.
- Measuring Pressure on Hot Tires: Driving friction heats air inside the tire, increasing pressure readings by several PSI. Fix this by taking all pressure measurements only when the vehicle has been parked for at least 3 hours or driven less than 1 mile.
- Neglecting the Spare Tire: Drivers frequently discover their spare tire is flat or rotted only after experiencing a roadside blowout. Fix this by integrating spare tire pressure checks and visual inspections into your semi-annual vehicle maintenance routine.
Variations: How the Process Changes for Different Situations
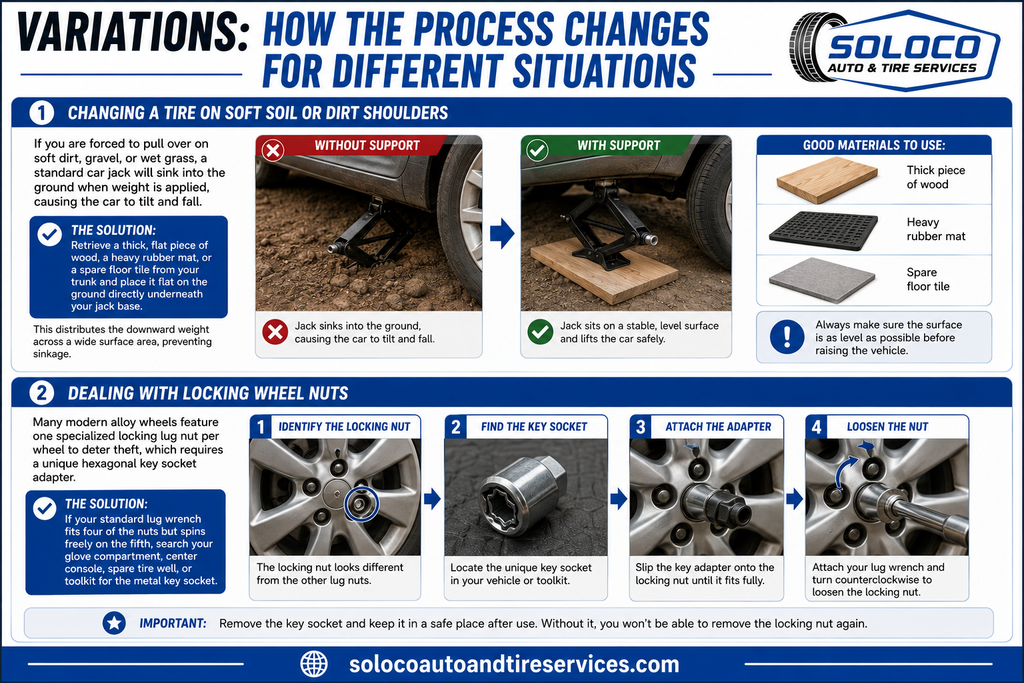
- Performance and Low-Profile Tires: Vehicles equipped with ultra-high-performance summer tires or low-profile sidewalls have extremely shallow initial tread depths (often starting around 8/32″ rather than 10/32″). Adjust your baseline expectations and rely more heavily on dedicated mechanical depth gauges and tread wear indicator bars rather than standard coin tests.
- Off-Road All-Terrain and Mud-Terrain Tires: Heavy-duty off-road tires feature aggressive, deep tread blocks and reinforced multi-ply sidewalls that make standard coin testing difficult. Use a digital tread depth gauge inserted into the primary center voids, and inspect the base of the deep shoulder lugs for stone drilling and chipping.
- Winter and Snow Tires: Dedicated winter tires utilize specialized rubber compounds designed to remain flexible in sub-freezing temperatures and feature secondary winter wear indicators. Check both the standard 2/32″ wear bars and the higher snow-service depth indicators to ensure adequate traction on ice and packed snow.
How Long Does It Take and What Does It Cost
- Time Investment: Performing a comprehensive, four-tire physical and dynamic inspection takes approximately 15 to 20 minutes for an experienced DIYer, or up to 30 minutes if you must lower a chassis-mounted spare tire.
- Financial Cost: The inspection process itself is 100% free if you use household items like a penny and a quarter. Purchasing professional-grade diagnostic tools, such as a certified digital pressure gauge and a mechanical dial tread depth gauge, typically costs between $10 and $20 total at any local auto parts store.
Frequently Asked Questions
Can I drive safely with mismatched tire brands or tread depths?
Mismatched tires on the same axle can cause severe handling imbalances, unpredictable traction in wet weather, and premature wear on your differential. For all-wheel-drive vehicles, mismatched rolling diameters can permanently damage the transfer case. Always replace tires in matched pairs on the same axle, and ideally replace all four at once for all-wheel-drive systems.
What causes a tire to wear out faster on one specific edge?
Rapid wear on the outer edge of a tire typically points to excessive positive camber or aggressive cornering, while inner edge wear indicates negative camber or worn-out suspension control arm bushings. Feathered wear across the tread blocks usually signals an incorrect toe alignment setting that requires immediate professional correction.
Why does my steering wheel vibrate only at highway speeds?
Steering wheel vibrations occurring strictly between 55 and 75 miles per hour are almost always caused by wheel imbalance, lost wheel weights, or a bent wheel rim. However, if the vibration is accompanied by a rhythmic thumping noise or visible tread distortion, it points to internal belt separation requiring immediate tire replacement.
Is it safe to repair a punctured tire with a simple plug?
A tire puncture is safely repairable using a combined plug-and-patch method applied from the inside of the tire, provided the puncture is located strictly within the flat tread area and is no larger than one-quarter of an inch. Punctures, cuts, or bulges located on the sidewall or shoulder can never be safely repaired and require immediate tire replacement.
How often should I check my tire pressure and tread depth?
You should check your tire pressure at least once a month and before any long road trip, as temperature fluctuations cause tires to naturally lose about 1 to 2 PSI per month. Conduct a physical tread depth and visual sidewall inspection using the coin and visual methods every three months or during every seasonal oil change.


