Checking your tyre tread with a coin is a fast, highly reliable manual method to determine if your vehicle is road-legal and safe to drive. By using specific national currency as a physical gauge against the rubber grooves, you can evaluate your tread depth without specialized mechanical tools in just 5 to 7 minutes across all four wheels.
Before You Start
- Time Required: 5 to 7 minutes.
- Difficulty Level: Beginner.
- Cost: Zero (requires standard circulating currency).
- Tools and Materials Checklist:
- Exactly one 20p coin (UK, Europe, Australia) or one Australian 20c coin. Alternatively, one US penny and one US quarter (North America).
- One clean microfiber cloth or shop rag.
- One smartphone flashlight or LED pocket torch.
- Prerequisite Conditions: Park on a dry, level, hard asphalt or concrete surface away from moving traffic. Ensure the vehicle engine is completely off and the parking brake is fully engaged.
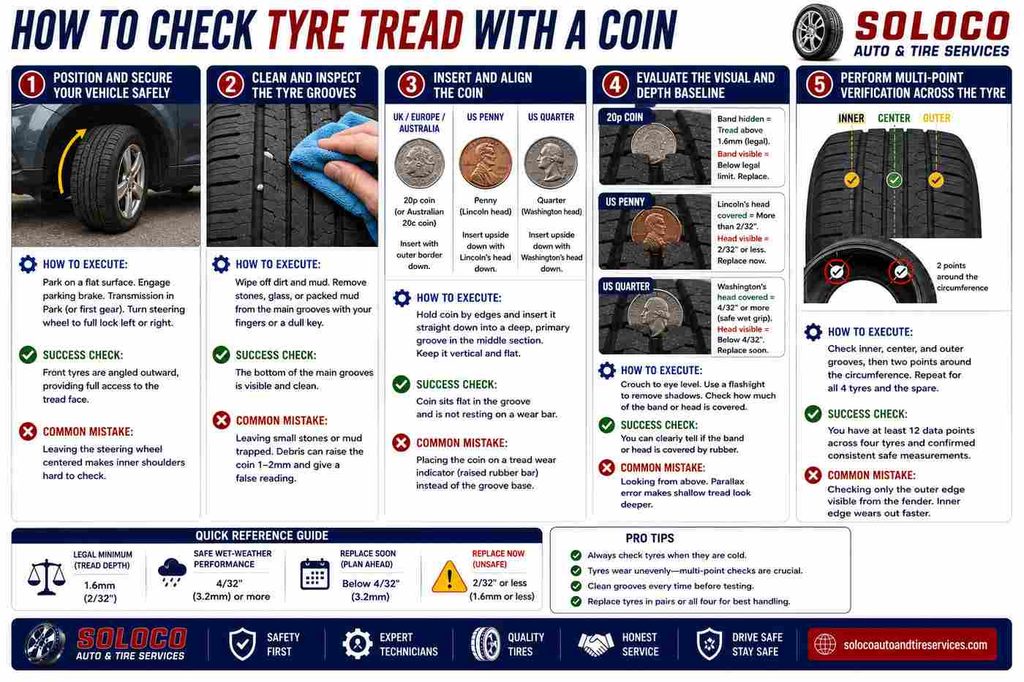
Step 1: Position and Secure Your Vehicle Safely
Park your car on a completely flat, level surface away from traffic, engage the parking brake firmly, and leave the transmission in Park for automatic vehicles or first gear for manual transmissions.
- How to execute: Pull your vehicle into a well-lit driveway or parking stall. Pull the handbrake lever upward until it clicks firmly into its locked position, or press the electronic parking brake button. Shift the gear selector into Park or engage first gear. Turn your steering wheel to a full lock (turning the steering wheel all the way to the left or right) to expose the full face of your front tyres so you can easily access the tread surface without crouching under the wheel arch.
- Success Check: You will know this step worked when your front tyres are angled sharply outward, providing unobstructed visual and physical access to the entire width of the rubber tread face.
- Common Mistake: Leaving the steering wheel centered makes checking the inner shoulders of front tyres nearly impossible. Always turn the steering wheel to full lock before exiting the cabin.
Step 2: Clean and Inspect the Tyre Grooves
Take your microfiber cloth and wipe away loose mud, dirt, stone dust, or compacted snow from the tyre surface, then flick out any trapped pebbles from the main circumferential grooves using your fingers or a dull key.
- How to execute: Kneel beside the front tyre. Wipe the rubber clean across the tread face to expose the true base of the grooves. Inspect the four main longitudinal channels running around the circumference of the tyre. If you spot embedded gravel, shards of glass, or dry mud chunks packed tightly into the channels, dislodge them completely. Debris left in the grooves will artificially block your coin and result in a false fail reading.
- Success Check: You will know this step worked when the rubber at the absolute bottom of the primary grooves is completely exposed and visible down to the dark base of the tread channel.
- Common Mistake: Rushing this step and leaving small stones wedged at the groove base. A single trapped pebble can elevate your coin by 1mm to 2mm, making a healthy tyre look dangerously worn.
Step 3: Insert and Align the Coin
Hold your chosen national currency coin vertically by its outer edges and insert it straight down into the primary, deep circumferential grooves running around the middle section of the tyre.
- How to execute: Do not force or wedge the coin into the rubber with excessive pressure. Align the coin according to your regional standard:
- For UK, Europe, and Australia: Hold the 20p coin (or Australian 20c coin) with the outer border facing downward into the groove.
- For US Pennies: Turn the coin upside down so that Abraham Lincoln’s head points straight down into the rubber groove.
- For US Quarters: Turn the coin upside down so that George Washington’s head points straight down into the groove.
- Success Check: You will know this step worked when the coin sits flat and perpendicular against the bottom surface of the groove without tilting or resting on raised rubber bridges.
- Common Mistake: Pushing the coin down onto a Tread Wear Indicator, which are small raised rubber bars embedded inside the grooves. If your coin rests on one of these indicators, you are measuring the height of the bar rather than the actual primary tread depth.
Step 4: Evaluate the Visual and Depth Baseline
Squat down until your eyes are level with the tyre surface where the coin meets the rubber, and observe how much of the coin’s outer band or the figure’s head is obscured by the tread walls.
- How to execute: Shine your smartphone flashlight directly across the groove to eliminate shadows. Evaluate the result based on your coin type:
- 20p Coin Result: If the outer dotted band or border of the 20p coin is completely hidden inside the rubber groove, your tyre tread is safely above the 1.6mm legal limit. If you can see the entire outer band, your tread has worn below the legal limit and the tyre is unsafe.
- US Penny Result: If the top of Lincoln’s head is covered by the tread rubber, you have more than 2/32 of an inch of tread remaining (legal in most regions). If his entire head is visible above the rubber line, your tyres are bald at 2/32 or less and must be replaced immediately.
- US Quarter Result: If Washington’s head is covered by the tread, your tyres have safe wet-weather traction exceeding 4/32 of an inch. If his head is clearly visible, your tread has dropped below 4/32, meaning you should begin shopping for replacement tyres soon to maintain wet-braking grip.
- Success Check: You will know this step worked when you can definitively state whether the threshold indicator (the 20p outer band or the president’s hair line) is submerged below the rubber surface or exposed to open air.
- Common Mistake: Viewing the coin from an overhead angle instead of squatting to eye level. Parallax error from a standing position makes a shallow tread look deeper than it actually is.
Step 5: Perform Multi-Point Verification Across the Tyre
Repeat Steps 3 and 4 at three distinct points across the width of the same tyre (inner edge, dead center, and outer edge) and at two separate points around its outer circumference, then repeat the entire process for the remaining three tyres and your spare.
- How to execute: Move the coin from the inner shoulder of the tyre to the center groove, and finally to the outer shoulder. Tyres do not wear uniformly; mechanical alignment issues often destroy one shoulder while leaving the middle intact. Once you finish testing all four positions on the front-left tyre, move to the front-right tyre, unlock the steering wheel to access the rear tyres, and finish with your boot or trunk spare tyre.
- Success Check: You will know this step worked when you have gathered a minimum of 12 distinct data points across your four active tyres and confirmed consistent safe measurements on all sides.
- Common Mistake: Checking only the outside edge of each tyre visible from the fender. The inner edge wears out faster due to negative camber settings, meaning single-spot checks leave dangerous inner bald spots completely undetected.
Common Mistakes and How to Fix Them
| Problem or Failure | Root Cause | Immediate Recovery and Troubleshooting Step |
| The coin refuses to stand straight and continually tips over into the groove. | Compacted stones, hardened mud, or frozen ice are wedged tightly at the bottom of the tyre channel. | Use a flathead screwdriver tip or a metal key to scrape out the debris, or wash the tyre thoroughly with a high-pressure hose before retesting. |
| The coin reads safe and deep on the outer shoulder, but completely unsafe on the inner shoulder. | Your vehicle suffers from severe wheel misalignment, worn suspension bushings, or incorrect tyre inflation pressures. | Replace the affected tyre immediately if any section falls below the legal limit. Book an appointment with an alignment technician to correct your steering geometry before installing new tyres. |
| Coin readings fluctuate wildly between different sections of the same tyre circumference. | Dynamic wheel imbalance, bent wheel rims, or worn shock absorbers causing cupping and feathering wear. | Disregard the coin test results for structural safety. Take your vehicle to a professional tyre specialist to inspect your suspension dampening system. |
| The coin test passes easily, but the tyre sidewall shows deep surface cracking or rubber separation. | The tyre has suffered structural dry rot and thermal degradation due to age, intense sun exposure, or harsh chemical exposure. | Check the four-digit DOT manufacturing code stamped on the outer sidewall (e.g., 2821 means the 28th week of 2021). Tyres older than 6 years must be replaced regardless of coin tread depth. |
Variations: Adjusting the Process for Different Situations
Checking Performance and Winter Tyres
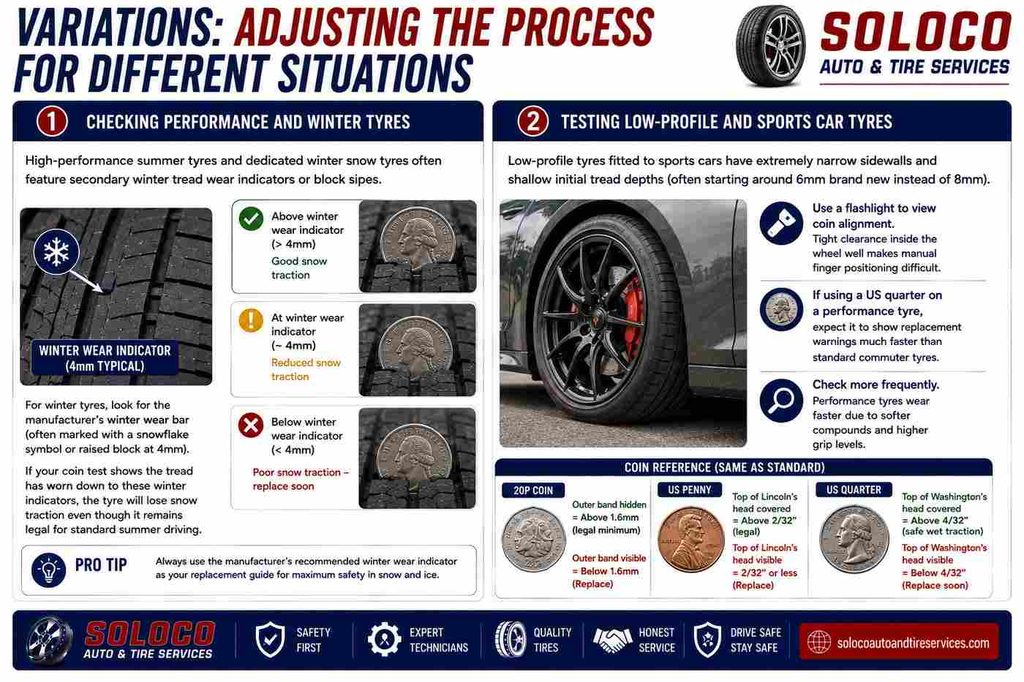
High-performance summer tyres and dedicated winter snow tyres often feature secondary winter tread wear indicators or block sipes. For winter tyres, look for the manufacturer’s winter wear bar (often marked with a snowflake symbol or raised block at 4mm). If your coin test shows the tread has worn down to these winter indicators, the tyre will lose snow traction even though it remains legal for standard summer driving.
Testing Low-Profile and Sports Car Tyres
Low-profile tyres fitted to sports cars have extremely narrow sidewalls and shallow initial tread depths (often starting around 6mm brand new instead of 8mm). When testing low-profile tyres, ensure you use a flashlight to view the coin alignment, as the tight clearance inside the wheel well makes manual finger positioning difficult. If using a US quarter on a performance tyre, expect it to show replacement warnings much faster than standard commuter vehicle tyres.
How Long Does It Take and What Does It Cost
- Time Investment: Expect to spend 5 to 7 minutes for a thorough check of all four active tyres and the spare. If you encounter heavy packed mud or stones that require scrubbing, budget an additional 5 minutes for cleaning.
- Financial Cost: Exactly zero dollars. The process relies entirely on standard circulating coins already in your possession, making it the most cost-effective diagnostic check available to vehicle owners.
Frequently Asked Questions
Is the coin test legally recognized by traffic police?
No. While the coin test is an exceptionally accurate field method to check whether your tyres meet minimum legal thresholds, police officers and vehicle inspection stations use calibrated digital tread depth gauges. If your coin test shows a borderline result, your tyre is close enough to the legal limit that you should visit a service station for a precise millimeter reading.
What is the exact legal minimum tread depth in my country?
In the United Kingdom, Europe, and Australia, the mandatory legal minimum tread depth is 1.6mm across the central three-quarters of the tyre breadth. In the United States and Canada, the legal limit is 2/32 of an inch (approx. 1.6mm) across major tread grooves, though safety organizations recommend replacing tyres at 4/32 for wet weather.
Can I use a credit card or a matchstick instead of a coin?
No. Standard credit cards have a uniform thickness of approximately 0.76mm, which is far too thin to measure the 1.6mm legal threshold accurately and will give you a dangerously false sense of security. Always use dedicated currency with known physical dimensions like a 20p piece, US penny, or US quarter.
How often should I perform the coin test on my vehicle?
You should perform this coin test at least once every month, as well as before embarking on any long-distance highway road trips. Monthly checks help you catch uneven wear patterns early before they develop into dangerous blowouts or fail mandatory annual vehicle inspections.
What should I do if only one tyre fails the coin test?
If a single tyre fails while the other three pass, you must replace the failing tyre immediately. If your vehicle is all-wheel drive, check your vehicle manufacturer’s manual, as you may need to replace all four tyres simultaneously to prevent differential damage caused by differing rolling diameters.


