Checking tire wear ensures driving safety, prevents dangerous hydroplaning, and extends fuel economy. This comprehensive guide covers measuring tread depth across multiple zones, inspecting sidewalls, checking tire pressure, and diagnosing abnormal wear patterns in about 15 minutes. Success depends entirely on measuring cold tires on a level surface while accounting for inner-groove variations that standard quick-checks miss.
Before You Start
- Time Required: 10 to 15 minutes for all four tires
- Difficulty Level: Beginner
- Cost: $0 to $25 (Free using a U.S. penny; $10 to $25 if purchasing a dedicated tread depth and pressure gauge)
- Tools and Materials Checklist:
- Plunger-style or digital tire tread depth gauge (1 unit)
- Digital or dial tire pressure gauge (1 unit)
- U.S. Penny (1 coin, optional verification alternative)
- Flashlight or headlamp (1 unit, 100+ lumens)
- Chalk or tire marker (1 stick)
- Prerequisite Conditions: The vehicle must be parked on a flat, level concrete surface with the engine off for at least 3 hours to ensure the tires are completely cold.
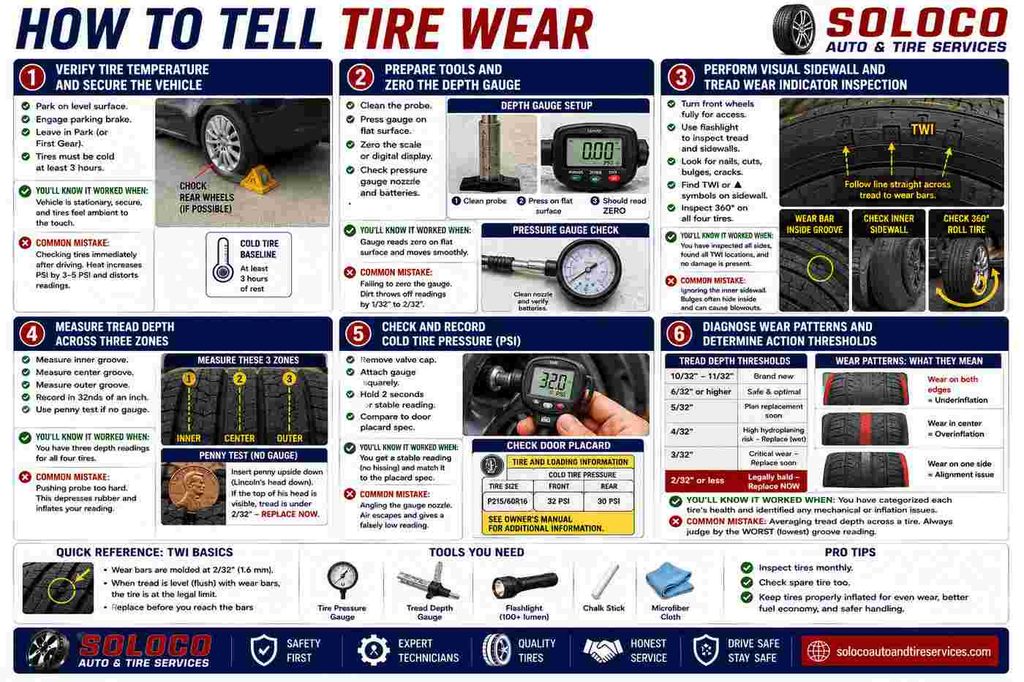
Step 1: Verify Tire Temperature and Secure the Vehicle
Park your vehicle on a flat, level concrete surface, engage the electronic or manual parking brake firmly, and ensure the tires have cooled completely for a minimum of 3 hours.
To execute this, select a stable parking spot away from heavy traffic. Turn off the ignition and pull your handbrake or engage your electronic parking brake switch until the indicator light illuminates solidly on your dashboard. Leave the transmission in Park (for automatic vehicles) or First Gear (for manual vehicles). Verify that the vehicle has not been driven for at least 3 hours and is not parked in direct, intense sunlight, as heat causes internal air expansion and rubber softening that skews both pressure readings and physical tread stiffness.
You will know this step worked when the vehicle is completely stationary, the parking brake holds the weight securely without rolling, and the rubber feels ambient to the touch.
- Common Mistake: Checking tires immediately after highway driving. Driving generates friction heat that increases tire pressure by 3 to 5 PSI and distorts rubber flexibility. Always test on cold tires.
Step 2: Prepare Tools and Zero the Depth Gauge
Inspect, clean, and zero your tread depth and pressure gauges before approaching the vehicle tires.
Take your plunger-style or digital tread depth gauge and push the metal probe all the way out until the measuring foot is fully extended. Wipe the sliding metal pin clean with a microfiber cloth or paper towel to remove any pocket lint, dirt, or grease. Press the flat plastic base of the gauge firmly against a flat, hard surface like a workbench or a coin. The indicator scale should read exactly zero. If using a digital gauge, press the zero or reset button while pressed flat. Next, ensure your tire pressure gauge has a clean nozzle and fresh batteries if it is a digital model.
You will know this step worked when the depth gauge reads absolute zero when depressed on a flat surface and moves smoothly without catching or binding.
- Common Mistake: Failing to zero the gauge. Residual dirt packed inside the barrel prevents the sliding pin from seating correctly, throwing off every subsequent measurement by 1/32″ to 2/32″.
Step 3: Perform Visual Sidewall and TREAD Wear Indicator Inspection
Shine your flashlight across the entire width of each tire to spot structural damage, foreign objects, and built-in Tread Wear Indicator bars.
Start at the front driver-side tire. Turn your steering wheel fully to the left to expose the entire outer tread face and inner sidewall. Switch on your 100+ lumen flashlight and sweep the beam slowly across the tread blocks and outer sidewall. Look closely for embedded nails, screws, glass shards, rubber cracking, sidewall bulges, or deep cuts. Next, locate the tiny rubber triangle symbols or the letters “TWI” printed on the outer shoulder of the tire sidewall. Follow that directional line straight across the tread pattern into the main circumferential grooves to find the raised rubber bars hidden inside, known as Tread Wear Indicators. For the rear tires, which cannot be turned via the steering wheel, use your flashlight to inspect the visible exterior sections, then roll the car forward or backward three feet to inspect the remaining hidden section. Mark your starting point on the tire sidewall using your chalk stick so you do not accidentally inspect the same section twice.
You will know this step worked when you have scanned 360 degrees of every tire, identified all TWI locations, and confirmed the absence of dangerous sidewall bulges or embedded punctures.
- Common Mistake: Ignoring the inner sidewall. Drivers often inspect only the outward-facing tread they can see while walking past the car, missing catastrophic inner-sidewall bubbles caused by potholes.
Step 4: Measure Tread Depth Across Three Zones
Measure the tread depth in 32nds of an inch across the inner, center, and outer grooves of every tire using your depth gauge or penny alternative.
Hold your zeroed tread depth gauge by its base and insert the metal probe straight down into the main central groove of the tire, avoiding the raised TWI bars. Press the flat outer base firmly down until it rests flat against the rubber tread block without lifting the surrounding rubber. Read the measurement where the scale meets the housing, recording the value in 32nds of an inch. Repeat this exact measurement procedure across three distinct zones on the same tire: the inner groove, the center groove, and the outer groove. Mark these down for each tire.
If you do not own a depth gauge, use the U.S. penny alternative: insert the penny upside down into the central groove with Lincoln’s head pointing down into the rubber. If the top of Lincoln’s head is fully visible with space above it, your tread depth is critically low at under 2/32″.
You will know this step worked when you have recorded three distinct numerical depth values for all four tires, giving a complete profile of how the tire is wearing across its width.
- Common Mistake: Pushing the depth gauge probe too hard into soft rubber tread blocks. Excessive downward force depresses the rubber compound, artificially inflating your tread depth reading by 1/32″ to 2/32″.
Step 5: Check and Record Cold Tire Pressure (PSI)
Remove the valve stem caps, measure the internal pressure of each tire using a pressure gauge, and compare the readings against the manufacturer placard.
Locate the metal or plastic valve stem on each wheel and unscrew the black or metallic valve cap counterclockwise, placing it in your pocket so it does not get lost in grass or gravel. Take your tire pressure gauge and press the nozzle squarely and firmly onto the valve stem tip in a single fluid motion. Hold it there for 2 seconds until you hear the hissing stop and the gauge locks or displays a stable digital reading. Note the Pounds per Square Inch (PSI). Open the driver-side door and look at the yellow and white manufacturing placard sticker affixed to the door jamb or B-pillar. Locate the specified cold tire pressure numbers for front and rear tires, and compare your measured PSI to these mandated values.
You will know this step worked when you obtain a stable PSI reading without a continuous hissing sound leaking air, and you have matched it against your vehicle’s door placard specifications.
- Common Mistake: Angling the pressure gauge nozzle during attachment. Holding the gauge at an angle causes air to hiss out rapidly, dropping the tire pressure during measurement and giving a falsely low reading.
Step 6: Diagnose Wear Patterns and Determine Action Thresholds
Analyze your multi-zone tread measurements and wear signatures against industry safety standards to determine whether your tires are safe, need monitoring, or require immediate replacement.
Review your recorded tread measurements from Step 4. Compare your lowest groove reading across all four tires against the standard replacement thresholds:
- 10/32″ to 11/32″: Brand new condition.
- 6/32″ or higher: Safe and optimal tread depth.
- 5/32″: Water dispersion begins to decline; prepare for replacement within a few thousand miles.
- 4/32″: Hydroplaning risk increases significantly at highway speeds in wet weather; replace tires immediately if you live in a high-rainfall climate.
- 3/32″: Critical wear zone; plan immediate replacement.
- 2/32″ or less: Legally bald, extremely dangerous, and illegal to drive on public roads.
Next, examine your wear distribution across the three zones. If the inner and outer edges are worn while the center is deep, your tires are chronically underinflated. If the center groove is worn down significantly faster than both outer edges, your tires are overinflated. If one side of a single tire is worn flat while the rest retains tread, your vehicle has severe alignment issues.
You will know this step worked when you have successfully categorized every tire’s health status and identified any mechanical suspension or inflation issues that require correction.
- Common Mistake: Averaging the tread depth numbers across a single tire. If the inner groove reads 2/32″ and the outer groove reads 6/32″, averaging them gives 4/32″ (deemed safe by some), but the tire is actually legally bald and dangerous on the inside edge due to a bad alignment. Always judge a tire by its worst-performing groove.
Common Mistakes and How to Fix Them
- Measuring on uneven or sloped ground: Measuring while parked on an incline shifts vehicle weight unevenly onto specific corners, compressing the rubber and invalidating pressure and depth readings. Fix: Always reposition the vehicle onto flat, level concrete before beginning your inspection.
- Checking tire pressure immediately after driving: Friction heats up compressed air inside the tire, raising PSI readings by 4 to 6 units. Fix: Wait a minimum of 3 hours after driving or park in deep shade until the tires match ambient air temperature.
- Over-tightening valve stem caps: Forcing plastic or metal caps down too tightly can strip the threads or fuse them to the valve stem core. Fix: Thread valve caps on finger-tight until they gently seat, never using pliers or wrenches.
- Ignoring the penny test orientation: Inserting a penny right-side up leaves the denomination numbers exposed rather than testing the critical depth limit against Lincoln’s head. Fix: Always invert the U.S. penny so Lincoln’s head faces downward into the deepest part of the central groove.
Variations: Adjusting the Process for Special Situations
Inspecting Winter and Snow Tires
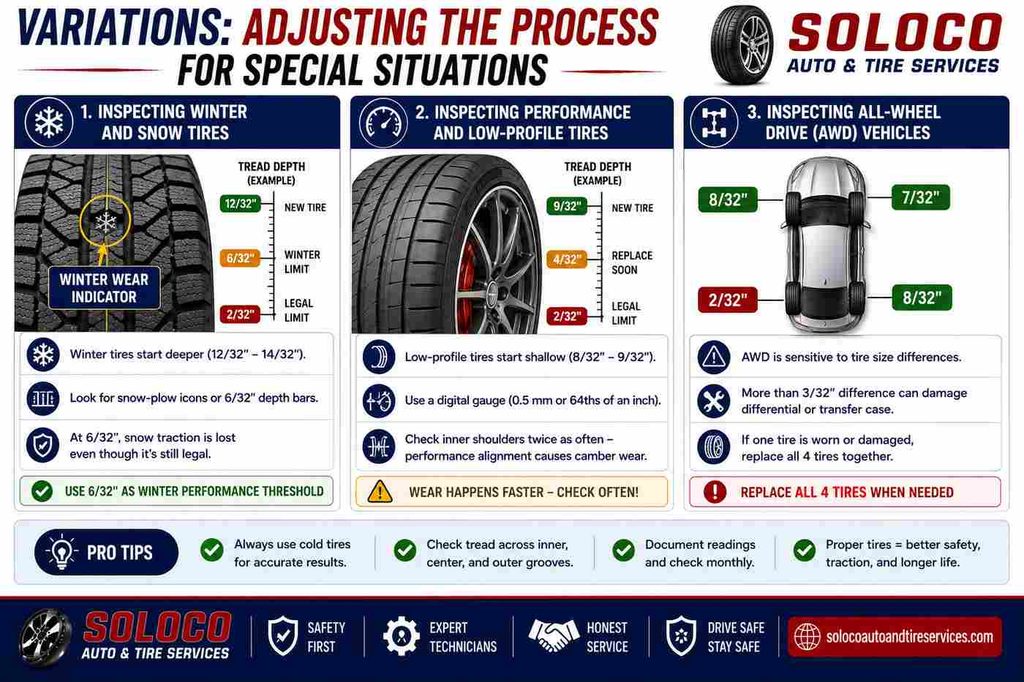
Winter tires utilize specialized rubber compounds optimized for sub-freezing temperatures and feature deeper initial tread depths (often starting at 12/32″ to 14/32″). Furthermore, winter tires feature secondary winter wear indicators (often molded snow-plow icons or 6/32″ depth bars). When winter tread wears down to 6/32″, the tire loses its snow-biting capability even though it remains legal for summer driving. Always measure winter tires against their specialized 6/32″ winter performance threshold rather than the standard 2/32″ legal limit.
Inspecting Performance and Low-Profile Tires
Low-profile sports car tires possess very shallow initial tread depths (often starting at 8/32″ or 9/32″) and stiff sidewalls. Because the total available rubber buffer is much smaller, wear happens much faster. When measuring low-profile tires, use a digital depth gauge capable of measuring in half-millimeter increments or 64ths of an inch, and inspect the inner shoulders twice as often because performance alignment setups naturally induce negative camber wear.
Inspecting All-Wheel Drive (AWD) Vehicles
AWD systems are highly sensitive to rolling circumference differences between tires. If one tire wears down to 2/32″ while another is at 8/32″, the speed differential forces the center differential or transfer case to slip constantly, leading to catastrophic mechanical failure costing thousands of dollars. For AWD vehicles, if one tire is damaged or worn past a 3/32″ variance compared to the others, you must replace all four tires simultaneously rather than just one.
How Long Does It Take and What Does It Cost?
- Time Investment: Checking all four tires thoroughly takes approximately 10 to 15 minutes for a beginner. This breaks down to 2 minutes for vehicle preparation and tool staging, 2 minutes for visual and sidewall checks, 5 minutes for multi-zone depth measurements across all four wheels, and 3 minutes for pressure checking and adjustment.
- Financial Cost: The process costs $0 if you utilize a standard U.S. penny and check pressure at a free gas station air pump. Purchasing a dedicated professional automotive kit containing a dial pressure gauge and a plunger-style tread depth gauge typically ranges from $10 to $25 at any auto parts store.
Frequently Asked Questions
Can I use a regular ruler instead of a tire depth gauge or penny?
Yes, you can use a precision metal ruler graduated in fractions of an inch or millimeters, but it is considerably harder to align flat against the rubber blocks inside a narrow groove. If using a ruler, measure carefully from the bottom of the groove to the top of the tread block, ensuring you avoid the raised TWI bars. A dedicated depth gauge or penny is much faster and less prone to user error.
How often should I check my tire wear and pressure?
You should perform a complete tread depth inspection and pressure check at least once every month, as well as immediately before any long-distance road trips. Tires naturally lose about 1 to 2 PSI per month due to natural air permeation through the rubber membrane, and seasonal temperature drops decrease tire pressure by roughly 1 PSI for every 10°F drop in ambient outdoor temperature.
What causes a tire to wear out faster on the inside edge?
One-sided inner edge wear is almost always caused by negative wheel camber or toe-out alignment issues, where the wheels are angled outward or tilted inward excessively. This concentrates the entire weight of the vehicle onto the inner shoulder of the tread. If you notice this pattern, schedule a professional four-wheel laser alignment immediately after replacing the damaged tires to prevent the new set from wearing out prematurely.
Are cheap tread depth gauges accurate?
Mechanical plunger-style depth gauges costing $5 to $10 are remarkably accurate because they rely on simple, direct physical spring resistance and gravity-seated pins. Digital gauges offer easier-to-read LED displays, but they require functioning batteries that can fail in freezing winter temperatures. Both types are sufficiently accurate for home automotive maintenance as long as they are zeroed before use.
Does driving style significantly impact how fast tires wear?
Aggressive driving habits drastically accelerate tread wear. Rapid acceleration spins drive wheels and strips microscopic layers of rubber off the tread blocks, hard cornering tears rubber off the outer shoulders due to lateral G-forces, and hard braking locks up or strains the contact patch. Smooth acceleration, gradual braking, and moderate cornering can easily double the operational lifespan of a standard passenger car tire set.


