Reading tire specs is an essential vehicle maintenance skill that allows you to buy correct replacement tires, monitor load safety, and verify tire age in just two to five minutes per tire. By systematically decoding the alphanumeric string permanently molded into the outer sidewall, you will uncover vital engineering metrics including width, aspect ratio, internal construction, rim diameter, load capacity, and manufacturing date. Success depends entirely on knowing which characters to isolate among the dozens of manufacturing stamps found on modern tire walls.
Before You Start
- Time Required: 2 to 5 minutes per tire
- Difficulty Level: Beginner
- Cost: Free ($0)
- Tools & Materials:
- Flashlight: 1 unit (optional, for dark wheel wells or low-light garages)
- Pen and Paper: 1 set (or smartphone camera to capture a clear photo)
- Mild soap, water, and a stiff nylon brush: Optional, for cleaning mud-obscured sidewalls
- Prerequisites & Conditions: Park your vehicle on a flat, level surface, engage the emergency parking brake, and ensure the ignition is turned off.
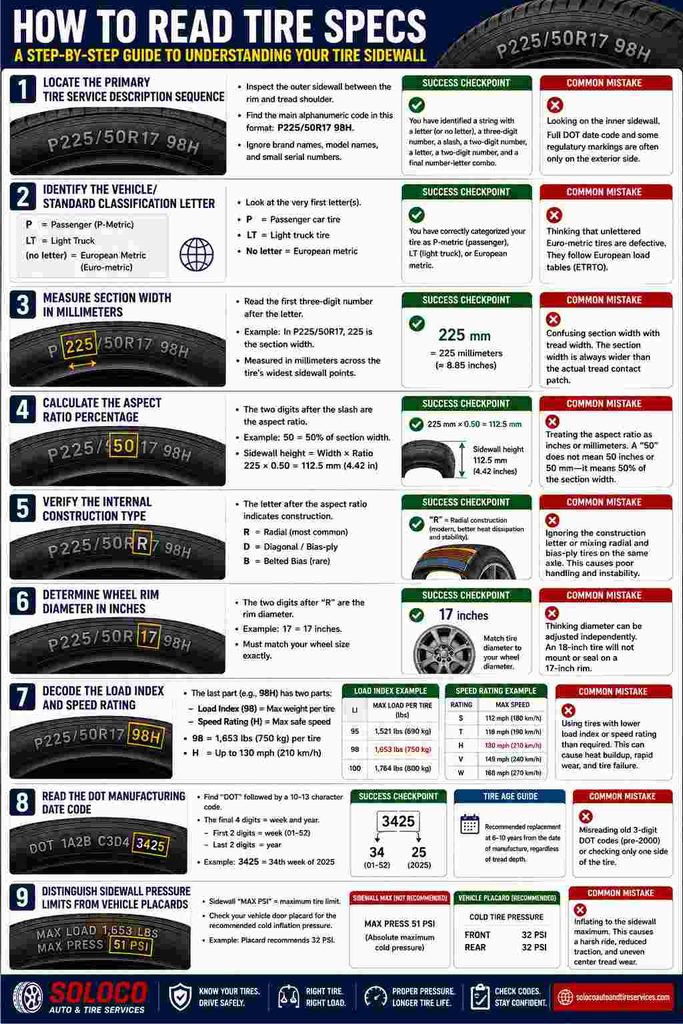
Step 1: Locate the Primary Tire Service Description Sequence
- Action: Inspect the outer sidewall of the tire to find the main sequence of bold, raised letters and numbers.
- How to Do It: Crouch or kneel beside the front or rear tire. Scan the vertical face of the rubber between the outer edge of the wheel rim and the tread shoulder. Look for a standardized alphanumeric code that starts with a letter or a three-digit number and follows a strict slash-and-space format, such as
P225/50R17 98H. Ignore larger, stylized brand names, model names like “All-Season,” and fine-print manufacturing serial numbers located near the inner rim flange. - Success Checkpoint: You will know this step worked when you have identified a continuous string containing a letter prefix, a three-digit number, a slash, a two-digit number, another letter, a two-digit number, and a final trailing number-letter combo.
- Common Mistake: Staring at the inner sidewall facing the vehicle chassis. While specs are stamped on both sides, the complete Department of Transportation (DOT) date code and certain regulatory markings are often only fully molded on the exterior-facing side.
Step 2: Identify the Vehicle/Standard Classification Letter
- Action: Read the very first letter or letters of the code sequence to determine the tire category.
- How to Do It: Examine the character at the absolute beginning of the service description string. If the code begins with the letter
P, the tire is built to “P-metric” standards for passenger vehicles, sedans, SUVs, and minivans. If the code begins withLT, it stands for “Light Truck,” denoting a heavy-duty tire designed for towing, high load capacities, and commercial hauling. If there is no letter at all and the sequence begins directly with a three-digit number, the tire follows European metric standards (Euro-metric), which have slightly different load capacities than P-metric tires of the exact same nominal size. - Success Checkpoint: You will know this step worked when you have correctly categorized your vehicle’s tire standard, confirming whether it is engineered for standard passenger use, heavy light-truck loads, or European metric specifications.
- Common Mistake: Assuming unlettered Euro-metric tires are defective or missing characters. They are manufactured to distinct load tables managed by the European Tyre and Rim Technical Organisation (ETRTO).
Step 3: Measure Section Width in Millimeters
- Action: Check the three-digit number immediately following the vehicle classification letter to find the tire width.
- How to Do It: Read the three digits following the initial letter (or starting the string if no letter is present). For example, in the code
P225/50R17, the number225represents the nominal section width. This measurement is expressed in millimeters and is taken from the widest point of the outer sidewall to the widest point of the inner sidewall when the tire is mounted on a specified rim width and inflated to its normal pressure. - Success Checkpoint: You will know this step worked when you convert or understand that a
225rating means the tire profile spans 225 millimeters (approximately 8.85 inches) across its widest lateral points. - Common Mistake: Believing the width number represents the width of the flat tread footprint that touches the asphalt. The section width is always wider than the actual tread contact patch.
Step 4: Calculate the Aspect Ratio Percentage
- Action: Look at the two-digit number located immediately after the forward slash (
/) to determine the aspect ratio. - How to Do It: Isolate the two numbers following the slash. In the sample string
P225/50R17, the number50is the aspect ratio. This figure represents the percentage relationship between the tire’s sidewall height (from the rim edge to the tread base) and its section width. Multiply the section width by this percentage to find the actual sidewall height. For example, multiplying 225 millimeters by 0.50 yields a sidewall height of 112.5 millimeters (4.42 inches). - Success Checkpoint: You will know this step worked when you can accurately calculate that a lower aspect ratio (such as 35 or 40) denotes a low-profile tire with a shorter sidewall, while a higher aspect ratio (such as 70 or 75) denotes a tall sidewall designed for ride comfort and rough terrain.
- Common Mistake: Treating the aspect ratio as an absolute measurement in inches or millimeters. A
50does not mean a 50-inch or 50-millimeter sidewall; it means the height is 50 percent of whatever the section width happens to be.
Step 5: Verify the Internal Construction Type
- Action: Note the single letter placed directly after the aspect ratio number.
- How to Do It: Locate the letter immediately following the aspect ratio. In almost all modern passenger and light truck tires, this letter is
R, which stands for Radial construction. Radial tires feature internal body plies running radially across the tire from bead to bead. If you see the letterD, it stands for Diagonal or bias-ply construction, which is now largely restricted to specialty trailer tires, vintage vehicles, or heavy industrial applications. Occasionally, you may seeBfor belted bias. - Success Checkpoint: You will know this step worked when you identify the
Rdesignation, confirming that your tires use modern radial steel-belted technology designed for high-speed stability and cooler operating temperatures. - Common Mistake: Ignoring the construction letter or confusing it with a speed rating. Mixing radial and bias-ply tires on the same axle severely compromises vehicle handling and stability and must be avoided.
Step 6: Determine Wheel Rim Diameter in Inches
- Action: Read the two-digit number positioned immediately after the construction letter.
- How to Do It: Find the number following the radial designation
R. In the codeP225/50R17, the number17indicates the wheel diameter. This measurement is given in inches and dictates the exact size of the metal wheel rim that the tire is designed to fit. A tire stamped with17can only be safely mounted on a 17-inch wheel rim. - Success Checkpoint: You will know this step worked when you match the tire diameter to your wheel size, ensuring that a replacement tire matches your rim size down to the exact inch without attempting to stretch it onto a smaller or larger wheel.
- Common Mistake: Assuming tire diameter can be adjusted independently of your wheels. Buying a tire with an 18-inch diameter designation means it will completely fail to seat or seal on a 17-inch wheel rim.
Step 7: Decode the Load Index and Speed Rating
- Action: Locate the separate two- or three-digit number and terminal letter combination isolated by a space after the rim diameter.
- How to Do It: Look at the final grouping at the end of the service description, such as
98H.- Load Index: The numeric portion (
98) represents the maximum weight carrying capacity of a single tire when properly inflated. Cross-reference this number with standard load index charts. For example, a load index of 98 corresponds to a maximum load capacity of 1,653 pounds (750 kilograms) per tire. Multiply this by four to estimate total vehicle weight support under ideal conditions. - Speed Rating: The final alphabetical character (
H) dictates the maximum safe operating speed for the tire under optimal conditions. Common speed ratings includeS(up to 112 mph / 180 km/h),T(up to 118 mph / 190 km/h),H(up to 130 mph / 210 km/h),V(up to 149 mph / 240 km/h), andW(up to 168 mph / 270 km/h).
- Load Index: The numeric portion (
- Success Checkpoint: You will know this step worked when you successfully look up your load index and speed rating on an industry conversion chart, confirming they meet or exceed the minimum safety specifications established by your vehicle manufacturer.
- Common Mistake: Installing replacement tires with a lower speed rating or load index than factory specifications, which can cause accelerated tread wear, heat buildup, and dangerous tire failure at highway speeds.
Step 8: Read the DOT Manufacturing Date Code
- Action: Find the standardized Department of Transportation string and decode the final four digits to determine tire age.
- How to Do It: Scan the lower perimeter of the sidewall near the wheel rim for the letters
DOT. FollowingDOTwill be a string of 10 to 13 letters and numbers. Focus exclusively on the final four digits of this block.- The first two digits represent the week of manufacture (01 through 52).
- The last two digits represent the year of manufacture.
- For example, a code ending in
3425means the tire was manufactured during the 34th week of the year 2025.
- Success Checkpoint: You will know this step worked when you can state the exact week and year your tire was produced, allowing you to evaluate whether the tire is within its safe operating window (typically 6 to 10 years from the date of manufacture regardless of remaining tread depth).
- Common Mistake: Misinterpreting old three-digit DOT codes (found on tires manufactured before the year 2000) as modern codes, or failing to check both sides of the vehicle if the full DOT stamp is only printed on the exterior-facing sidewall.
Step 9: Distinguish Sidewall Pressure Limits from Vehicle Placards
- Action: Locate the “Max PSI” stamp on the sidewall and compare it against your vehicle’s recommended inflation pressure.
- How to Do It: Look near the outer bead for text stating
MAX LOADandMAX PSI(e.g.,MAX PRESS 51 PSI). Understand that this figure represents the absolute maximum pressure the tire casing can hold when cold, not the recommended inflation pressure for your specific car. Open the driver-side door and read the white and yellow manufacturer placard affixed to the door jamb to find the true recommended cold inflation pressure (such as32 PSI). - Success Checkpoint: You will know this step worked when you inflate your tires to the vehicle manufacturer placard specification rather than the maximum pressure limit printed on the rubber sidewall.
- Common Mistake: Inflating tires to the maximum pressure listed on the sidewall, which results in a harsh ride, reduced traction, accelerated center-tread wear, and compromised braking performance.
Common Mistakes and How to Fix Them
- Reading the Inside Sidewall for Date Codes: Many modern asymmetric or directional tires only stamp the full 11-to-13-character DOT serial code and complete date block on the exterior-facing sidewall. Fix: If you see only a partial DOT code containing letters without the four-digit date block, walk around to the outer-facing side of the tire to read the complete string.
- Confusing Aspect Ratio with Physical Height: Assuming that a higher second number means a taller tire overall. Fix: Remember that the aspect ratio is a percentage of the section width. A wide tire with a low aspect ratio can be taller overall than a narrow tire with a high aspect ratio depending on the rim size. Always calculate total diameter by combining section width, aspect ratio, and rim diameter.
- Ignoring Tire Age Past Tread Wear Limits: Replacing tires exclusively based on remaining tread depth while ignoring rubber degradation. Fix: Inspect the DOT code on every tire. Even if tread depth exceeds minimum legal limits (2/32 of an inch), rubber compounds dry out, harden, and crack over time. Replace any tire exceeding 6 to 10 years of age.
- Buying Lower Load Index Replacements: Selecting a cheaper tire replacement with a lower load index number because it matches the physical dimensions. Fix: Always verify that the replacement tire’s load index meets or exceeds the original equipment manufacturer (OEM) rating to safely support the vehicle’s gross weight rating.
Variations
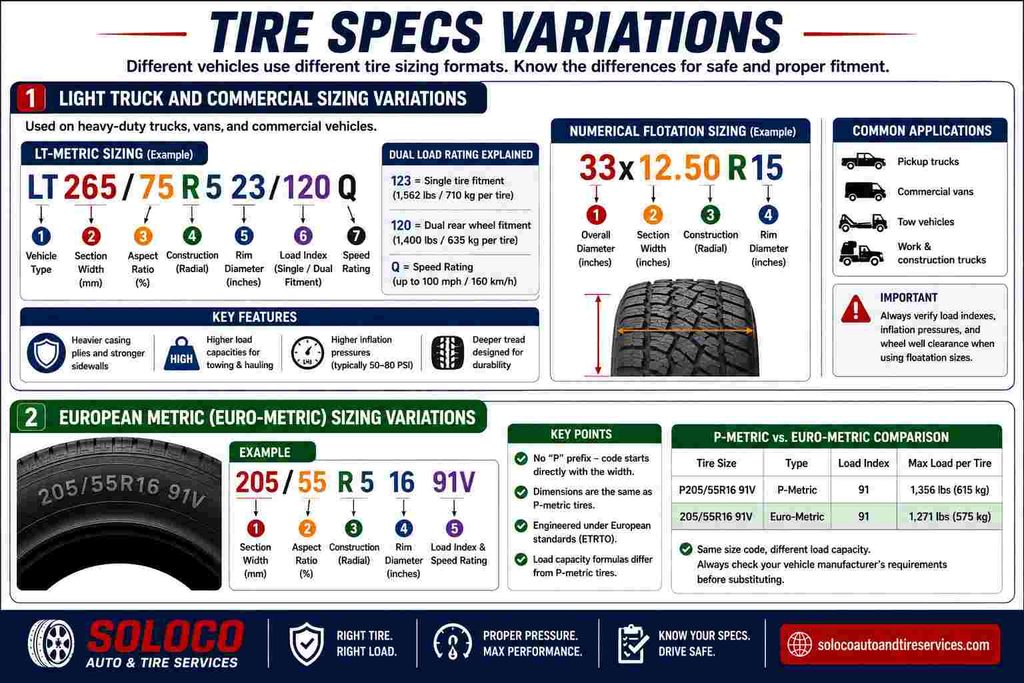
Light Truck and Commercial Siring Variations
For heavy-duty trucks, vans, and commercial vehicles, tire specs often use LT-metric sizing or numerical flotation sizing. An LT-metric tire (e.g., LT265/75R16 123/120Q) includes an LT prefix and often lists dual-wheel load ratings separated by a slash (e.g., 123 for single fitment, 120 for dual rear wheel fitment). Flotation sizes (e.g., 33x12.50R15) list the overall outer diameter in inches first, followed by the section width in inches, the construction type, and the rim diameter.
European Metric (Euro-metric) Siring Variations
European metric tires omit the P prefix entirely, beginning directly with the three-digit section width (e.g., 205/55R16). While dimensions match P-metric tires identically, Euro-metric tires are engineered to different load capacity formulas under European standards, meaning substitution requires careful verification of load indexes.
How Long Does It Take / What Does It Cost
- Time Investment: Reading and recording specs for all four tires takes between 8 to 20 minutes total, depending on lighting conditions and how clean the sidewalls are.
- Financial Cost: $0. Reading tire specifications requires no specialized tools, digital scanners, or professional assistance.
Frequently Asked Questions
What does the letter P mean on a tire spec?
The letter P at the beginning of a tire specification stands for P-metric, indicating that the tire was engineered according to standards set by the Tire and Rim Association for passenger vehicles, including sedans, minivans, crossovers, and light SUVs.
How do I know if my tires are too old to drive on?
You can determine tire age by locating the four-digit DOT manufacturing date code on the outer sidewall. The first two digits represent the manufacturing week and the last two represent the year. Industry safety experts recommend replacing tires that are more than six to ten years old, regardless of remaining tread depth.
Is the maximum PSI on the sidewall the correct tire pressure?
No. The maximum PSI printed on the sidewall represents the upper structural pressure limit for the tire casing, not the optimal inflation pressure for your vehicle. Always inflate your tires to the psi values listed on the placard located on the driver-side door jamb.
What is the difference between load index and speed rating?
The load index is a numeric code that dictates the maximum weight capacity a single tire can safely support when properly inflated. The speed rating is a letter code indicating the maximum safe operating speed certified for that tire under optimal operational loads and inflation pressures.


