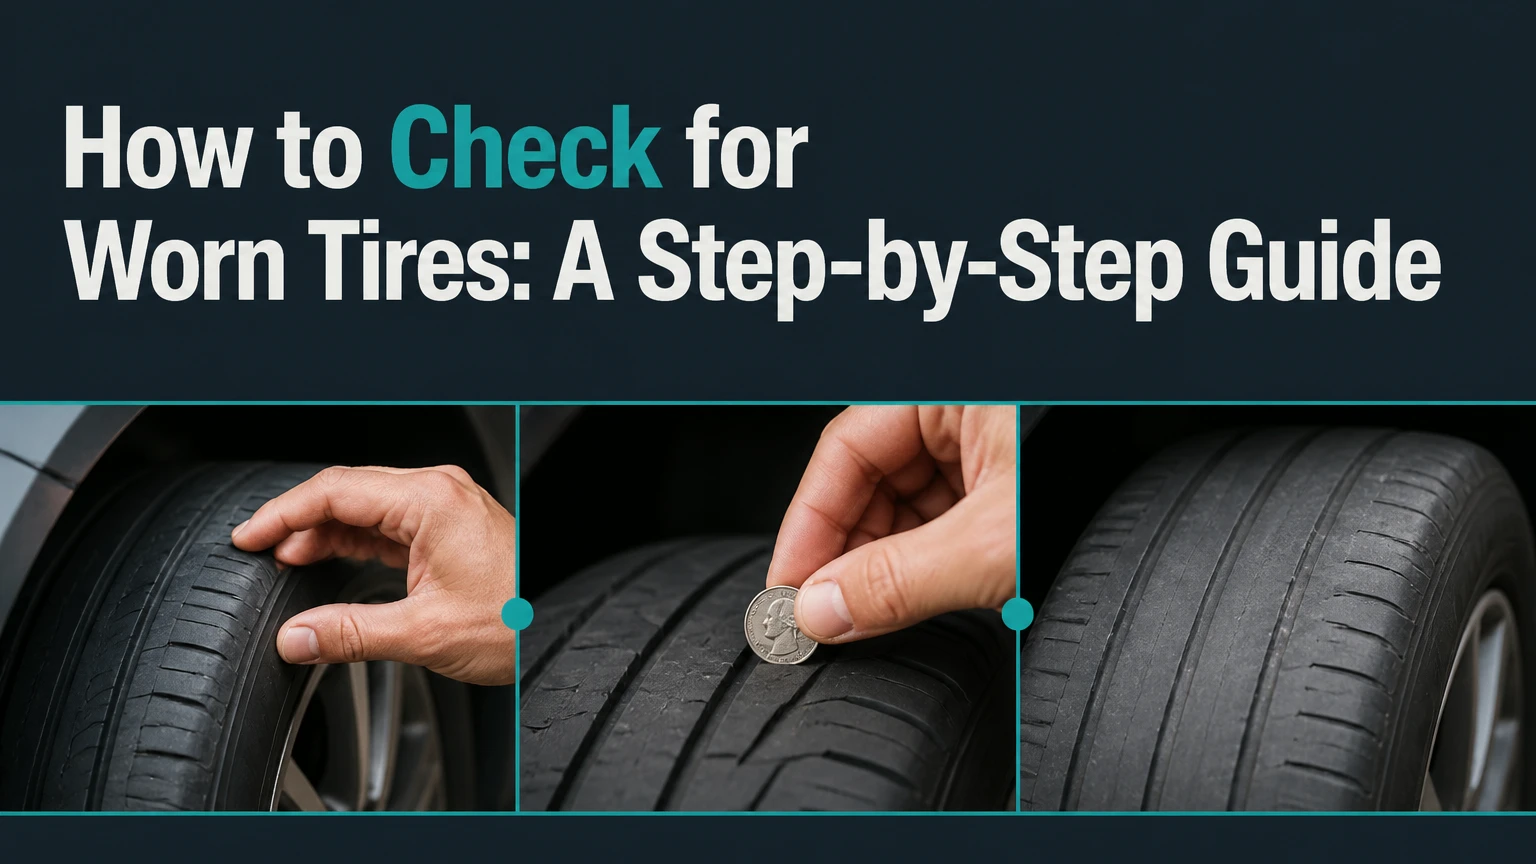
Checking for worn tires is a critical maintenance task that takes about 15 minutes to complete for all four wheels. By completing five simple steps—preparing the vehicle, verifying age and specifications, measuring tread depth, inspecting surfaces and sidewalls, and testing air pressure—you can prevent blowouts, maintain wet-weather traction, and ensure optimal vehicle safety. The single factor that most determines success is taking multiple depth measurements across the width of the tread rather than relying solely on a quick glance at the outer edge.
Before You Start
- Time Required: 15 minutes total
- Difficulty Level: Beginner
- Cost: $0 to $15 (depending on whether you already own a tread depth and pressure gauge)
- Tools and Materials Checklist:
- Tire tread depth gauge (1 unit, analog or digital, set to 32nds of an inch or millimeters)
- Tire pressure gauge (1 unit, calibrated)
- U.S. Penny or Quarter (1 coin, for quick visual validation)
- Flashlight (1 unit, for inner sidewall and tread inspection)
- Stiff-bristled brush or pick (1 unit, for clearing trapped gravel)
- Prerequisite Conditions: The vehicle must be parked on a flat, level surface with the engine off and the parking brake fully engaged. Tires should be cold (parked for at least 3 hours or driven less than 1 mile).
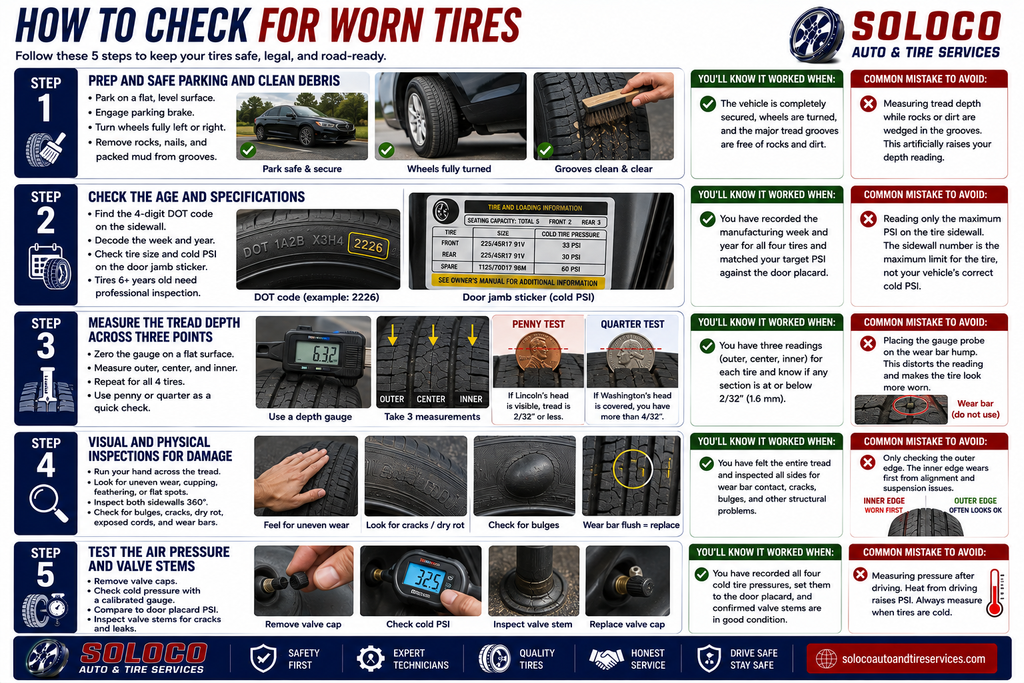
Step 1: Prep and Safe Parking and Clean Debris
Park the vehicle on a flat, level surface, engage the parking brake, and clear all debris from the tire tread grooves.
Turn the steering wheel fully to the left or right to expose the front tire treads completely, granting clear access to the inner and outer tread blocks. Take your stiff-bristled brush or pick and remove any large stones, nails, or packed mud lodged inside the circumferential grooves. A depth gauge cannot sit flat against the rubber base if debris remains trapped in the channel.
- You’ll know it worked when: The vehicle is completely secured against rolling, the front wheels are fully turned to provide unobstructed access, and the major tread grooves are free of rocks and packed dirt.
- Common Mistake to Avoid: Measuring tread depth while rocks or dirt are wedged in the grooves. This artificially raises your depth reading and hides dangerous wear.
Step 2: Check the Age and Specifications
Locate the four-digit DOT code on the outer sidewall and cross-reference your tire size and cold PSI requirements with the vehicle door jamb sticker.
Find the letters “DOT” on the tire sidewall followed by a series of numbers and letters, ending in a four-digit manufacturing stamp. For example, a code of “2226” indicates the tire was manufactured during the 22nd week of the year 2026. Open the driver door and read the white placard sticker on the door frame to find the exact cold inflation pressure recommended by the vehicle manufacturer. Tires older than 6 years from their manufacture date require immediate professional inspection regardless of remaining tread depth, because the rubber compounds degrade structurally over time.
- You’ll know it worked when: You have successfully recorded the manufacturing week and year for all four tires and matched your target PSI against the official vehicle door placard.
- Common Mistake to Avoid: Reading only the maximum PSI printed on the tire sidewall. The sidewall number represents the maximum limit for the tire, whereas the door jamb sticker lists the correct PSI for your specific vehicle weight and handling dynamics.
Step 3: Measure the Tread Depth Across Three Points
Zero out your depth gauge on a flat surface and measure the tread depth across three distinct points on every tire.
Push the depth gauge probe all the way out. If using a digital gauge, ensure it is set to 32nds of an inch or millimeters. Insert the probe into the shallowest center groove, pressing the sliding base flat against the rubber tread blocks. Take three separate readings across the tire width: the outer edge, the center groove, and the inner edge. Repeat this process for all four tires. As an alternative validation method, insert a U.S. penny upside down into the center groove; if the top of Lincoln’s head is visible, your tread is at or below 2/32 of an inch and is legally bald. Using a quarter provides a safer 4/32 of an inch cushion before wet-weather hydroplaning risk increases significantly.
- You’ll know it worked when: You have obtained three distinct numerical readings (outer, center, inner) for each tire, confirming whether any section has dropped below 2/32 of an inch or 1.6 millimeters.
- Common Mistake to Avoid: Placing the gauge probe directly on top of the built-in wear bar indicator hump. This distorts the measurement and makes the tire appear much more worn than it actually is in the surrounding tread area.
Step 4: Visual and Physical Inspections for Damage
Run your bare hand across the entire tread surface and use your flashlight to thoroughly inspect both sidewalls.
Glove your hand or use bare fingers to sweep across the tread face, feeling for any uneven patches, cupping, feathering, or flat spots. Next, shine your flashlight along the outer sidewall, then crawl down to check the inner sidewall facing the vehicle suspension. Look closely for bulges, blisters, deep cracks, dry rot checking, or exposed internal cords. Locate the built-in wear bars, which are narrow rubber strips running perpendicular across the bottom of the main grooves; if the surrounding tread is completely flush with these bars, the tire must be replaced immediately.
- You’ll know it worked when: You have physically felt every tread face and visually inspected 360 degrees of both inner and outer sidewalls for structural flaws or wear bar contact.
- Common Mistake to Avoid: Only inspecting the easy-to-see outer edge of the tire. Steering alignment and suspension issues usually destroy the inner edge of the tire first, leaving the outer edge looking deceptively healthy.
Step 5: Test the Air Pressure and Valve Stems
Remove the valve stem caps, measure the cold inflation pressure of each tire, and inspect the rubber valve stems for degradation.
Unscrew the plastic valve cap from the tire valve stem and store it in your pocket. Firmly press your calibrated tire pressure gauge squarely onto the end of the valve stem until the hissing sound stops and the indicator bar or digital screen locks in a reading. Compare this measurement against the target PSI you found on the door jamb sticker in Step 2. Finally, inspect the rubber base of the valve stem for fine cracks or dry rot, and wiggle it gently to ensure it does not leak air. Replace the valve caps securely when finished.
- You’ll know it worked when: You have recorded the exact pressure of all four cold tires, adjusted them to match the manufacturer placard, and confirmed that the valve stems show no signs of cracking or leaking.
- Common Mistake to Avoid: Measuring tire pressure right after driving the vehicle. Driving generates friction that heats up the air inside the tire, resulting in a falsely elevated PSI reading. Always measure when tires are cold.
Common Mistakes and How to Fix Them
Checking tires improperly leads to false confidence and unsafe driving conditions. Review these common failure modes to ensure accurate assessments:
| Wear Symptom / Failure | Root Cause | Immediate Solution |
| Center Tread Wear | Over-inflation | Lower the air pressure using the valve core pin until it matches the vehicle door jamb sticker. |
| Outer Edge Wear (Both Sides) | Under-inflation | Inflate the tire to the correct cold PSI using an air compressor; inspect for slow punctures. |
| Single Edge Wear (Inner/Outer) | Bad alignment or camber issues | Schedule a professional four-wheel alignment and suspension check immediately. |
| Cupping / Scalloped Dips | Worn suspension components | Inspect and replace faulty shock absorbers, struts, or ball joints. |
| Sidewall Bulge / Bubble | Broken internal cords or impact damage | Complete structural failure risk. Do not drive the vehicle; replace the tire immediately. |
| Hissing sound at valve stem | Misaligned gauge or bad valve core | Re-seat the gauge squarely on the stem. If hissing continues, replace the valve core tool. |
Variations Based on Vehicle Type and Conditions
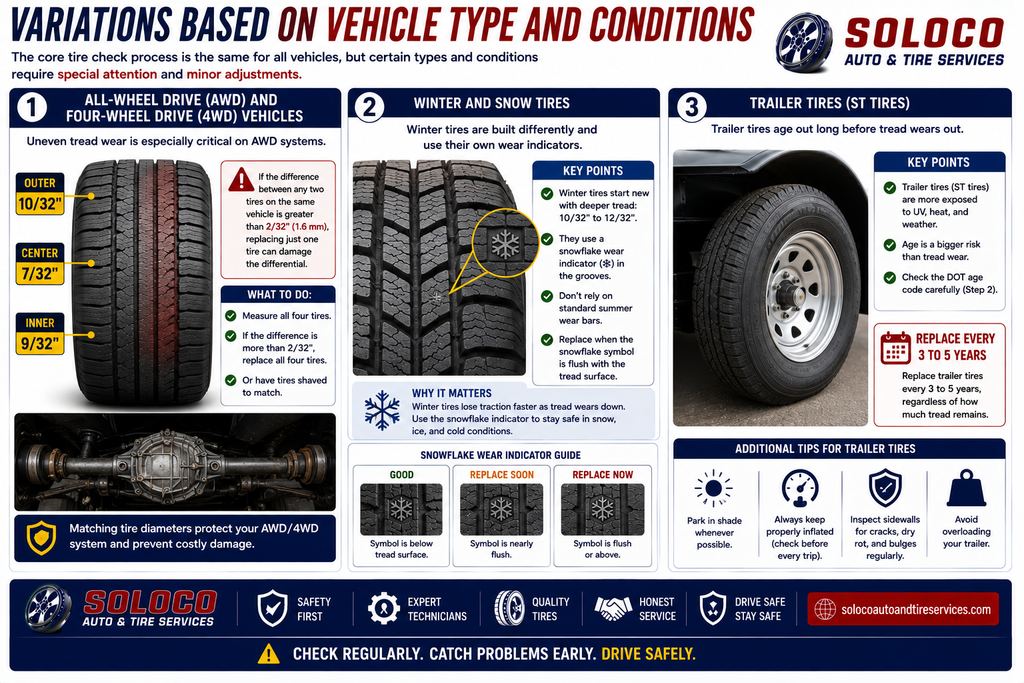
The core process remains identical across passenger vehicles, but specific conditions require minor adjustments:
- All-Wheel Drive (AWD) and Four-Wheel Drive (4WD) Vehicles: Uneven tread wear is especially critical on AWD systems. If you measure a difference greater than 2/32 of an inch between tires on the same vehicle, replacing just a single tire can damage the differential. You may need to replace all four tires simultaneously or have them shaved to match.
- Winter and Snow Tires: Winter tires feature specialized rubber compounds and deeper tread blocks, often starting at 10/32 to 12/32 of an inch when brand new. They also feature secondary winter wear indicators. When checking winter tires, look for the snowflake wear symbol rather than standard summer wear bars.
- Trailer Tires (ST Tires): Trailer tires often degrade from age and UV exposure long before the tread wears down. Pay special attention to the DOT age code in Step 2, and replace trailer tires every 3 to 5 years regardless of how deep the remaining tread appears.
How Long Does It Take and What Does It Cost?
- Time Investment: 15 to 20 minutes for a complete four-wheel check, including cleanup and putting tools away.
- Monetary Cost: $0 if you use the coin test and your vehicle’s built-in tire pressure monitoring system (TPMS). Purchasing a dedicated digital tread depth gauge and a quality mechanical dial pressure gauge costs between $10 and $25 total at any auto parts store.
Frequently Asked Questions
How often should I check my tire tread depth?
You should check your tire tread depth and air pressure at least once a month, and always before taking long road trips or driving in severe weather conditions like heavy rain or snow. Routine monthly checks help you catch alignment issues and slow leaks before they destroy a tire prematurely.
Can I fix a tire with uneven edge wear by rotating the tires?
Tire rotation helps equalize normal wear patterns, but it cannot fix abnormal wear caused by mechanical issues. If a tire exhibits severe inner edge wear from bad wheel alignment or a blown shock absorber, rotating it to another position will simply cause the new position to wear out in the exact same way until you fix the root cause.
What is the legal minimum tread depth for driving?
The legal minimum tread depth in most regions is 2/32 of an inch (1.6 millimeters). However, safety experts and tire manufacturers strongly recommend replacing tires when they reach 4/32 of an inch, because wet-weather traction and water evacuation drop off sharply below that threshold, greatly increasing hydroplaning risks.
Why do my tires wear out faster on the inside edge?
Inner edge wear is almost always caused by negative camber misalignment or worn suspension bushings, control arms, or ball joints. When suspension components sag or lose stiffness, the wheels tilt inward during driving, concentrating all the vehicle weight onto the inner shoulder of the rubber tread block.
Are digital tread depth gauges more accurate than analog ones?
Both analog pin gauges and digital gauges are highly accurate when used correctly, provided they are zeroed out on a flat surface before measurement. Digital gauges offer the advantage of easily switching between metric millimeters and imperial 32nds of an inch with the press of a button, reducing reading errors.


