Decoding tire codes requires no specialized tools, taking just 3 to 5 minutes of visual inspection along a tire’s sidewall to reveal critical safety, sizing, and manufacturing specifications. This definitive guide breaks down every letter, number, and code sequence into 7 actionable steps. Mastering these markings ensures exact vehicle compatibility, optimal load safety, and accurate tire life tracking.
Before You Start
- Time Required: 3 to 5 minutes per tire.
- Difficulty Level: Beginner.
- Cost: Free ($0).
- Tools and Materials Checklist:
- Clean microfiber towel (1 piece).
- Spray bottle filled with water or mild automotive dish soap (optional, 250 ml).
- Standard LED flashlight or smartphone flashlight (1 piece).
- Optional: Tire tread depth gauge (1 piece).
- Prerequisite Conditions: Vehicle safely parked on a flat, level surface with the engine turned off and the parking brake firmly engaged. For front tires, turn the steering wheel fully to one side to angle the sidewall outward into open space, providing clear, unobstructed line-of-sight to all embossed lettering.
Phase 1: Preparation and Sidewall Positioning
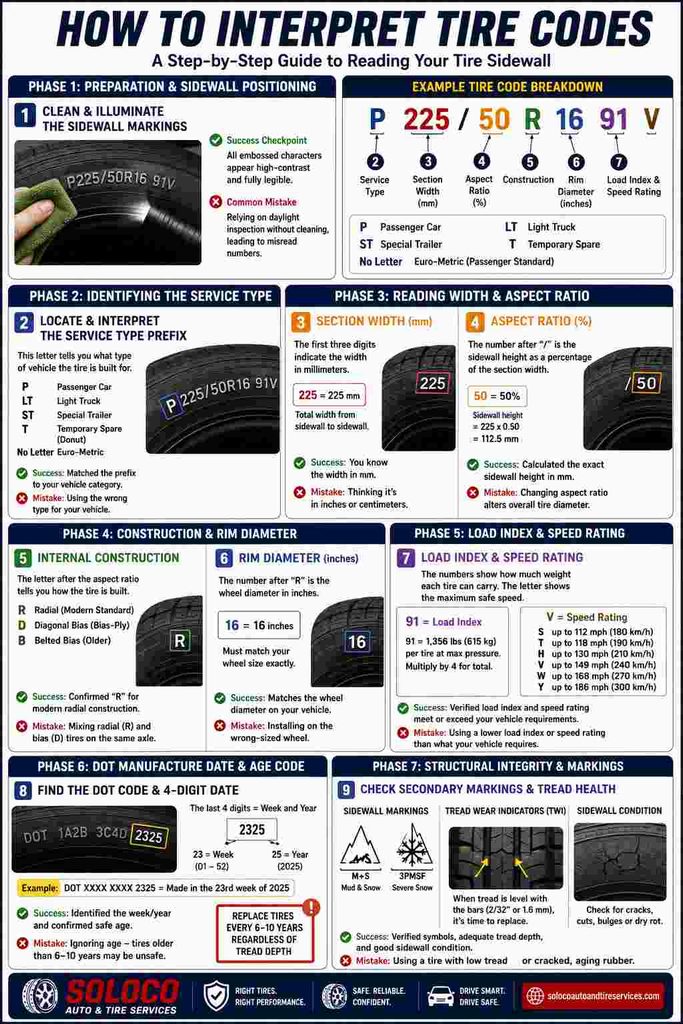
Step 1: Clean and Illuminate the Sidewall Markings
- Action: Wipe away accumulated road grime, brake dust, and mud from the outer tire sidewall using a damp microfiber towel, then angle your flashlight parallel to the rubber surface.
- Process Details: Tire sidewalls feature raised, black-on-black molded lettering that can easily blend into the rubber texture when covered by a fine layer of road film. Spray a light mist of water or soapy water over the raised text if stubborn brake dust obscures the sequence. Hold your flashlight flat against the sidewall so the beam skims horizontally across the rubber; this creates stark micro-shadows that highlight every embossed digit and letter instantly.
- Success Checkpoint: You will know this step worked when all embossed characters, numbers, and symbols along the main circumference of the tire appear high-contrast and fully legible under the parallel light beam.
- Common Mistake: Relying on casual daylight inspection without cleaning the rubber, which frequently leads to misreading a worn number 3 as an 8 or an 8 as a 3.
Phase 2: Identifying the Service Type
Step 2: Locate and Interpret the Service Type Prefix
- Action: Identify the one- or two-letter prefix situated at the absolute beginning of the primary alpha-numeric code sequence stamped on the sidewall.
- Process Details: Look for a bold sequence formatted like
P225/50R16 91V. Scan the very front of this sequence for the letter code. P designates a Passenger car tire built to strict U.S. standards, optimized for smooth ride quality and passenger weight loads. LT stands for Light Truck, indicating heavier sidewall construction and higher inflation pressures designed for pickup trucks and heavy-duty SUVs. ST stands for Special Trailer, built explicitly for towable trailers and never for motorized steering or drive axles. T designates a Temporary spare tire (donut), strictly rated for limited speeds and short distances. If no letter appears at the beginning of the sequence, the tire uses European Metric standards (Euro-metric), which share load capacities with passenger tires via alternate calculation margins. - Success Checkpoint: You will know this step worked when you have successfully matched your tire’s initial prefix letter against its specific vehicle category (Passenger, Light Truck, Trailer, Temporary, or Euro-metric).
- Common Mistake: Installing a passenger-rated (P) tire onto a heavy utility trailer or light truck, which can cause severe sidewall flex, rapid heat buildup, and catastrophic tread separation under high payload stress.
Phase 3: Reading Section Width and Aspect Ratio
Step 3: Measure the Section Width in Millimeters
- Action: Read the first three-digit number immediately following the service type prefix (or at the absolute start of the string if no prefix is present).
- Process Details: In the sample code
P225/50R16, the three digits225represent the section width. This metric value measures the linear distance from the widest point of the outer sidewall to the widest point of the inner sidewall, expressed strictly in millimeters. This dimension dictates how much physical space the tire occupies horizontally inside the wheel well and governs contact patch width on the road surface. - Success Checkpoint: You will know this step worked when you can accurately state your tire’s section width in millimeters (e.g., 225mm means 225 millimeters of total section width).
- Common Mistake: Assuming the three-digit number represents inches or centimeters, or comparing it directly to wheel rim width instead of total physical cross-section span.
Step 4: Determine the Aspect Ratio (Sidewall Profile Height)
- Action: Identify the two-digit number immediately following the forward slash (
/) in the code sequence. - Process Details: In the sample code
P225/50R16, the number50represents the aspect ratio. This is not a direct measurement in millimeters or inches; rather, it is a percentage. It expresses the height of the tire’s sidewall (from the outer rim flange to the edge of the tread) as a percentage of its section width. To calculate the physical sidewall height in millimeters, multiply the section width by the aspect ratio percentage ($225 \times 0.50 = 112.5$ millimeters of vertical sidewall height). A lower aspect ratio (such as 35 or 40) indicates a low-profile tire with a short sidewall for crisp handling; a higher aspect ratio (such as 70 or 75) indicates a tall sidewall for enhanced ride comfort over bumps. - Success Checkpoint: You will know this step worked when you have calculated the exact vertical sidewall height in millimeters by multiplying the section width by the decimal equivalent of the aspect ratio percentage.
- Common Mistake: Believing that changing the aspect ratio without modifying the wheel rim diameter will not affect overall speedometer calibration or vehicle ground clearance.
Phase 4: Determining Internal Construction and Rim Diameter
Step 5: Verify the Internal Construction Letter
- Action: Locate the single letter placed directly after the aspect ratio digits.
- Process Details: In the sample code
P225/50R16, the letterRdefines the internal carcass construction of the tire. R stands for Radial, meaning the internal body plies run radially across the tire from bead to bead at a 90-degree angle to the centerline of the tread, reinforced by stabilizing steel belts. Radial construction is the universal industry standard for nearly all modern passenger vehicles due to its superior durability, fuel efficiency, and heat dissipation. D stands for Diagonal bias (or bias-ply), where plies intersect at an angle, common on vintage cars or heavy specialized industrial equipment. B stands for Belted bias, an older hybrid construction combining bias plies with stabilizing belts. - Success Checkpoint: You will know this step worked when you have verified that an
Rappears in the sequence, confirming modern radial construction safety and compatibility standards. - Common Mistake: Mixing radial tires (R) with bias-ply tires (D) on the same vehicle axle, which creates severe handling instability, unpredictable steering response, and loss of directional control.
Step 6: Identify the Wheel Rim Diameter in Inches
- Action: Read the two-digit number immediately following the internal construction letter.
- Process Details: In the sample code
P225/50R16, the final number16represents the wheel rim diameter. This value indicates the exact size of the metal wheel rim that the tire is engineered to mount onto, measured in inches from bead seat to bead seat across the center. Unlike the section width (which is measured in millimeters), the rim diameter is universally measured in inches. A 16-inch tire must be mounted exclusively onto a 16-inch wheel rim; attempting to install it on a 15-inch or 17-inch wheel will cause immediate bead seal failure, air loss, and potential structural destruction of the tire bead. - Success Checkpoint: You will know this step worked when your recorded rim diameter matches the physical wheel size stamped on your metal wheel or vehicle placard in exact inches (e.g., 16 inches).
- Common Mistake: Confusing the wheel rim diameter digits with the aspect ratio or assuming tires possess stretching flexibility across different inch-sized wheel diameters.
Phase 5: Decoding Load Index and Speed Rating
Step 7: Decode the Load Index and Speed Rating Sequence
- Action: Locate the separate alphanumeric code sequence typically placed immediately after a space following the rim diameter (e.g.,
91V). - Process Details: This trailing sequence consists of a two- or three-digit number followed by an uppercase letter. The numbers represent the Load Index, a standardized rating corresponding to the maximum weight a single tire can safely support when inflated to its maximum recommended pressure limit. For example, a load index of
91corresponds to a maximum weight capacity of 1,356 pounds (615 kilograms) per tire. Multiply this by four to find the total gross vehicle weight limit under optimal inflation. The final uppercase letter represents the Speed Rating, designating the maximum safe sustained operating speed capability of the tire under its recommended load. Common speed ratings include S (up to 112 mph / 180 km/h), T (up to 118 mph / 190 km/h), H (up to 130 mph / 210 km/h), V (up to 149 mph / 240 km/h), W (up to 168 mph / 270 km/h), and Y (up to 186 mph / 300 km/h). - Success Checkpoint: You will know this step worked when you have cross-referenced both your numeric load index and alphabetical speed rating against standard tire load tables to confirm they meet or exceed your vehicle manufacturer’s baseline requirements.
- Common Mistake: Installing replacement tires with a lower load index or lower speed rating than specified on the vehicle placard, which increases tire flexing, accelerates heat buildup, and risks structural blowout at highway speeds.
Phase 6: Locating the DOT Manufacture Date and Age Code
Step 8: Find the DOT Prefix and Read the 4-Digit Date Code
- Action: Scan the lower inner or outer sidewall for the acronym DOT, followed by a multi-digit serial block, and isolate the final 4-digit numeric block at the end of that string.
- Process Details: Every legal highway tire sold features a Department of Transportation (DOT) identification code. The final four digits of this serial string represent the exact manufacture date. The first two digits indicate the week of production (ranging numerically from
01to52), and the last two digits indicate the calendar year of production. For example, a code readingDOT XXXX XXXX 2325signifies that the tire was manufactured during the 23rd week of the year 2025. This date tracking is vital because rubber degrades chemically over time due to UV exposure, ozone, and thermal cycling, regardless of remaining tread depth. Tires exceeding 6 to 10 years of age from their manufacturing date should be professionally inspected or replaced. - Success Checkpoint: You will know this step worked when you have successfully identified a clear 4-digit week-and-year stamp and confirmed your tire falls within safe chronological operating age limits.
- Common Mistake: Looking at only one side of the tire or checking a 3-digit code from pre-2000 vintage tires without realizing the rubber compound has degraded beyond safe operational limits.
Phase 7: Inspecting Structural Integrity and Secondary Markings
Step 9: Examine Secondary Markings and Tread Health Indicators
- Action: Inspect the sidewall for auxiliary environmental and performance symbols, and check the tread wear indicator bars across the tread channels.
- Process Details: Look for additional standardized markings on the sidewall, such as M+S (Mud and Snow) or the Three-Peak Mountain Snowflake (3PMSF) symbol, which indicate winter traction capability. Check the Tread Wear Indicator (TWI) bars molded across the bottom of the main tread grooves; when the surrounding tread rubber wears down level with these solid rubber wear bars (reaching the legal minimum depth of 2/32 of an inch or 1.6 millimeters), the tire must be replaced immediately. Finally, inspect the sidewall rubber for fine dry-rot cracking (micro-fissures).
- Success Checkpoint: You will know this step worked when you have verified all seasonal capability badges, confirmed adequate tread depth above legal wear limits, and ensured the sidewall is free of deep dry-rot fissures.
- Common Mistake: Assuming a tire with excellent numerical code specs is roadworthy when its tread depth is legally depleted or its sidewall displays deep structural cracking from prolonged sun exposure.
Common Mistakes and How to Fix Them
- Mixing Units Across Dimensions: Forgetting that section width is measured in millimeters while rim diameter is strictly measured in inches. Fix: Always double-check your dimensions against your vehicle door placard before ordering replacements.
- Checking Only One Sidewall for the DOT Date: Assuming the full 4-digit date code is stamped on both sides of the tire casing. Fix: If you see an incomplete DOT block or letters only on the outer face, inspect the inner sidewall facing the vehicle chassis, as manufacturers frequently print the complete 4-digit date stamp on only one side.
- Misreading Historic 3-Digit Date Codes: Encountering a 3-digit code (e.g.,
359meaning the 35th week of 1999 or 1989) and assuming it is standard. Fix: Any tire featuring a 3-digit manufacturing code is over two decades old; immediately take it out of service due to extreme risk of tread separation. - Matching Size Only While Ignoring Load and Speed Ratings: Purchasing replacement tires based exclusively on size numbers like
225/50R16while ignoring the load index (91) and speed rating (V). Fix: Verify that your replacement tires match or exceed the minimum load index and speed rating specified on the vehicle manufacturer’s door jamb sticker.
Variations and Edge Cases
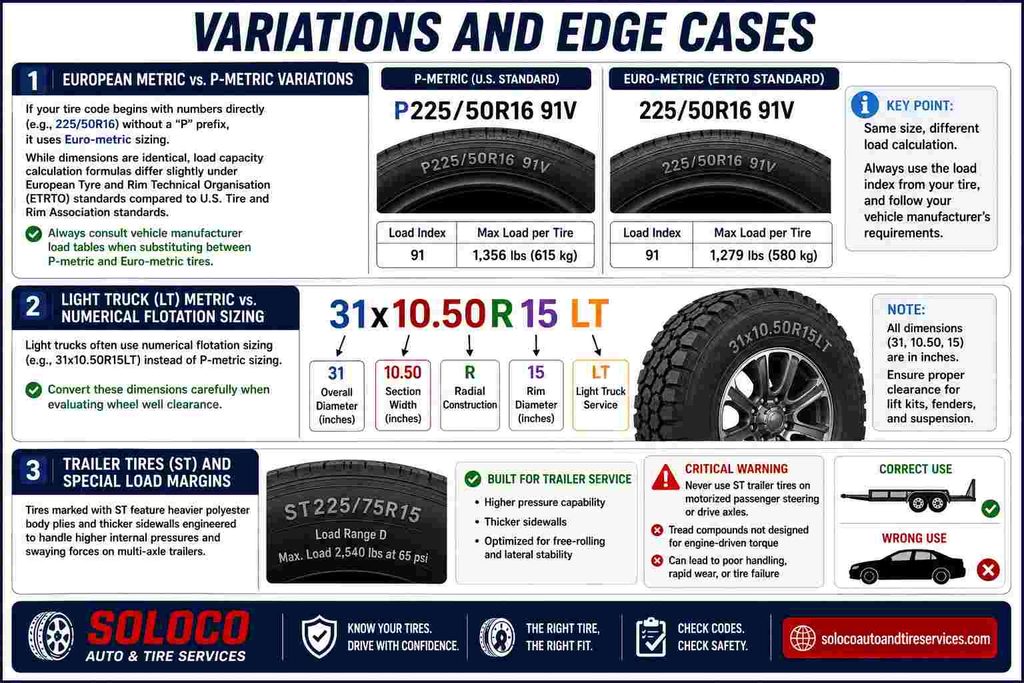
- European Metric vs. P-Metric Variations: If your tire code begins with numbers directly (e.g.,
225/50R16) without a “P” prefix, it uses Euro-metric sizing. While dimensions are identical, load capacity calculation formulas differ slightly under European Tyre and Rim Technical Organisation (ETRTO) standards compared to U.S. Tire and Rim Association standards. Always consult vehicle manufacturer load tables when substituting between P-metric and Euro-metric tires. - Light Truck (LT) Metric vs. Numerical Flotation Sizing: Light trucks often use numerical flotation sizing (e.g.,
31x10.50R15LT) instead of P-metric sizing. In this format,31represents the total outer diameter in inches,10.50represents the section width in inches,Rstands for radial construction,15is the rim diameter in inches, andLTindicates light truck service. Convert these dimensions carefully when evaluating wheel well clearance. - Trailer Tires (ST) and Special Load Margins: Tires marked with ST feature heavier polyester body plies and thicker sidewalls engineered to handle higher internal pressures and swaying forces on multi-axle trailers. Never interchange ST trailer tires onto motorized passenger steering or drive axles, as their tread compounds are optimized for free-rolling tow service rather than engine-driven steering and braking torque.
How Long Does It Take and What Does It Cost
- Time Investment: 3 to 5 minutes for a complete visual inspection of all four vehicle tires when conditions are clean and accessible.
- Monetary Cost: $0 (completely free visual inspection requiring no specialized diagnostic equipment or paid software subscriptions). Optional cleaning supplies or a tire tread depth gauge cost between $5 and $15 if purchased new.
Frequently Asked Questions
What does the M+S designation on a tire sidewall mean?
The M+S marking stands for Mud and Snow, indicating that the tire’s tread pattern features designated void areas and sipes designed to improve traction in loose mud or light snow conditions. However, M+S is a geometry-based classification rather than a tested winter performance standard; for severe winter weather, look for the Three-Peak Mountain Snowflake symbol.
Why do some tires have a complete DOT date on only one side?
During the high-speed tire manufacturing vulcanization process, curing molds are typically engraved with the full 4-digit DOT serial and date stamp on only one half of the outer mold shell to streamline manufacturing efficiency. Consequently, if a symmetric tire is mounted with that specific sidewall facing inward toward the vehicle suspension, you must look at the opposite side of the vehicle to read the date code.
Can I install tires with a higher speed rating than factory specifications?
Yes, installing tires with a higher speed rating (e.g., upgrading from an H-rated tire to a V-rated or W-rated tire) is generally safe and legal. Higher speed ratings indicate superior high-speed heat dissipation and stiffer construction, though they may result in a slightly firmer ride quality depending on the tire’s sidewall stiffness.
How many years do tires last before they become unsafe?
Most automotive and tire manufacturers recommend replacing tires when they reach 6 to 10 years from their DOT manufacturing date, regardless of how much tread depth remains. Ultraviolet solar radiation, atmospheric ozone, and constant thermal cycling cause rubber compounds to oxidize, harden, and develop microscopic internal fissures over time, creating a hidden risk of sudden structural failure.


