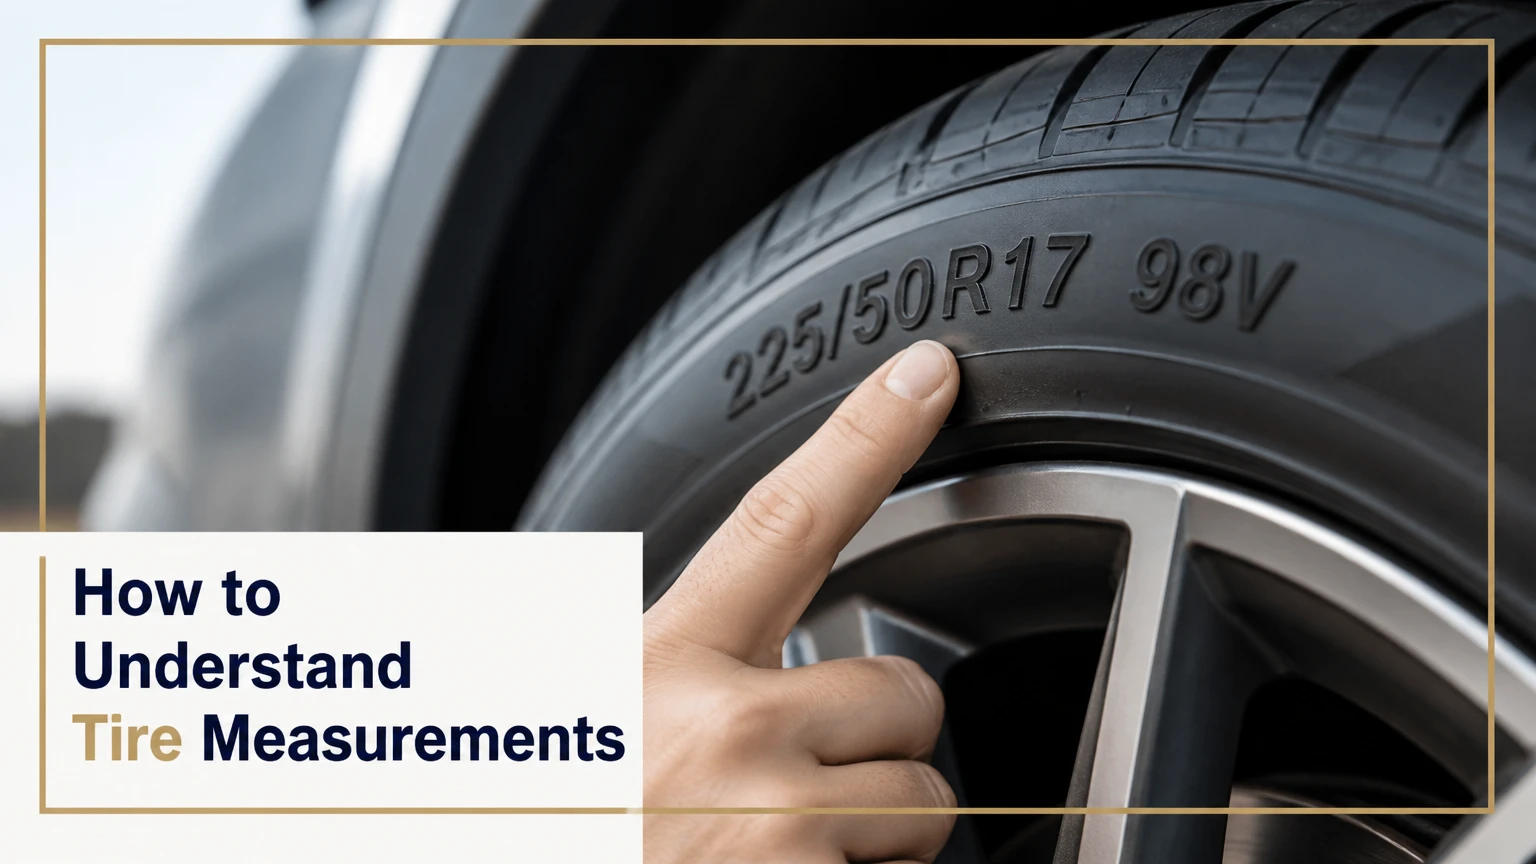
Mastering how to understand tire measurements allows you to select correct replacement tires, verify load safety, and ensure proper vehicle handling without relying on guesswork. By reading the standardized alphanumeric code molded into the sidewall, you can decode sizing, construction, and performance ratings in 8 systematic steps taking under 5 minutes. The factor that most determines success is locating the exact primary service description block while ignoring secondary manufacturing stamps.
Before You Start
- Time Required: 3 to 5 minutes
- Difficulty Level: Beginner
- Cost: $0 (or under $10 if purchasing a tire pressure and tread depth gauge set)
- Tools and Materials Checklist:
- Vehicle tire with an accessible outer sidewall (Quantity: 1)
- LED flashlight or smartphone light (Quantity: 1)
- Mild dish soap and water solution in a spray bottle (Quantity: 8 oz)
- Stiff-bristled nylon utility brush (Quantity: 1)
- Digital tire pressure gauge (Quantity: 1)
- Tread depth gauge reading in millimeters or 32nds of an inch (Quantity: 1)
- Prerequisite Conditions: The vehicle must be parked on a flat, level surface with the steering wheel turned fully outward to expose the front tire sidewall clearly.
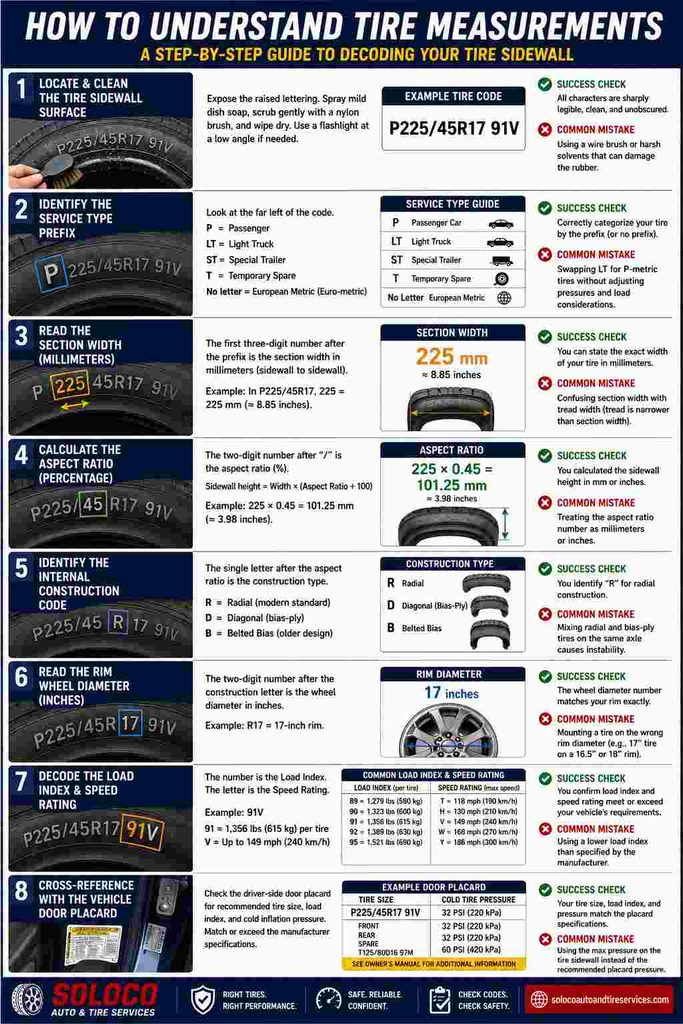
Step 1: Locate and Clean the Tire Sidewall Surface
To begin decoding, you must expose the raised black lettering molded into the outer rubber surface of the tire. Park your vehicle in a well-lit area, turn the steering wheel completely to one side to give yourself unobstructed access, and inspect the outer sidewall for the primary sizing block. Spray your mild dish soap solution over the raised lettering, scrub gently with your nylon utility brush to dislodge accumulated brake dust and road grime, and wipe dry with a clean microfiber towel. If natural lighting is insufficient, hold your LED flashlight at a low, horizontal angle against the rubber surface to cast shadows across the molded characters.
- Success Check: You will know this step worked when all characters in the primary tire code are sharply legible, black-on-black or raised cleanly, without obscured dirt hiding decimal points or letters.
- Common Mistake: Scrubbing too aggressively with a wire brush or harsh petroleum-based solvent, which can degrade the rubber compounds. Always use a soft-to-medium nylon brush and mild dish soap.
Step 2: Identify the Service Type Prefix
Look at the extreme left-hand side of the primary sizing code sequence to find the service type letter designation. This prefix dictates the intended vehicle application category for the tire engineering standard. A code beginning with P designates a Passenger car tire built to Tire and Rim Association standards. A code beginning with LT denotes a Light Truck tire designed for heavier loads and towing applications. An ST prefix stands for Special Trailer, meant exclusively for trailer axles. A T prefix indicates a Temporary spare tire. If your tire code starts directly with a three-digit number without a letter prefix, it follows European metric sizing standards, which function identically for width calculations.
- Success Check: You will know this step worked when you correctly categorize your tire as passenger, light truck, trailer, or temporary based strictly on the prefix letters or their absence.
- Common Mistake: Assuming an LT tire can be swapped directly for a P-metric tire without adjusting inflation pressures and load capacity calculations, which can compromise stability under load.
Step 3: Read the Section Width in Millimeters
Locate the first three-digit number immediately following the service type prefix (or at the absolute beginning of the string if no prefix exists). This number represents the nominal section width of the tire measured in millimeters from the widest point of the outer sidewall to the widest point of the inner sidewall when mounted on the specified rim width. For example, in the code P225/45R17, the number 225 indicates a section width of 225 millimeters, which equals roughly 8.85 inches.
- Success Check: You will know this step worked when you can state the exact width of your tire across its widest profile in millimeters.
- Common Mistake: Confusing section width with tread width. Tread width is narrower than section width because the outer sidewalls bulge outward past the tread face.
Step 4: Calculate the Aspect Ratio Percentage
Find the two-digit number located directly after the forward slash ($\slash$) following the section width number. This number is the aspect ratio, expressed as a percentage that defines the relationship between the tire sidewall height (section height) and its section width. To calculate the actual height of the sidewall from the wheel rim edge to the tread edge, multiply the section width by the aspect ratio percentage. For example, with a width of 225mm and an aspect ratio of 45, you multiply 225 by 0.45, yielding a sidewall height of 101.25 millimeters (about 3.98 inches).
- Success Check: You will know this step worked when you successfully compute the vertical height of the sidewall in millimeters or inches rather than treating the aspect ratio as an absolute linear measurement.
- Common Mistake: Treating the aspect ratio number as millimeters or inches. A lower aspect ratio number (such as 35 or 40) means a low-profile tire with a shorter sidewall, while a higher number (such as 70 or 75) indicates a taller sidewall.
Step 5: Identify the Internal Construction Code
Examine the single uppercase letter immediately following the aspect ratio number. This letter designates the internal carcass ply construction method used to build the tire’s internal skeletal structure. The letter R stands for Radial construction, where the body plies run radially from bead to bead across the tread centerline. Radial tires are the universal standard for modern passenger and light truck vehicles due to their superior heat dissipation and tread life. An old or specialized bias-ply tire will display a D (Diagonal) or B (Belted bias) designation.
- Success Check: You will know this step worked when you identify an R for radial construction, confirming your tire is modern and structurally sound for highway speeds.
- Common Mistake: Mixing radial tires and bias-ply tires on the same axle, which creates severe handling instability and vehicle control loss.
Step 6: Read the Rim Wheel Diameter in Inches
Locate the two-digit number immediately following the internal construction letter. This number specifies the diameter of the wheel rim that the tire is specifically engineered to fit, measured in inches from bead seat to bead seat. For example, if the code reads R17, the number 17 means the tire requires a wheel rim with a 17-inch diameter. This is the only major measurement in standard tire sizing codes that uses imperial inches rather than metric millimeters.
- Success Check: You will know this step worked when you verify that the wheel diameter number matches your metal rim’s exact nominal diameter size.
- Common Mistake: Attempting to mount a tire onto a wheel with a mismatched diameter (such as putting a 17-inch tire on a 16.5-inch or 18-inch rim), which prevents the bead from seating and causes catastrophic pressure failure.
Step 7: Decode the Load Index and Speed Rating
Locate the separate alphanumeric code appearing after a space or hyphen following the rim diameter, such as 91V. The number portion (91) represents the load index, which corresponds to the maximum weight carrying capacity a single tire can safely support when properly inflated. The letter portion (V) represents the speed rating, indicating the maximum safe operating speed capability under maximum load conditions. Cross-reference these codes against a standardized tire industry index chart. A load index of 91 corresponds to a maximum weight capacity of 1,356 pounds (615 kg) per tire, and a speed rating of V corresponds to a maximum safe speed of 149 mph (240 km/h).
- Success Check: You will know this step worked when you look up both the load index number and speed rating letter on an official manufacturer chart and confirm they meet or exceed your vehicle’s factory requirements.
- Common Mistake: Installing replacement tires with a lower load index than the vehicle manufacturer specifies, which risks tire overloading, excessive heat buildup, and blowout under highway conditions.
Step 8: Cross-Reference with the Vehicle Door Placard
Walk over to the driver-side door opening and inspect the yellow and white federal certification placard affixed to the door jamb or pillar. Compare the tire size, load index, and recommended cold inflation pressure printed on this placard against the numbers you decoded from your tire sidewall. The vehicle manufacturer specifies these exact figures based on vehicle weight, suspension tuning, and gross axle weight ratings. Ensure your tires match or exceed these baseline specifications.
- Success Check: You will know this step worked when your tire size and load ratings match the factory placard specifications for your specific vehicle make, model, and trim year.
- Common Mistake: Relying solely on the maximum pressure printed on the tire sidewall rather than the vehicle placard pressure. The sidewall pressure is the maximum pressure limit for the tire, whereas the door placard pressure is the optimal operating pressure for your specific car.
Common Mistakes and How to Fix Them
- Confusing Aspect Ratio for Absolute Height: If you assume a 50 aspect ratio means a 50mm sidewall, you will miscalculate clearances. Fix: Always multiply the three-digit section width by the decimal equivalent of the two-digit aspect ratio percentage.
- Mixing Metric and Imperial Standards: Assuming all measurements are metric leads to improper rim sizing purchases. Fix: Remember that section width is in millimeters, but wheel diameter is always in inches.
- Ignoring Load Ratings During Replacement: Buying tires with correct physical dimensions but an insufficient load index creates structural safety hazards. Fix: Always verify that the replacement tire’s load index number equals or exceeds the original equipment manufacturer (OEM) specification on the door placard.
- Misinterpreting DOT Manufacturing Date Codes: Reading the 4-digit Department of Transportation (DOT) code incorrectly can leave you driving on expired rubber. Fix: Locate the letters “DOT” followed by a series of numbers; the final four digits indicate the week and year of manufacture (e.g., “2424” means the 24th week of 2024). Tires older than 6 to 10 years should be replaced regardless of tread depth.
Variations Based on Vehicle Type
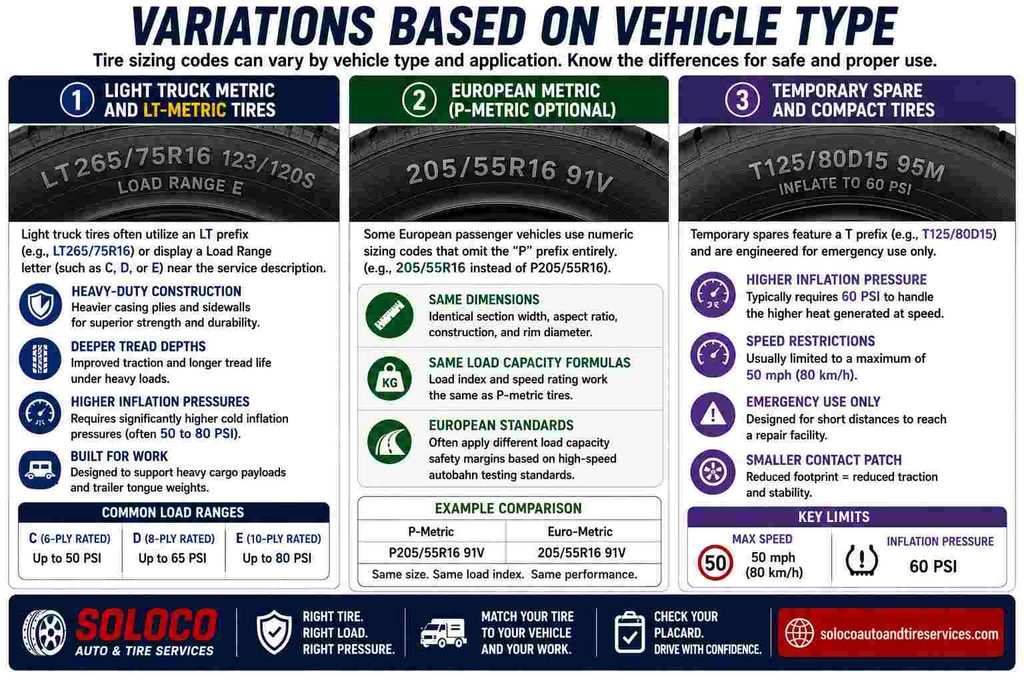
Light Truck Metric and LT-Metric Tires
Light truck tires often utilize an LT prefix (e.g., LT265/75R16) or display a Load Range letter (such as Load Range C, D, or E) near the service description. These tires feature heavier casing plies, deeper tread depths, and require significantly higher cold inflation pressures (often 50 to 80 PSI) compared to standard passenger car tires to support heavy cargo payloads and trailer tongue weights.
European Metric (P-Metric Optional) Sizing
Some European passenger vehicles use numeric sizing codes that omit the “P” prefix entirely (e.g., 205/55R16 instead of P205/55R16). The dimensions and load capacity formulas remain identical, but European manufacturers often apply slightly different load capacity safety margins based on high-speed autobahn testing standards.
Temporary Spare and Compact Tires
Temporary spares feature a T prefix (e.g., T125/80D15) and are engineered for emergency use only. They require much higher inflation pressures (typically 60 PSI) and strict speed restrictions (usually limited to a maximum of 50 mph or 80 km/h) to compensate for their reduced physical contact patch.
Frequently Asked Questions
What do the letters and numbers on a tire sidewall mean?
The complete alphanumeric sequence on a tire sidewall provides a comprehensive profile of its design, dimensions, and performance limits. It details the service type application, section width in millimeters, aspect ratio percentage, internal carcass construction method, wheel rim diameter in inches, weight load index capacity, and maximum safe speed rating category.
Why do tire sizes use both millimeters and inches?
Tire manufacturing evolved through a mix of global metric standards and legacy imperial engineering. Section width transitioned to millimeters for finer precision in sizing profile widths, while wheel rim diameters remained anchored to traditional inch measurements because wheel manufacturing infrastructure worldwide standardized around inch increments early in automotive history.
Where can I find the correct tire size for my car if the sidewall is faded?
You can find the exact factory-recommended tire size by opening the driver-side door and checking the federal certification placard affixed to the door jamb or B-pillar. Alternatively, you can check your vehicle owner’s manual, look inside the glove box door, or enter your vehicle license plate number or VIN into an online tire retailer catalog.
How do I check if my tire load index is safe for heavy towing?
Locate the two-digit load index number immediately following the rim diameter in your tire code and look it up on a standard load index chart. Ensure that the maximum weight capacity listed per tire multiplied by two exceeds your vehicle’s maximum axle weight rating when fully loaded with cargo or connected to a heavy trailer tongue.


