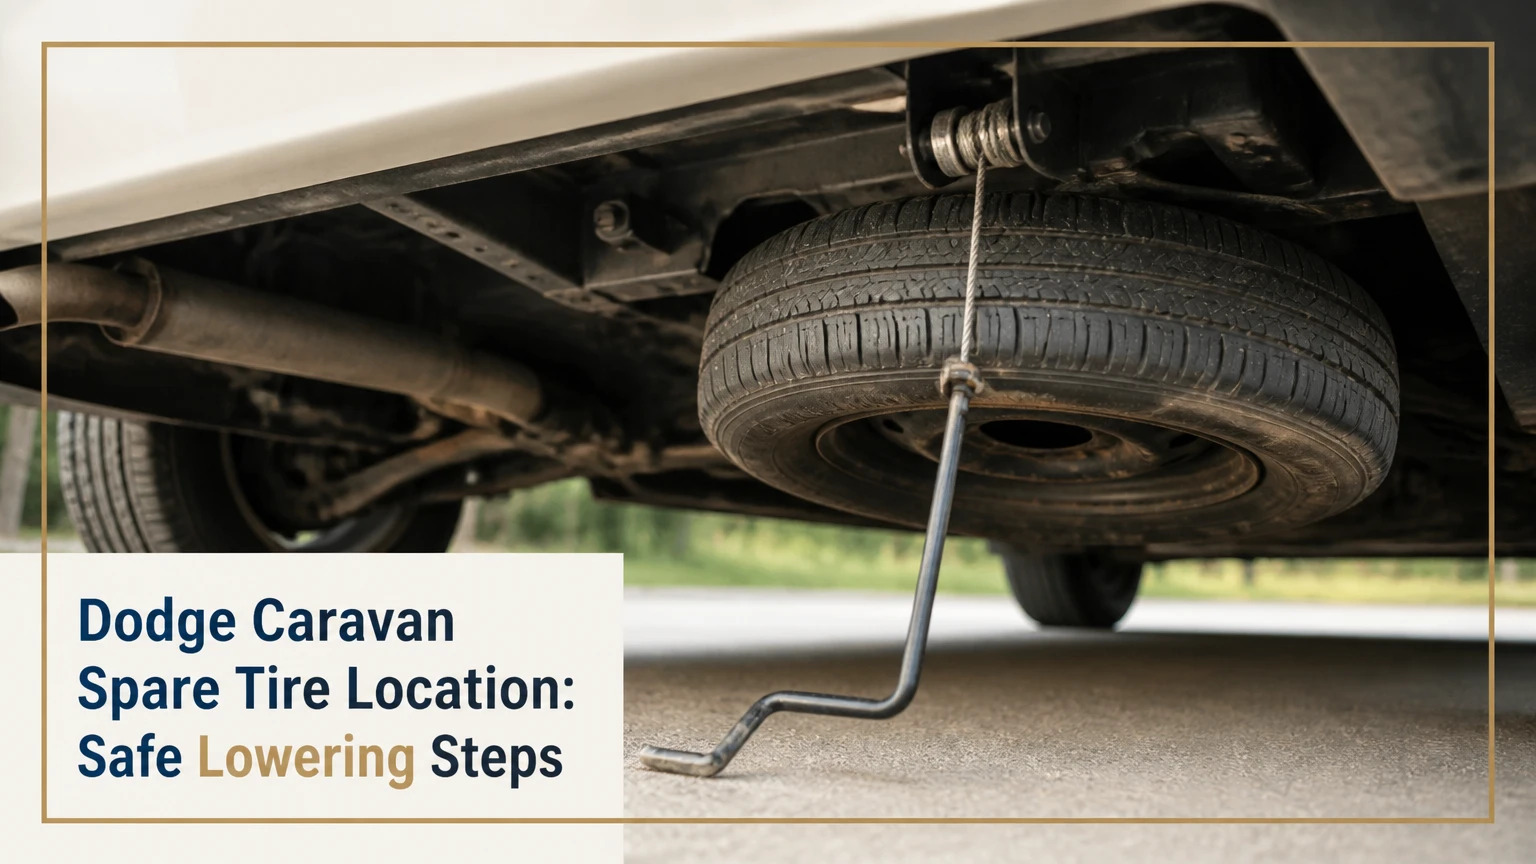
The Dodge Caravan and Dodge Grand Caravan spare tire is mounted underneath the vehicle, usually near the center of the body between the front seats and second-row seating area. A steel cable hoist holds the temporary spare flat against the underbody, and a cabin-accessible winch nut lowers it when turned counterclockwise with the factory lug wrench.
Key Facts at a Glance
- The Dodge Caravan spare tire is normally stored beneath the vehicle, not inside the rear cargo compartment.
- The spare is lowered through a cable-operated hoist using a nut accessed from inside the cabin.
- The access point is commonly in the floor console or a floor storage compartment between the front seats.
- The factory temporary spare often carries a 60-PSI inflation specification, but the tire sidewall and owner’s manual control.
- A temporary spare commonly carries a 50 mph, or 80 km/h, maximum speed limit.
- A rusted hoist can make roadside removal unsafe; do not crawl under an inadequately supported vehicle.
Where Is the Dodge Caravan Spare Tire Location?
The Dodge Caravan spare tire location is under the vehicle’s middle section, approximately below the floor area between the front seats and the second-row seats. The wheel lies horizontally, with its visible side facing the road, and a steel cable connects the wheel to a winch mounted above it.
The location preserves rear cargo capacity and allows Chrysler’s Stow ’n Go seating system to fold into the floor. On long-wheelbase Dodge Grand Caravan models, the tire can look closer to the second row than expected because the body extends farther behind the front axle.
Model-year access differs. Many 2008-2020 Grand Caravan vehicles provide access through the front floor console or a removable floor plug, while earlier Caravans may use a floor opening, center-console access point, or a different jack-storage arrangement. The owner’s manual for the specific year is the final authority.
How Can You Confirm the Spare Is Present?
Confirm the spare by checking three points before a roadside emergency:
- Look beneath the center underside for a horizontally mounted wheel.
- Open the jack-storage compartment and verify that the lug wrench and jack handle are present.
- Inspect the cabin access plug or floor bin for the winch actuator.
A missing wheel, absent retainer, or empty tool compartment changes the procedure. Some used Caravans have lost their spare after a previous tire change, and some replacement hoists are installed without the original tool set.
How the Underbody Hoist Works
The Caravan hoist converts rotation at the cabin actuator into cable movement under the vehicle. The lug wrench turns a worm-drive winch, the winch winds or unwinds a steel cable, and a retainer plate at the cable end passes through the spare wheel’s center opening.
The cable must lower far enough for the tire to rest completely on the ground. When slack appears, the retainer plate can be tilted and pushed sideways through the wheel center. The wheel then slides out from beneath the vehicle.
The retainer is more than a simple hook. Depending on the year and hoist design, a secondary catch or safety feature may help prevent a raised wheel from dropping if the primary cable connection fails. Reinstall every retainer component exactly as designed.
| Hoist component | Function | Typical failure symptom |
|---|---|---|
| Cabin actuator nut | Receives lug-wrench rotation | Nut inaccessible or tool will not seat |
| Worm-drive winch | Converts rotation into cable travel | Nut turns with no cable movement |
| Steel cable | Supports and lowers wheel | Frayed strands, broken cable, uneven lowering |
| Retainer plate | Locks through wheel center | Tire lowers but cannot be released |
| Underbody guide or housing | Keeps cable aligned | Tire jams after partial movement |
What Should You Do Before Lowering the Tire?
Park on firm, level ground, switch on the hazard lamps, apply the parking brake, and place the transmission in Park. If the vehicle is on a freeway shoulder, near moving traffic, in soft soil, or on a slope, roadside assistance is safer than a wheel change.
Before lifting anything, collect the jack, lug wrench, extension handle, wheel chock, gloves, flashlight, and a reflective warning device. A typical roadside removal takes 10-20 minutes when the hoist is clean and functional, but corrosion can extend the job substantially.
Before You Start
| Requirement | Typical value | Why it matters |
|---|---|---|
| Normal removal time | 10-20 minutes | Assumes a working hoist and accessible lug nuts |
| Rusted-hoist time | 30-90 minutes | Penetrating oil and repeated checks may be needed |
| Factory lug wrench | 17-19 mm equivalent | Size varies by wheel and model year |
| Wheel chock | 1-2 pieces | Prevents vehicle movement before lifting |
| Replacement temporary spare | 100-180 USD typical | Price depends on tire, wheel, and supplier |
| Correct spare pressure | Often 60 PSI | Verify the sidewall and year-specific manual |
Do not rely on the jack to stabilize a vehicle while you work underneath it. The tire can be removed from beneath the body without placing any part of your body under the vehicle, but a hoist inspection should occur only when the vehicle is safely supported.
How Do You Lower and Remove the Caravan Spare?
Lowering the Dodge Caravan spare requires six actions: expose the actuator, assemble the handle, unwind the cable, create slack, release the retainer, and slide out the wheel. A functional system usually lowers the tire in several dozen wrench turns, while a jammed or damaged mechanism requires professional recovery.
Step 1: Secure the Vehicle
Move the Caravan away from traffic when conditions permit. Select Park, set the parking brake, turn on the hazard lamps, and chock a wheel opposite the flat tire.
Remove passengers from the traffic-facing side. Do not begin if the vehicle can roll, the shoulder is too narrow, or the pavement cannot support the jack.
You will know this step worked when the vehicle remains stationary with the transmission in Park and the parking brake engaged. A common mistake is starting the wheel change before finding a safe position.
Step 2: Find the Cabin Actuator
Open the floor console or storage compartment between the front seats. Remove the small plastic access plug, lift the compartment cover, or locate the metal winch nut exposed in the floor.
The exact opening differs by generation and interior configuration. Never force a trim panel that does not release with light, even pressure, because broken console clips can prevent the actuator cover from being secured later.
You will know the actuator is correct when the factory lug wrench fits the hexagonal nut fully. A common mistake is confusing the actuator with a seat-mount fastener or unrelated floor bolt.
Step 3: Assemble the Lug-Wrench Handle
Retrieve the jack and lug wrench from the rear jack-storage area, commonly behind the left-rear quarter-panel trim or in a rear side compartment. Connect the extension pieces if the vehicle uses a multi-part handle.
Keep the jack on the ground until the spare has been released. The lowering handle, not the jack screw, operates the underbody hoist.
You will know the handle is assembled correctly when the extension locks together and the socket remains straight on the actuator. A common mistake is using a ratchet or impact tool, which can damage the winch gear.
Step 4: Turn the Actuator Counterclockwise
Insert the handle into the cabin actuator and rotate counterclockwise to unwind the cable. Continue until the spare tire reaches the pavement and the cable becomes visibly slack.
Do not keep forcing the handle after the cable has fully unwound. Excessive torque can strip the worm-drive mechanism or twist the cable around the winch.
You will know the tire is low enough when the wheel rests flat on the ground and the cable no longer supports its weight. A common mistake is stopping when the tire is only partially lowered, leaving the retainer under tension.
Step 5: Release the Retainer Plate
Reach toward the wheel center from the side of the vehicle, keeping your hands clear of pinch points. Tilt the retainer plate so its narrow dimension aligns with the wheel’s center opening, then slide the plate through the opening.
Mud, ice, or corrosion can make the plate difficult to see. Use a flashlight and gloves, but do not place your torso beneath the vehicle.
You will know the retainer is free when the cable end separates from the wheel without resistance. A common mistake is pulling the tire sideways while the plate is still flat across the center hole.
Step 6: Pull Out and Inspect the Spare
Slide the wheel out from beneath the side of the Caravan. Inspect the tread, sidewall, valve stem, wheel rim, cable, and retainer before installation.
Reject a spare with cracks, exposed cords, severe corrosion, a damaged bead, or an expiration concern. A temporary tire can look unused while its rubber has aged beyond a sensible service period.
You will know removal is complete when the wheel is fully clear of the vehicle and the cable is not trapped around suspension or exhaust components. A common mistake is leaving the retainer hanging where it can strike the road.
What Can You Drive on the Temporary Spare?
A Caravan temporary spare is for emergency travel to a tire shop, not normal commuting or extended highway use. Many compact spares specify a maximum of 50 mph, or 80 km/h, and approximately 50 miles, or 80 kilometers, but the sidewall marking and owner’s manual take precedence.
The temporary wheel may have a different diameter, tread pattern, load rating, and traction level from the regular tires. Avoid abrupt steering, hard braking, towing, and high-speed driving. If the spare is fitted to a drive axle, some owners prefer moving a matching full-size tire to the drive axle when the vehicle manual permits that sequence.
| Tire option | Typical speed limit | Typical distance guidance | Main limitation |
|---|---|---|---|
| Compact temporary spare | 50 mph, 80 km/h | 50 miles, 80 km | Reduced traction and handling |
| Full-size matching tire | Vehicle placard limit | No temporary-distance limit | Requires storage space |
| Tire inflator and sealant | Not applicable | Repair-kit instructions | Cannot repair many sidewall tears |
| Run-flat replacement | Often 50 mph, 80 km/h | Commonly 50 miles, 80 km | Requires compatible vehicle setup |
Chrysler owner manuals commonly describe the compact wheel as a limited-use spare. That wording matters because a temporary spare is not equivalent to a normal replacement tire, even when its tread appears full.
What Pressure Does the Spare Require?
Many Caravan compact spares use 60 PSI, but the correct value must be read from the spare’s sidewall or the vehicle’s year-specific documentation. The driver-door tire label usually lists the regular tire pressures, not necessarily the compact spare pressure.
Check pressure at least monthly when the spare is accessible and before long trips. Underbody storage exposes the wheel to temperature changes, water, salt, and valve-stem corrosion, so visual inspection alone cannot confirm readiness.
How Does a Caravan Compare With Other Spare Options?
The factory underbody compact spare is usually the best packaging choice for a Caravan because it protects passenger and cargo space. A full-size spare improves distance capability, but the Caravan generally lacks a factory interior compartment designed to carry one without sacrificing cargo room.
| Option | Typical purchase cost | Storage effect | Appropriate use |
|---|---|---|---|
| Factory compact spare | 100-180 USD | Preserves Stow ’n Go floor space | Emergency trip to tire service |
| Used OEM compact spare | 40-100 USD | Preserves floor space | Budget replacement after inspection |
| Full-size tire and wheel | 150-300 USD | Uses cargo or roof space | Repeated long-distance travel |
| Inflator and sealant kit | 25-100 USD | Occupies small compartment | Small tread punctures only |
A full-size conversion is not a simple tire swap. The tire must be secured against movement, protected from passengers, and kept clear of cargo, seat mechanisms, wiring, and exhaust heat. An unsecured wheel weighing roughly 20-30 kilograms can become a dangerous projectile in a collision.
An inflator kit cannot repair a sidewall cut, a separated tread, a bent wheel, or a tire that has come off the bead. Sealant can also interfere with some tire-pressure monitoring sensors and may require disclosure to the tire shop.
What Are the Common Hoist Problems?
The most common Caravan hoist problems are corrosion, a frayed cable, a stripped winch, and a retainer that binds in the wheel center. Underbody exposure makes the mechanism more vulnerable in salt-using regions than an interior-mounted spare system.
The Actuator Turns, but the Tire Does Not Move
Stop turning the nut if several rotations produce no cable movement. The cable may be broken, detached from the pulley, or disconnected from the retainer.
Do not place a body under a vehicle supported only by the factory jack. A repair facility can lift the Caravan safely, cut a failed cable if necessary, and replace the hoist assembly.
The Tire Lowers and Then Jams
A partial drop followed by resistance usually indicates cable misalignment, packed mud, ice, a bent retainer, or a tire contacting underbody components. Spray penetrating lubricant onto the accessible hoist hardware, wait 10-15 minutes, and try gentle movement only if the vehicle remains safely positioned.
Do not hammer the actuator or use an impact wrench. A jammed cable can store tension, and sudden release can move the wheel or handle unexpectedly.
The Winch Is Frozen
A completely frozen actuator often indicates rust inside the winch rather than a simple tight fastener. Apply penetrating oil to the exposed actuator and allow 15-30 minutes, then attempt small alternating movements.
If the nut does not move with moderate hand force, stop. A snapped extension or stripped gear creates a harder recovery problem than the original frozen mechanism.
The Retainer Will Not Pass Through the Wheel
Raise or lower the wheel slightly until the cable is slack but the plate remains accessible. Rotate the plate through the wheel opening rather than pulling the tire at an angle.
Replacement wheels may have a center hole too small for the original retainer. Confirm wheel compatibility before installing an aftermarket wheel as the stored spare.
How Should You Maintain the Underbody Spare?
Lower the Caravan spare for inspection at least twice each year and before winter travel. Check tire pressure, tread age, sidewall damage, rim corrosion, cable fraying, retainer movement, and winch operation while the mechanism is unloaded.
A practical maintenance schedule uses the following intervals:
| Inspection item | Interval | Replacement or service trigger |
|---|---|---|
| Spare-air pressure | Monthly | Any pressure below sidewall specification |
| Hoist operation | Every 6 months | Rough movement or incomplete lowering |
| Cable condition | Every 6 months | Rust scale, broken strands, kinks |
| Retainer and rim | Every 6 months | Bent plate or severe wheel corrosion |
| Underbody cleaning | After winter | Salt accumulation around winch |
| Spare tire age | Every year | Cracking, aging, or manufacturer limit |
Do not pack the cable with heavy grease unless the component manufacturer specifies it. Thick grease can collect abrasive grit and salt; a light corrosion-protective lubricant applied to the appropriate metal surfaces is usually more suitable.
An expert rule of thumb is to lower the spare before an emergency, not during one. A hoist that works in a dry driveway may fail after years of corrosion when the vehicle is stopped beside a wet road at night.
How Much Does Replacement or Repair Cost?
Typical US pricing is 40-100 USD for a used compact wheel, 100-180 USD for a new replacement temporary spare, and 150-350 USD for a replacement hoist assembly before labor. A shop may charge 100-250 USD in labor when corrosion requires lifting, cutting, or drilling.
| Repair or purchase | Typical parts cost | Typical total cost | Typical time |
|---|---|---|---|
| Pressure check and inspection | 0-20 USD | 0-40 USD | 10-20 minutes |
| Replacement compact spare | 100-180 USD | 120-230 USD | 30-60 minutes |
| Replacement hoist assembly | 80-220 USD | 180-500 USD | 1-3 hours |
| Broken-cable recovery | 0-100 USD | 150-400 USD | 1-2 hours |
| Full-size spare setup | 150-300 USD | 200-500 USD | 30-90 minutes |
Prices vary by year, supplier, wheel size, and rust severity. A dealer may charge more than an independent repair shop, while a used part can reduce cost but requires careful inspection for corrosion and correct fit.
Which Caravan Owners Need a Different Plan?
Daily urban drivers usually benefit from the factory compact spare because it keeps all seating and cargo functions available. Owners who travel long distances through areas with limited tire-service coverage may prefer a maintained compact spare plus a 12-volt compressor, plug kit, and roadside-assistance membership.
Snow-belt owners should inspect the hoist before the first major winter trip. Salt can corrode the cable from inside its strands, where surface cleaning will not reveal the full loss of strength.
Families carrying a full passenger load should not assume that a temporary spare restores the original handling. Reduce speed, avoid heavy additional cargo, and replace the damaged regular tire as soon as practical.
FAQ
Does Every Dodge Caravan Have a Spare Tire?
No, equipment varies by model year, trim, market, and prior ownership. Many Dodge Caravan and Grand Caravan vehicles were equipped with an underbody compact spare, but some may have an inflator kit, a missing wheel, or a removed hoist. Check beneath the vehicle and verify the equipment list in the owner’s manual.
Can You Access the Spare Without the Factory Lug Wrench?
Sometimes, but the factory lug wrench is the safest intended tool because its extension reaches the cabin actuator correctly. A compatible socket and extension may work in a garage, yet an improvised tool can round the nut or apply excessive torque. Carry the original handle whenever possible.
Can You Leave the Spare Under the Caravan Permanently?
Yes, if the cable, retainer, wheel, and tire remain in good condition. Long-term underbody storage requires periodic lowering and inspection because moisture, salt, and road debris attack the hoist. A spare that has never been lowered may be impossible to release when needed.
Can a Caravan Spare Be Used on the Front Axle?
A compact spare can often be installed on the axle specified by the vehicle manual, but compatibility depends on drivetrain, brake clearance, tire size, and the damaged wheel’s position. Follow the manual’s instructions rather than assuming front and rear installation are interchangeable.
What Should You Do if the Spare Is Missing?
Confirm the hoist is present, then inspect the underbody mounting points and cabin tool compartment. Purchase the correct wheel and tire by matching the model year, wheel diameter, bolt pattern, load rating, and sidewall pressure. A tire shop or Dodge parts department can verify the correct assembly using the vehicle identification number.
How Do You Put the Spare Back Under the Vehicle?
Place the retainer through the wheel center, position the tire flat beneath the hoist, and turn the cabin actuator clockwise until the wheel is firmly seated. Stop when the tire is secure against the underbody, then verify that the retainer remains centered and the cable is not visibly tangled. Do not overtighten the winch.
The Bottom Line
The Dodge Caravan spare tire location is normally beneath the vehicle’s center floor, held by a cable hoist and lowered through an actuator inside the cabin. Park securely, use the correct factory handle, unwind the cable until the tire rests flat, release the retainer, and inspect the spare before driving. Check the sidewall for pressure and speed limits, because the compact wheel is an emergency replacement rather than a normal tire.


