Changing a tire without a machine is a demanding mechanical skill that requires patience, proper leverage, and heavy-duty hand tools.
You will complete this task in seven distinct steps over 45 to 60 minutes per tire, relying primarily on hand levers, proper drop-center positioning, and high-volume compressed air. Success depends entirely on keeping the tire bead relaxed in the deepest part of the wheel well while you work.
Before You Start
- Time Required: 45 to 60 minutes per tire.
- Difficulty Level: Advanced DIY / Intermediate Mechanical.
- Cost Range: $15 to $40 for basic hand tools if you already own an air compressor.
- Tools and Materials Checklist:
- 2 or 3 heavy-duty tire spoons or irons (minimum 24-inch length).
- Valve core removal tool.
- Bead breaker tool, farm jack, or slide hammer.
- Tire lubricant (1:1 dish soap and water mixture in a spray bottle, or dedicated commercial tire mounting paste).
- Air compressor capable of delivering at least 40 to 60 PSI quickly.
- New tire and a fresh rubber or metal valve stem.
- Heavy-duty work gloves and safety glasses.
- Plastic rim protectors or cut sections of a plastic gallon jug to prevent wheel gouges.
- Prerequisite Conditions: Perform this work on a flat, stable concrete surface. Never attempt this on soft dirt or gravel where the wheel can slip under pressure.
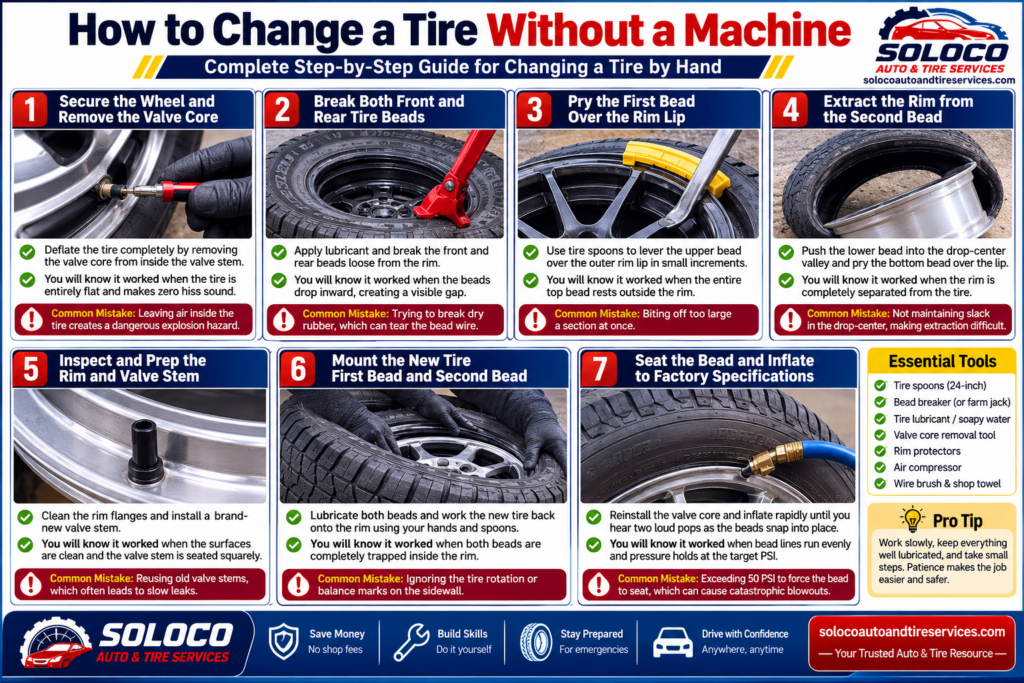
Step 1: Secure the Wheel and Remove the Valve Core
Deflate the tire completely by removing the valve core from inside the valve stem.
Place the wheel flat on a clean piece of cardboard or carpet to protect the face of the rim. Take your valve core removal tool, insert the slotted tip into the center of the valve stem, and turn counter-clockwise for 3 to 4 turns until the core unscrews. Press down on the open stem to exhaust all remaining pressurized air.
- You will know it worked when: The tire is entirely flat, floppy, and makes zero hiss when you squeeze the sidewalls together.
- Common Mistake: Leaving even 2 to 3 PSI inside the tire. Breaking the bead with internal air pressure creates a dangerous explosion hazard and makes separating the rubber from the rim flange impossible.
Step 2: Break Both Front and Rear Tire Beads
Apply abundant tire lubricant around both rim edges and break the front and rear rubber beads loose from the metal flanges.
Spray your 1:1 dish soap and water mixture generously all around the perimeter where the rubber meets the metal rim on both sides. Position your bead breaker tool, farm jack, or slide hammer foot approximately 5mm away from the rim edge on the tire sidewall. Apply heavy downward force until you hear a sharp snap as the bead unseats. Flip the wheel over and repeat the process on the back side. Once broken, push the freed rubber completely down into the center drop-center valley of the wheel.
- You will know it worked when: The entire circumference of both tire beads drops inward, creating a visible gap between the tire bead and the outer lip of the rim.
- Common Mistake: Trying to break dry rubber. Without heavy liquid lubrication, the rubber will friction-lock against the alloy or steel, tearing the bead wire and rendering the tire unusable.
Step 3: Pry the First Bead Over the Rim Lip
Insert two tire spoons between the top bead and the rim flange, then lever the upper bead completely over the outer rim lip.
Generously lubricate the upper rim lip again. Snap a plastic rim protector over the edge of the rim to shield the metal. Insert the first 24-inch tire spoon about 1 inch deep between the bead and the rim, and pry downward to lift a 3-inch section of the bead up and over the rim lip. Leave the first spoon hooked over the rim. Move 4 inches away, insert the second tire spoon, and pry the next section over. Walk the spoons around the perimeter in small 3 to 4-inch increments until the entire top bead pops clear of the rim.
- You will know it worked when: The entire top face of the tire bead is completely resting outside and above the upper rim flange while the bottom bead remains inside the well.
- Common Mistake: Trying to bite off too large of a section at once (such as 8 or 10 inches). This creates extreme tension that will bend your spoons or rip the bead core.
Step 4: Extract the Rim from the Second Bead
Push the lower tire bead into the deep drop-center valley and lever the remaining bottom bead up and over the top rim flange.
Tilt the wheel assembly slightly. Push the side of the tire closest to you deep into the center well of the wheel, which gives the opposite side enough slack to stretch. Insert a tire spoon from the bottom side of the rim, hooking the lower bead from underneath. Pry the tool upward and outward to force the lower bead over the upper rim lip. Pull or hammer the metal rim out of the remaining tire shell.
- You will know it worked when: The metal rim is completely separated from the tire cavity and lying free on your workspace floor.
- Common Mistake: Forgetting to keep the opposite side pushed down into the drop-center valley. If slack is not maintained across the diameter, the steel cables inside the bead will prevent stretching, making extraction physically impossible.
Step 5: Inspect and Prep the Rim and Valve Stem
Clean the inner rim flanges thoroughly with a wire brush and install a brand-new valve stem.
Scrape away any old rubber residue, corrosion, or dirt buildup from the inner lips of the rim using a wire brush, then wipe clean with a shop towel. Cut the old rubber valve stem off with a utility knife. Push the new rubber valve stem through the valve hole from the inside of the rim out. Attach a valve puller tool or use pliers to pull the stem straight through until it seats firmly with a distinct snap.
- You will know it worked when: The inner rim sealing surfaces are completely smooth, shiny, and free of debris, and the new valve stem is seated squarely without any crooked tilting.
- Common Mistake: Reusing old valve stems. Rubber degrades over time, leading to slow leaks weeks after mounting a fresh tire. Always replace them.
Step 6: Mount the New Tire First Bead and Second Bead
Lubricate both new tire beads heavily and work the tire back onto the rim using your hands and tire spoons.
Align any yellow balance dot or directional rotation arrow on the tire sidewall with the valve stem location. Coat both inner beads of the new tire with thick tire mounting paste or soapy water. Push the first (bottom) bead down into the rim by hand, using your body weight to angle it over the top rim lip until it drops into the center well. For the second bead, use your hands as far as possible, then use your tire spoons in small 2-inch increments to walk the remaining section over the top lip.
- You will know it worked when: Both beads of the new tire are completely trapped inside the outer channel of the metal rim, and the tire is resting squarely around the wheel.
- Common Mistake: Ignoring the tire rotation or balance marks. Mounting a directional tire backward means it will channel water poorly and wear out prematurely.
Step 7: Seat the Bead and Inflate to Factory Specifications
Reinstall the valve core, connect a high-volume air compressor, and inflate the tire rapidly until the beads snap into place.
Screw the valve core back into the valve stem tightly. Connect your air compressor hose directly to the stem. Inflate rapidly. You will hear two loud, distinct popping sounds as the rubber beads expand outward and lock tightly against the safety humps of the rim. Monitor the pressure gauge closely during this phase. Once seated, disconnect the air chuck and adjust the final pressure to your vehicle manufacturer specification.
- You will know it worked when: You hear two loud pops, the bead lines run evenly parallel all the way around the rim perimeter, and the pressure holds steady at your target PSI.
- Common Mistake: Exceeding 50 PSI while trying to seat stubborn beads. If the bead does not snap into place by 45 PSI, stop immediately, deflate, relubricate, and check for obstructions. Over-inflation can cause catastrophic tire blowouts.
Common Mistakes and How to Fix Them
- Trying to mount tires dry: Forcing dry rubber over a metal rim tears the inner bead wire and destroys the tire. Always use a generous amount of soap and water or commercial mounting paste.
- Failing to utilize the drop-center: If you pull against taut rubber without pushing the opposite side into the deep valley of the wheel, you will bend your levers. Always ensure slack is pushed across the diameter.
- Scratching expensive alloy wheels: Metal spoons directly against aluminum will gouge and weaken the wheel structure. Always use plastic rim guards or cut pieces of thick plastic bottles between the spoon and the rim edge.
- Leaving the valve core in during initial inflation: When fighting a stubborn bead that leaks air out of the gaps, leaving the core restricts airflow speed. Remove the core entirely to let maximum CFM rush in, then quickly screw the core back in once the tire catches air.
Variations: How the Process Changes
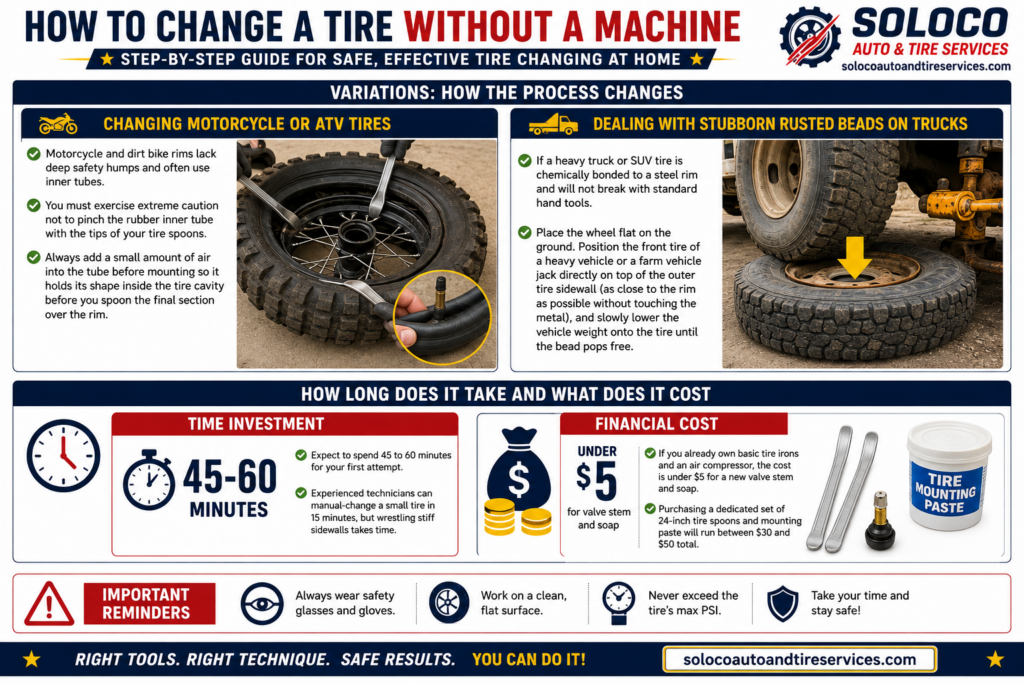
Changing Motorcycle or ATV Tires
Motorcycle and dirt bike rims lack deep safety humps and often use inner tubes. You must exercise extreme caution not to pinch the rubber inner tube with the tips of your tire spoons. Always add a small amount of air into the tube before mounting so it holds its shape inside the tire cavity before you spoon the final section over the rim.
Dealing with Stubborn Rusted Rusted Beads on Trucks
If a heavy truck or SUV tire is chemically bonded to a steel rim and will not break with standard hand tools, place the wheel flat on the ground. Position the front tire of a heavy vehicle or a farm vehicle jack directly on top of the outer tire sidewall (as close to the rim as possible without touching the metal), and slowly lower the vehicle weight onto the tire until the bead pops free.
How Long Does It Take and What Does It Cost
- Time Investment: Expect to spend 45 to 60 minutes for your first attempt. Experienced technicians can manual-change a small tire in 15 minutes, but wrestling stiff sidewalls takes time.
- Financial Cost: If you already own basic tire irons and an air compressor, the cost is under $5 for a new valve stem and soap. Purchasing a dedicated set of 24-inch tire spoons and mounting paste will run between $30 and $50 total.
Frequently Asked Questions
Can I seat a tire bead without a high-volume air compressor?
Standard 12V emergency plug-in tire inflators do not push enough volume to force a floppy tire bead out against the rim flanges. You need a compressor with a storage tank capable of delivering a rapid burst of air, or you must use the ratcheting strap trick to flare the sidewalls outward before inflating.
Why does my newly changed tire lose air slowly over a few days?
A slow leak after manual installation is almost always caused by residual corrosion on the inner rim lip, a poorly seated valve stem, or dirt trapped between the rubber bead and the metal flange. Break the bead down in that specific spot, clean the metal thoroughly with a wire brush, apply fresh soap, and reinflate.
Is it safe to use dish soap instead of commercial tire paste?
Yes, a 1:1 mixture of standard liquid dish soap and water serves as an excellent temporary lubricant for home mechanics. However, dish soap contains water and salt which can promote rust on steel rims over long periods, whereas commercial tire pastes dry out into a tacky seal that helps prevent the tire from slipping on the rim under heavy acceleration or braking.
What causes the tire spoons to constantly slip out while I am prying?
Spoon slippage happens when you try to bite off too much rubber at once, or when your levers are held at too steep of an angle. Reduce your bite size to 2 or 3 inches maximum, keep the shaft of the spoon parallel to the face of the wheel, and ensure the opposite side of the tire remains pushed down deep into the center well.


