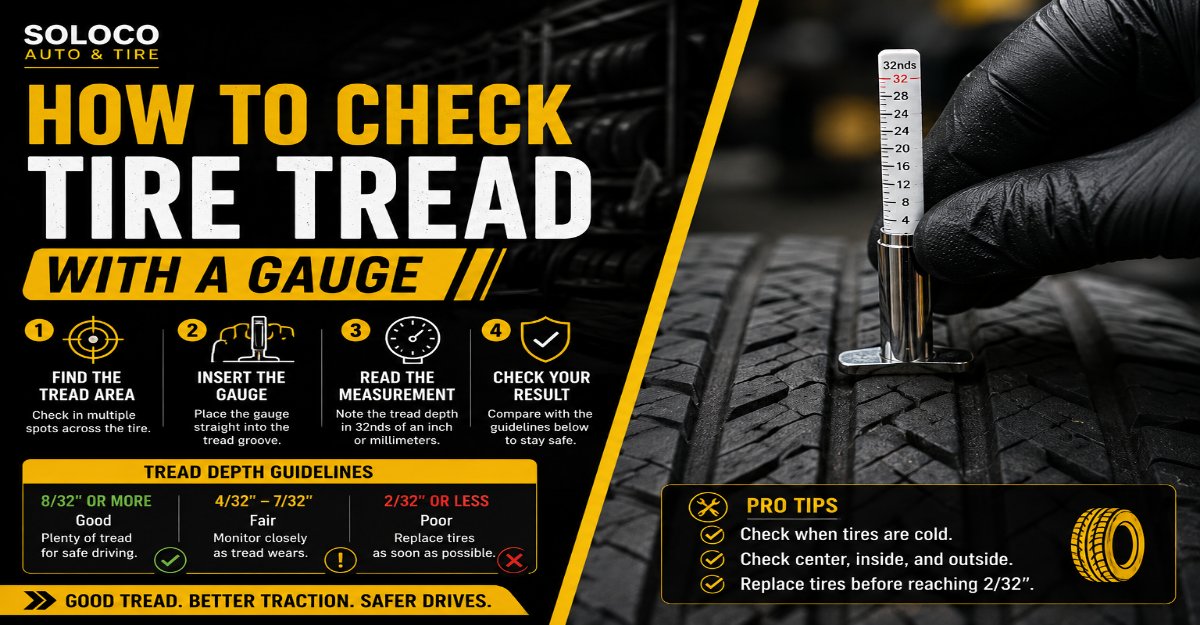
Accurately measuring your tire tread depth ensures optimal wet-weather traction, prevents hydroplaning, and lets you replace worn tires before they become a safety hazard. By following this six-step process using a standard tread depth gauge, pen, paper, and a cleaning rag, you can evaluate all four tires in under ten minutes with exact precision. Success depends entirely on keeping the gauge perpendicular to the tread face and avoiding raised wear bars.
Before You Start
- Total Time Required: 8 to 12 minutes for all four tires.
- Difficulty Level: Beginner.
- Typical Cost: $5 to $15 for a mechanical or digital tread depth gauge.
- Tools and Materials Checklist:
- Tire tread depth gauge (1 unit; digital, plunger-style, or color-coded pin).
- Pen and paper or smartphone notes app (1 set).
- Clean rag or paper towel (1 unit).
- Flathead key or small non-marring pick (optional, for stubborn rocks).
- Prerequisite Conditions: Vehicle parked on a level, paved surface with the engine off and parking brake engaged. Tires should be cool to the touch (driven less than 2 miles).
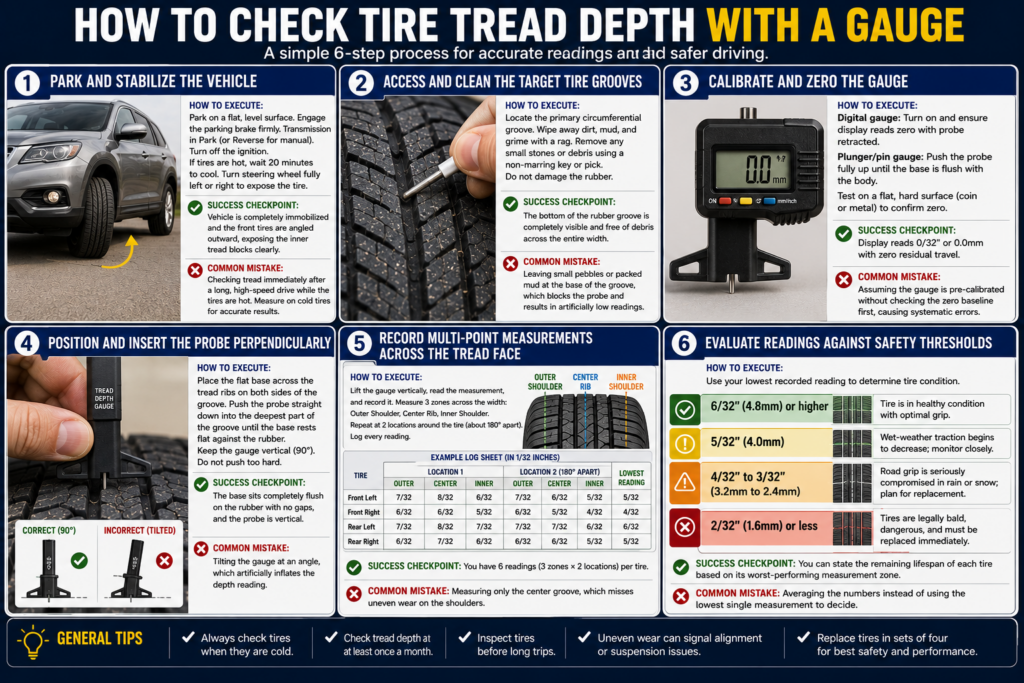
Step 1: Park and Stabilize the Vehicle
Park your vehicle on a flat, level concrete or asphalt surface, engage the emergency parking brake firmly, and turn off the ignition.
- How to execute: Ensure the transmission is in Park (or Reverse for manual transmissions). If you have just driven on the highway, wait 20 minutes for the tires to cool down to ambient temperature, as hot rubber can slightly alter dimensional readings. To access the front tires easily, turn your steering wheel all the way to the left or right lock depending on which side you are inspecting.
- Success checkpoint: You will know this step worked when the vehicle is completely immobilized and the front tires are angled outward, exposing the inner tread blocks clearly to your line of sight.
- Common mistake: Checking tire tread immediately after a long, high-speed drive while the tires are hot. Always measure on cold tires for accurate baseline results.
Step 2: Access and Clean the Target Tire Grooves
Locate the primary circumferential grooves running along the face of the tire and clear out any trapped foreign objects.
- How to execute: Select the widest straight groove on the tire face. Take your rag or paper towel and firmly wipe away accumulated road dirt, mud, and loose grime. If small stones are wedged tightly into the channel, use a non-marring key or pick to pop them out without gouging the rubber compound.
- Success checkpoint: You will know this step worked when the bottom of the rubber groove is completely visible and free of debris across the entire width of the contact patch.
- Common mistake: Leaving small pebbles or packed mud at the base of the groove, which blocks the depth probe and results in artificially low readings.
Step 3: Calibrate and Zero the Gauge
Reset your tread depth gauge to ensure absolute measurement accuracy before taking any physical readings.
- How to execute: If using a digital gauge, press the power button and ensure the screen reads zero while the probe is fully retracted. If using a traditional plunger or pin-style gauge, push the sliding metal or plastic probe all the way up into the cylindrical barrel until the flat base plate is flush with the gauge body. Test the gauge by pressing the flat base against a hard, flat surface like a coin or smooth metal to confirm the indicator reads zero.
- Success checkpoint: You will know this step worked when the display reads
0/32"or0.0mmwith zero residual travel on the mechanical scale. - Common mistake: Assuming out-of-the-box gauges are pre-calibrated without checking the zero baseline first, leading to a systematic error across all four tires.
Step 4: Position and Insert the Probe Perpendicularly
Insert the gauge probe straight down into the cleared groove while keeping the instrument stable and vertical.
- How to execute: Hold the outer plastic or metal housing of the gauge firmly between your thumb and index finger. Place the flat base plate squarely across the two adjacent rubber ribs bordering your chosen groove. Push the central pin or probe downward into the deepest part of the channel until the base plate rests flat against the top of the rubber blocks. Do not apply excessive downward force that might compress the rubber tread.
- Success checkpoint: You will know this step worked when the flat base sits completely flush against the rubber without any daylight showing underneath, and the probe is vertical at a 90-degree angle to the tire surface.
- Common mistake: Tilting the gauge probe at an angle while inserting it, which artificially inflates the depth reading because the diagonal path is longer than the vertical depth.
Step 5: Record Multi-Point Measurements Across the Tread Face
Lift the gauge carefully, read the measurement, and log data across three distinct zones for every tire.
- How to execute: Without disturbing the indicator scale, lift the gauge straight up and read the measurement in thirty-seconds of an inch or millimeters. Take measurements at three distinct points across the width of each tire: the outer shoulder, the center rib, and the inner shoulder. Repeat this three-zone check at two different locations around the circumference of the tire, spacing them roughly 180 degrees apart. Write down every reading in a grid format on your paper or note app.
- Success checkpoint: You will know this step worked when you have a complete matrix of six distinct numerical readings logged for each individual tire, noting both shoulder wear and center wear patterns.
- Common mistake: Measuring only the center groove of the tire, which completely misses alignment issues that cause severe, hidden bald spots on the inner or outer shoulders.
Step 6: Evaluate Readings Against Safety Thresholds
Analyze your lowest recorded measurement to determine whether your tires are safe for continued driving or require immediate replacement.
- How to execute: Compare your lowest recorded number against industry safety standards:
- 6/32″ (4.8mm) or higher: Tire is in healthy condition with optimal grip.
- 5/32″ (4.0mm): Wet-weather traction begins to decrease; monitor closely.
- 4/32″ to 3/32″ (3.2mm to 2.4mm): Road grip is seriously compromised in rain or snow; plan for replacement.
- 2/32″ (1.6mm) or less: Tires are legally bald, dangerous, and must be replaced immediately.
- Success checkpoint: You will know this step worked when you can definitively state the remaining lifespan of each tire based on its worst-performing measurement zone.
- Common mistake: Averaging the numbers together instead of using the lowest single measurement to make your replacement decision.
Common Mistakes and How to Fix Them
- Measuring directly on wear bars: Wear bars are molded horizontal bridge indicators sitting about 2/32″ above the groove base. Measuring on top of them gives a false shallow reading. Fix: Shift your probe slightly forward or backward into the open channel away from any raised rubber bridge.
- Compressing the rubber tread: Pushing down too hard with a metal gauge flexes the rubber blocks downward, making the tread look deeper than it actually is. Fix: Rest the base gently on the rubber surface using only light finger pressure.
- Failing to account for rear tire access: Trying to check rear tires without proper clearance leads to awkward angled measurements. Fix: For tight rear wheel wells, jack up the rear safely or turn the vehicle wheels to gain maximum sighting angles.
- Ignoring inconsistent numbers across the tread: Finding a deep outer groove while the inner edge is bald indicates a suspension misalignment. Fix: Schedule a professional wheel alignment check alongside your tire replacement.
Variations and Adaptations
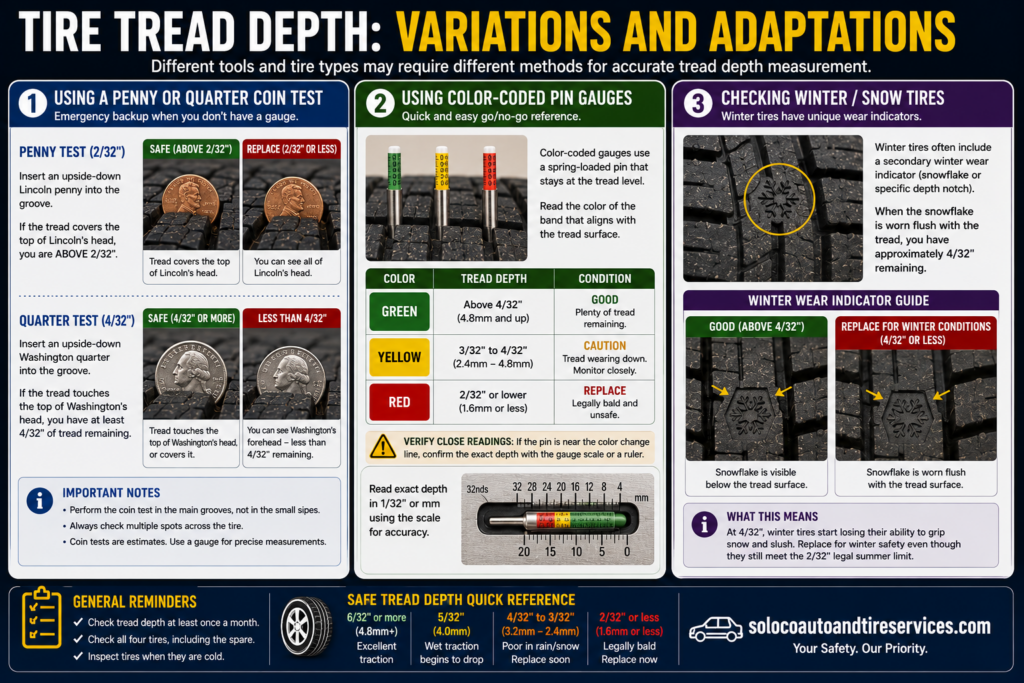
- Using a Penny or Quarter Coin Test: If you do not own a tread depth gauge, you can use a standard coin as an emergency backup. Insert an upside-down Lincoln penny into the groove; if the tread covers the top of Lincoln’s head, you are above 2/32″. With a Washington quarter, if the tread touches the top of his head, you have at least 4/32″ remaining.
- Using Color-Coded Pin Gauges: Color-coded gauges use green (above 4/32″), yellow (3/32″ to 4/32″), and red (2/32″ or lower) bands on a spring-loaded pin. While faster to read than digital or fractional scales, always verify the exact numerical reading with a ruler scale if you are close to the replacement threshold.
- Checking Winter / Snow Tires: Winter tires feature deeper tread blocks designed to hold snow for friction. Many winter tires include a secondary winter wear indicator (often shaped like a snowflake or specific depth notch) that disappears at 4/32″, which is the point where they lose snow performance even if they pass legal 2/32″ summer limits.
Frequently Asked Questions
How often should I check my tire tread depth?
You should check your tire tread depth at least once every month, and always before taking a long road trip or driving through seasonal weather transitions like winter snow or heavy autumn rains. Regular monthly checks help you catch uneven wear patterns caused by improper tire inflation or alignment issues early.
What causes uneven wear across a single tire?
Uneven wear is typically caused by mechanical problems outside of normal aging. If the outer and inner edges wear out faster than the center, your tires are chronically under-inflated. If the center rib wears out faster, they are over-inflated. Wear on only one edge points directly to poor wheel alignment or worn suspension components.
Can I use a digital caliper instead of a tread depth gauge?
Yes, a standard digital vernier caliper works well if it features a depth probe rod extending from the tail end. Ensure the flat body of the caliper bridges across the tread ribs securely while sliding the depth rod straight down into the groove until it touches the bottom surface safely.
Do front and rear tires wear down at the same rate?
Front and rear tires wear at different rates depending on whether your vehicle is front-wheel drive, rear-wheel drive, or all-wheel drive. Front tires handle steering friction and engine braking loads, usually wearing out much faster than rear tires. Rotating your tires every 5,000 to 7,500 miles balances this wear out across all four positions.


