Figuring out how to determine what wheel bearing is bad requires a combination of acoustic tracking, heat measurement, and physical play checks. You can complete these five diagnostic steps in roughly one hour. Proper diagnosis relies entirely on isolating the symptoms to one specific wheel before you begin replacing expensive parts.
Before You Start
- Time Required: 1 to 1.5 hours
- Difficulty Level: Intermediate
- Estimated Tool Cost: $20 to $50 for diagnostic tools
- Tools and Materials Needed:
- 1 hydraulic floor jack (2-ton minimum capacity)
- 2 heavy-duty jack stands (rated for your specific vehicle weight)
- 2 solid rubber wheel chocks
- 1 infrared laser thermometer
- 1 mechanic stethoscope (or electronic chassis ears)
- 1 pair of heavy-duty mechanics gloves
- 1 pair of ANSI-rated safety glasses
- Prerequisites: A perfectly flat concrete surface. Do not attempt diagnostic lifting on dirt, gravel, or inclined asphalt. You must also know the location of your factory jacking points.
Step-by-Step Diagnostic Process
Step 1: Perform the Swaying Road Test
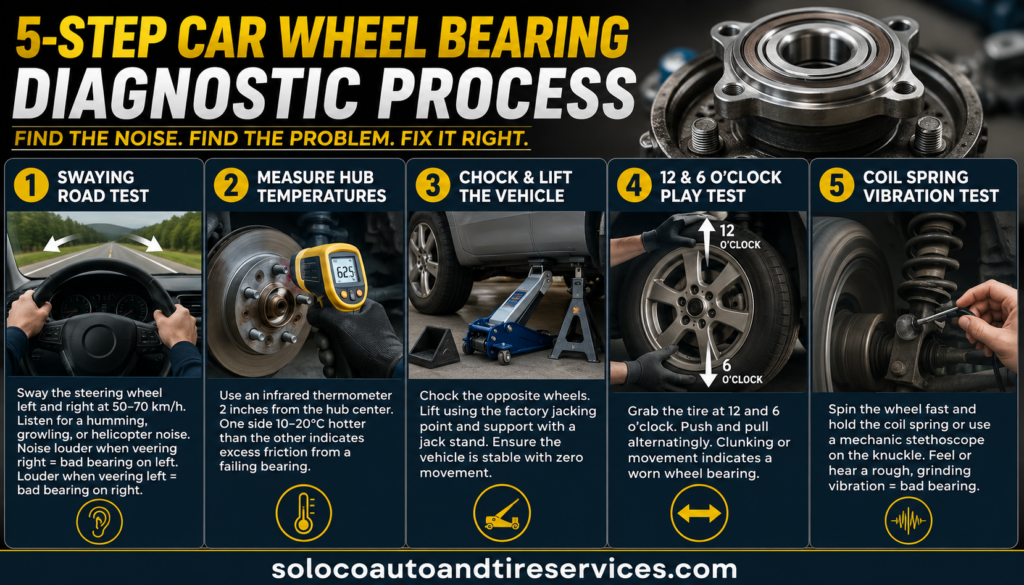
Drive your vehicle at 50 to 70 km/h on a safe, open road and gently sway the steering wheel from left to right.
To perform this correctly, turn off your radio, roll up all windows, and listen closely to the cabin acoustics. A failing wheel bearing produces a rhythmic humming, growling, or helicopter type noise. When you steer slightly to the right, the centrifugal force shifts the weight of your vehicle onto the left wheels. If the growling noise gets louder while veering right, the bad bearing is likely on the left side. Conversely, if the noise amplifies when you veer left, the faulty bearing is on the right.
You will know this step worked when you can definitively confirm that the humming noise changes pitch or volume based on your steering input.
A common mistake at this step is confusing uneven tire wear with bearing failure. Cupped tires make a rhythmic slapping noise that remains constant regardless of side-to-side weight shifts. Always inspect your tire tread before assuming the bearing is at fault.
Step 2: Measure Hub Temperatures
Park the vehicle on a level surface immediately after your road test and measure the temperature of each wheel hub assembly.
Leave the engine running in park or apply the parking brake. Turn on your infrared laser thermometer. Hold the thermometer exactly 2 inches from the center of the wheel hub and aim the laser directly between the metal lug nuts. Record the temperature for the left and right sides of the same axle. A failing bearing creates excessive internal friction, which generates significant thermal energy.
You will know this step worked when you find one wheel hub measuring 10 to 20 degrees Celsius hotter than the healthy hub on the exact opposite side of the axle.
A common mistake at this step is braking heavily right before parking. Hard stops saturate the brake rotors and wheel hubs with intense heat, which completely masks the temperature of the bearing. You must coast to a gentle stop to get an accurate thermal reading.
Step 3: Chock and Lift the Vehicle
Secure the wheels that will remain on the ground and lift the suspected axle using your hydraulic jack and jack stands.
Place your two rubber wheel chocks tightly against the front and back of a tire on the opposite end of the car. Position your 2-ton hydraulic floor jack directly under the factory-designated pinch weld or structural subframe jacking point. Raise the vehicle until the tire clears the ground by 3 to 4 inches. Slide a weight-rated jack stand under a secure frame rail and slowly lower the jack until the vehicle rests entirely on the stand.
You will know this step worked when the car rests securely on the jack stand and pushing firmly against the fender causes absolutely zero swaying or movement.
A common mistake at this step is lifting the vehicle on uneven asphalt or gravel. The floor jack must roll slightly as the lifting arm arcs upward. If the jack catches on rough ground, it can slip off the pinch weld and drop the vehicle.
Step 4: Perform the 12 and 6 O’Clock Play Test
Grab the suspended tire at the top and bottom positions to push and pull alternatingly.
Put on your heavy-duty mechanics gloves to protect your hands from road debris. Place your left hand at the 12 o’clock position on the top of the tire tread. Place your right hand at the 6 o’clock position on the bottom. Vigorously push the top inward while pulling the bottom outward, then rapidly reverse the motion. You are feeling for any distinct clicking, shifting, or physical looseness inside the central hub assembly.
You will know this step worked when the wheel either remains completely rigid or shifts back and forth with an audible metallic clunk.
A common mistake at this step is testing at the 9 and 3 o’clock positions first. Play at the sides often indicates worn tie rod ends or steering rack issues. Play at the top and bottom strictly isolates the wheel bearing and the lower ball joint.
Step 5: Execute the Coil Spring Vibration Test
Spin the suspended wheel rapidly by hand while holding the suspension coil spring to check for internal harmonic vibration.
Put the vehicle transmission in neutral so the driven wheels can spin freely. Grab the outer edges of the tire tread and spin the wheel forward as fast as humanly possible. While the wheel is in motion, reach behind the tire and firmly grasp the metal suspension coil spring with your bare hand. Alternatively, place the metal tip of your mechanic stethoscope directly against the steering knuckle near the bearing housing.
You will know this step worked when you feel a distinct, rough, grinding vibration traveling directly up through the coil spring. A perfectly healthy bearing will feel completely smooth to the touch.
A common mistake at this step is attempting this on an all-wheel-drive vehicle with only one wheel off the ground. The drivetrain will bind and stop the wheel from spinning. You must lift the entire front end or rear end to free the drivetrain.
Common Mistakes and How to Fix Them
Misjudging the Side Due to Cabin Acoustics
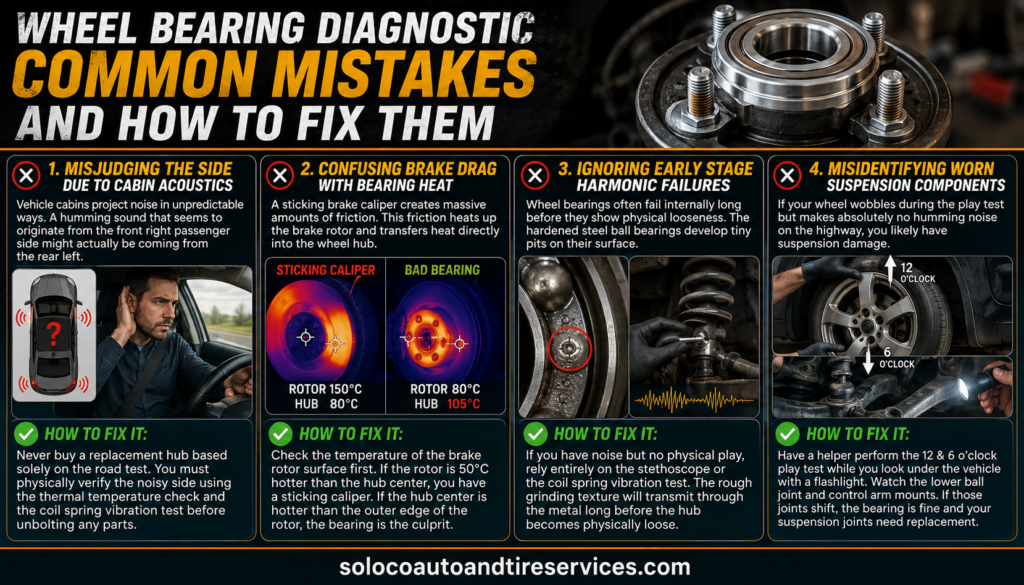
Vehicle cabins project noise in unpredictable ways. A humming sound that seems to originate from the front right passenger side might actually be coming from the rear left. Sound waves bounce off the windshield and center console, completely tricking your ears. How to fix it: Never buy a replacement hub based solely on the road test. You must physically verify the noisy side using the thermal temperature check and the coil spring vibration test before unbolting any parts.
Confusing Brake Drag with Bearing Heat
A sticking brake caliper creates massive amounts of friction. This friction heats up the brake rotor and transfers heat directly into the wheel hub. This makes a perfectly good wheel bearing look like a failing one during your thermal test. How to fix it: Check the temperature of the brake rotor surface first. If the brake rotor is 50 degrees hotter than the hub center, you have a sticking caliper. If the hub center is hotter than the outer edge of the brake rotor, the bearing is the culprit.
Ignoring Early Stage Harmonic Failures
Wheel bearings often fail internally long before they show physical looseness. The hardened steel ball bearings develop tiny pits on their surface. This pitting causes a loud helicopter noise at highway speeds, but the wheel will feel completely tight during the 12 and 6 o’clock play test. How to fix it: If you have noise but no physical play, rely entirely on the stethoscope or the coil spring vibration test. The rough grinding texture will transmit through the metal long before the hub becomes physically loose.
Misidentifying Worn Suspension Components
If your wheel wobbles during the play test but makes absolutely no humming noise on the highway, you likely have suspension damage rather than a bearing failure. How to fix it: Have a helper perform the 12 and 6 o’clock play test while you look under the vehicle with a flashlight. Watch the lower ball joint and the upper control arm mounts. If you see those joints shifting in their sockets, the bearing is fine and your suspension joints require replacement.
Diagnostic Variations for Different Vehicles
Diagnosing All-Wheel Drive and 4WD Systems
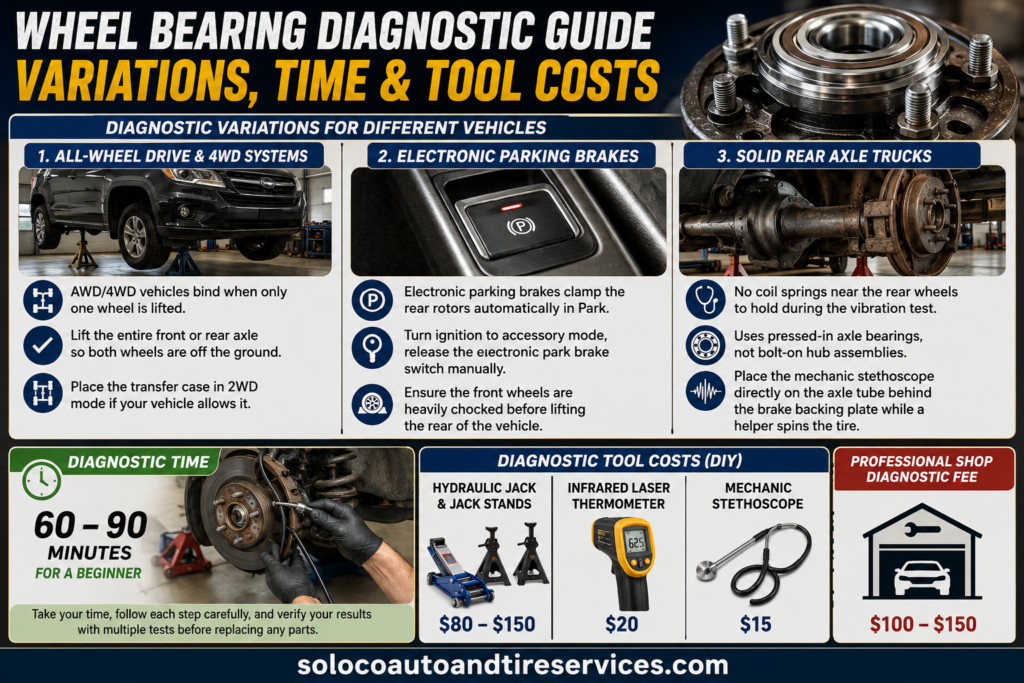
If you own an AWD or 4WD vehicle, spinning a single wheel by hand is often impossible due to the differential and transfer case binding.
To perform the spin test, you must safely lift the entire front end or rear end of the vehicle so both tires on the axle are off the ground simultaneously. Place the transfer case in two-wheel drive if your vehicle allows it.
Working with Electronic Parking Brakes
Modern vehicles utilize electronic parking brakes that clamp the rear rotors automatically when you put the car in park. You cannot perform the spin test on rear wheels if the electronic brake is engaged.
You must turn the ignition to accessory mode, manually release the electronic parking brake switch, and ensure the front wheels are heavily chocked before lifting the rear of the vehicle.
Solid Rear Axle Trucks
Pickup trucks with solid rear axles do not have coil springs near the rear wheels for you to hold during the vibration test. They also use pressed-in axle bearings rather than bolt-on hub assemblies.
To test these, you must place your mechanic stethoscope directly onto the solid metal axle tube, just behind the brake backing plate, while a helper spins the heavy truck tire.
Diagnostic Time and Tool Costs
Diagnosing a bad wheel bearing costs very little if you already own basic garage tools. A standard 2-ton hydraulic jack and a pair of heavy-duty jack stands will cost between $80 and $150.
An infrared laser thermometer runs about $20 at any hardware store. A basic mechanic stethoscope costs less than $15. If you take the vehicle to a professional shop, expect to pay between $100 and $150 for a diagnostic fee. Completing this process in your driveway takes about 60 to 90 minutes for a beginner.
Frequently Asked Questions
Can I drive on a bad wheel bearing?
You should not drive on a failing bearing for long distances. As the internal friction increases, the metal components overheat and expand. In severe cases, the bearing can seize completely while you are driving, causing the wheel to lock up or detach from the steering knuckle entirely.
Should I replace wheel bearings in pairs?
You do not strictly need to replace wheel bearings in pairs. Unlike brake pads or shock absorbers, wheel bearings degrade at different rates based on pothole impacts and curb strikes. You can safely replace only the side that has failed without compromising vehicle safety.
Does an alignment fix a bad wheel bearing?
A wheel alignment will never fix a bad bearing. Alignments adjust the geometric angles of your steering rods and control arms to keep the tires pointing straight. A bearing is a sealed mechanical part that allows the wheel to spin. Once the internal metal pits or grinds, replacement is the only option.
Why do my tires sound like a helicopter?
A rhythmic helicopter sound that changes pitch based on vehicle speed is the classic symptom of a failing bearing. The metal rollers inside the hub are grinding against a pitted metal race. As you drive faster, the rotational speed increases, transforming a low growl into a rapid chopping noise.
Will a bad wheel bearing shake the steering wheel?
A severely degraded front wheel bearing can cause a noticeable vibration or shimmy in your steering wheel, especially at highway speeds. However, if the steering wheel shakes only when you apply the brakes, the issue is warped brake rotors rather than the bearing assembly.
By following these procedures methodically, avoiding the common acoustic traps, and utilizing heat and vibration checks, you now know exactly how to determine what wheel bearing is bad on any passenger vehicle.


