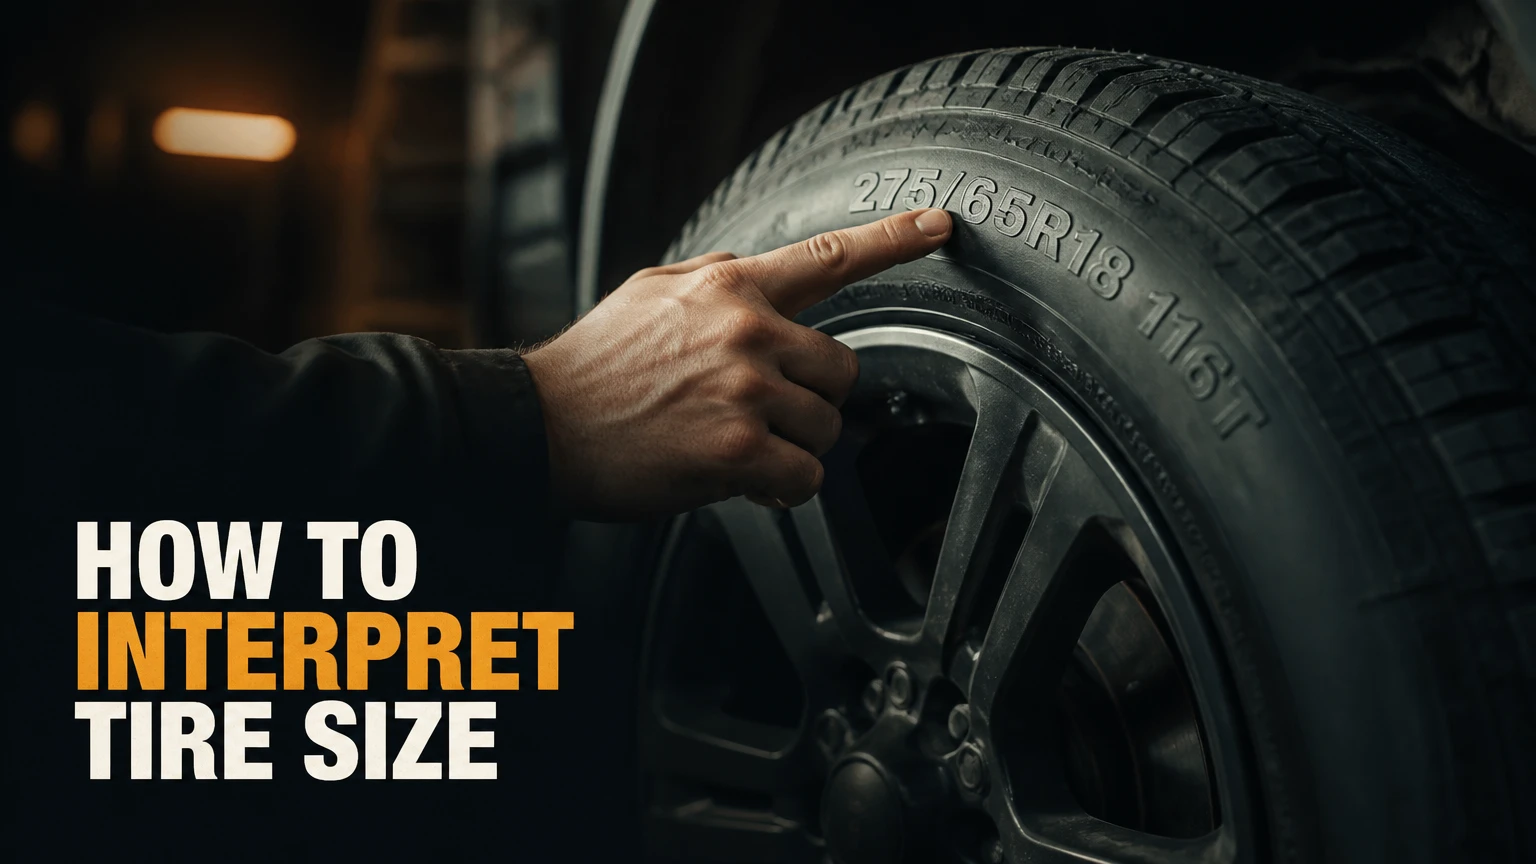
Mastering how to interpret tire size empowers you to select the correct replacement tires, maintain proper inflation pressures, and ensure vehicle safety. By following this precise 8-step decoding process, you can read any passenger, light truck, or specialty trailer sidewall in under two minutes with absolute confidence.
Before You Start
- Time Required: 2 to 3 minutes per tire
- Difficulty Level: Beginner
- Cost: Free ($0)
- Tools and Materials Needed:
- Tire with visible sidewall markings (Quantity: 1)
- Flashlight or smartphone flashlight (Quantity: 1)
- Stiff-bristled nylon utility brush (Quantity: 1)
- Mild dish soap and water solution in a spray bottle (16 oz)
- Microfiber towel or rag (Quantity: 1)
- Notepad or smartphone notes application
- Prerequisite Conditions: Vehicle safely parked on level ground with the parking brake fully engaged. Ensure the engine is turned off and wheels are cool to the touch.
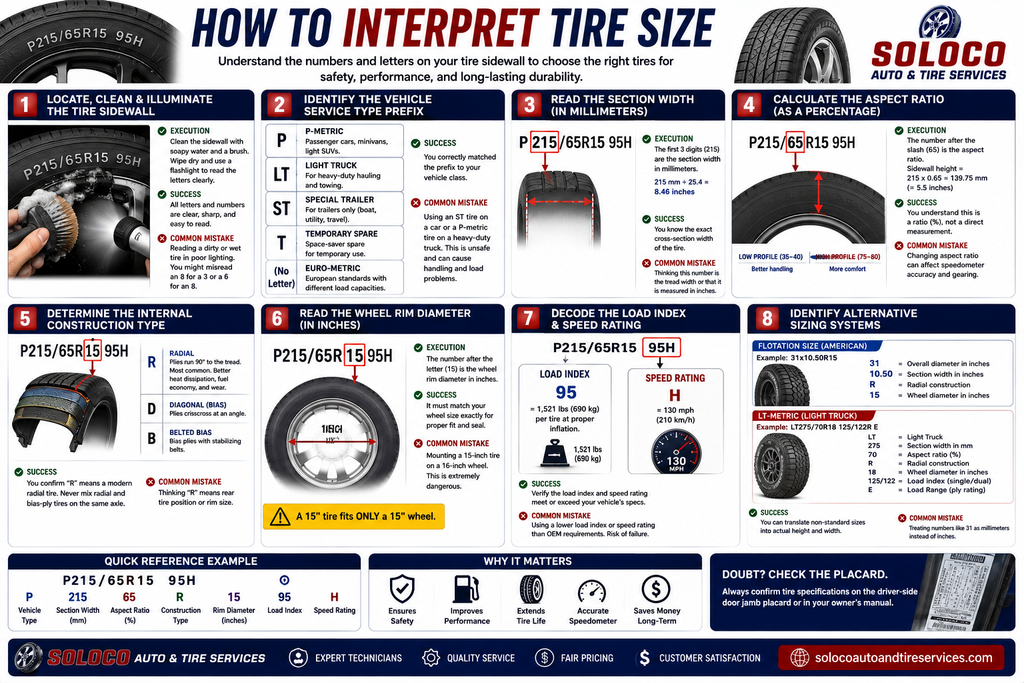
Step-by-Step Interpretation Process
Step 1: Locate, Clean, and Illuminate the Tire Sidewall
Locate the primary alphanumeric sidewall stamping and scrub away road grime, brake dust, and old tire dressings using a stiff-bristled nylon brush, soapy water, and a flashlight.
- Execution Details: Walk around your vehicle and inspect the outer sidewall of the target tire. Spray the soapy water solution directly onto the raised black lettering. Scrub gently with the nylon brush in circular motions to pull embedded brake dust out of the recessed mold channels. Wipe the area dry with a microfiber towel and angle your flashlight beam horizontally across the surface to cast shadows over the raised rubber characters, making faint or weathered digits instantly legible.
- Success Checkpoint: You will know this step worked when all digits, letters, and symbols in the primary sidewall sequence appear sharp, clear, and high-contrast under direct illumination.
- Common Mistake: Attempting to read a dirty or wet tire without a flashlight in dim garage lighting, which leads to misreading an 8 for a 3 or a 6 for an 8.
Step 2: Identify the Vehicle Service Type Prefix
Identify the application prefix letter at the very beginning of the sidewall sequence to determine the vehicle category and engineering design standard.
- Execution Details: Look at the first one or two letters preceding the 3-digit number. If the sequence starts with P, the tire is engineered to P-Metric standards for passenger cars, minivans, and light SUVs. If it starts with LT, it is a Light Truck tire built for heavy-duty towing and high payloads. ST stands for Special Trailer (used exclusively on boat, utility, and travel trailers and never on steering or drive axles). T stands for Temporary Spare (space-saver donut spares restricted to low speeds). If no letter exists before the first number, the tire is a Euro-metric tire manufactured to European Technical and Tyre Organization standards, which often feature different load capacities than P-metric equivalents.
- Success Checkpoint: You will know this step worked when you have correctly matched the prefix letter to your vehicle class, ensuring you respect specific load and inflation adjustments.
- Common Mistake: Installing an ST (Special Trailer) tire on a passenger vehicle or a P-metric tire on a heavy-duty commercial truck, which compromises vehicle handling and load safety.
Step 3: Read the Section Width in Millimeters
Locate the 3-digit number immediately following the service type prefix to establish the nominal cross-sectional width of the tire.
- Execution Details: Read the first numeric group (for example, the 215 in P215/65R15). This 3-digit figure represents the straight-line distance in millimeters measured from the widest point of the outer sidewall to the widest point of the inner sidewall when mounted on its designated rim width and inflated to nominal pressure. Convert millimeters to inches mentally by dividing by 25.4 if needed (e.g., 215mm equals approximately 8.46 inches).
- Success Checkpoint: You will know this step worked when you can state the exact cross-section width of the tire in millimeters, which dictates physical clearance inside the wheel well.
- Common Mistake: Believing that this 3-digit number represents the tread width or that it is measured in inches instead of millimeters.
Step 4: Calculate the Aspect Ratio as a Percentage
Find the 2-digit number located immediately after the forward slash to determine the height profile of the sidewall.
- Execution Details: Locate the number following the slash mark (for example, the 65 in P215/65R15). This aspect ratio is the percentage relationship between the sidewall height (section height) and the section width. To calculate the actual physical height of the sidewall in millimeters, multiply the section width by the aspect ratio percentage ($215 \times 0.65 = 139.75\text{ mm}$, or about 5.5 inches of sidewall height). A lower aspect ratio (such as 35 or 40) indicates a low-profile tire with a shorter sidewall and sharper handling response; a higher aspect ratio (such as 75 or 80) indicates a high-profile tire with a taller sidewall designed for ride comfort and impact absorption over rough roads.
- Success Checkpoint: You will know this step worked when you understand that the profile number is a ratio percentage, not a direct millimeter or inch measurement.
- Common Mistake: Assuming that changing a tire’s aspect ratio without changing the wheel diameter will not affect your vehicle’s speedometer calibration and final gear ratio.
Step 5: Determine the Internal Construction Type
Identify the single letter directly following the aspect ratio to recognize how the internal body plies of the tire are arranged.
- Execution Details: Look for the letter positioned after the aspect ratio (for example, the R in P215/65R15). The letter R stands for Radial construction, meaning the body ply cords run radially at a 90-degree angle to the centerline of the tread, reinforced by stabilizing steel belts underneath the tread face. This is standard on over 99 percent of modern passenger vehicles due to superior heat dissipation, fuel economy, and tread wear. The letter D stands for Diagonal or Bias ply construction, where plies crisscross at an angle. The letter B stands for Belted Bias, combining bias plies with stabilizing belts.
- Success Checkpoint: You will know this step worked when you confirm an R designates a modern radial tire, ensuring you never mix radial and bias-ply tires on the same axle.
- Common Mistake: Confusing the construction letter R with a rim diameter measurement or assuming it stands for “Rear” tire position.
Step 6: Read the Wheel Rim Diameter in Inches
Locate the 2-digit number immediately following the internal construction letter to determine the exact wheel size required for the tire.
- Execution Details: Find the number positioned after the construction letter (for example, the 15 in P215/65R15). This 2-digit figure indicates the diameter of the wheel rim in inches measured bead-to-bead where the tire’s inner bead seats against the metal wheel flange. Your replacement tire rim diameter must match your wheel diameter down to the exact inch; a 15-inch tire can only be mounted on a 15-inch wheel rim.
- Success Checkpoint: You will know this step worked when you match the wheel diameter value directly to your wheel size, ensuring a safe, airtight bead seal during mounting.
- Common Mistake: Attempting to mount a tire with a 15-inch diameter designation onto a 16-inch wheel, which creates an explosive failure hazard and prevents proper bead seating.
Step 7: Decode the Load Index and Speed Rating
Look at the separate alphanumeric code at the end of the full sequence (for example, 95H) to determine the maximum weight capacity and safe top speed threshold of the tire.
- Execution Details: Examine the service description block separated by a space from the main sizing sequence. The 2- or 3-digit number is the Load Index (e.g., 95 corresponds to a maximum load capacity of 1,521 pounds or 690 kg per single tire when inflated properly). The final letter is the Speed Rating (e.g., H indicates a certified maximum safe operating speed of 130 mph or 210 km/h under normal operating conditions). Always verify load index and speed ratings against your vehicle manufacturer placard located on the driver-side door jamb.
- Success Checkpoint: You will know this step worked when you cross-reference the load index and speed rating values against official industry lookup charts to confirm they meet or exceed factory specifications.
- Common Mistake: Installing replacement tires with a lower load index or speed rating than original equipment manufacturer (OEM) specifications, which can cause structural tire failure during high-speed sustained driving or heavy loading.
Step 8: Identify Alternative Sizing Systems
Recognize alternative sizing structures such as flotation sizing or metric commercial sizing when standard metric codes are absent.
- Execution Details: If your sidewall displays a format like 31×10.50R15 instead of a metric code, you are looking at an American Flotation Size common on off-road trucks and larger 4×4 vehicles. In this format, the first number (31) is the total overall diameter of the inflated tire in inches, the second number (10.50) is the section width in inches, and the final letter and number (R15) indicate radial construction and a 15-inch wheel diameter. For light commercial vans, you may also encounter LT-Metric sizing with load range letters (such as Load Range C, D, or E) designating reinforced ply ratings.
- Success Checkpoint: You will know this step worked when you can successfully translate non-standard flotation or light truck sizing into overall height and width dimensions.
- Common Mistake: Treating flotation sizing numbers as metric millimeters, which would lead you to believe a 31-inch tire is only 31 millimeters wide.
Common Mistakes and How to Fix Them
- Mistake 1: Confusing Section Width Units.
- Symptom: Believing that a section width like 225 means 225 inches wide.
- Fix: Remember that standard metric tire widths are always measured in millimeters. Divide by 25.4 if you need to convert to inches for custom clearance checks.
- Mistake 2: Confusing the DOT Date Code with Tire Size.
- Symptom: Trying to decode a 4-digit week and year manufacturing code (e.g., 2424) as part of the tire size sequence.
- Fix: Look for the letters DOT preceding a separate oval stamp on the lower sidewall. The 4-digit code at the end of the DOT stamp indicates manufacturing week and year, not sizing dimensions.
- Mistake 3: Downgrading Speed Ratings for Economy.
- Symptom: Installing lower speed-rated tires (e.g., S or T-rated) on a performance sedan that originally required V or W-rated tires.
- Fix: Always match or exceed the original speed rating specified on the vehicle door placard to maintain proper handling stability and cornering grip.
- Mistake 4: Ignoring Extra Load (XL) Designations.
- Symptom: Replacing an XL-rated tire with a Standard Load (SL) tire of the exact same dimensions on a heavy modern electric vehicle or SUV.
- Fix: Check the sidewall for an XL (Extra Load) or RF (Reinforced) marking. Ensure replacement tires carry equivalent load-carrying reinforcement if specified by the vehicle manufacturer.
- Mistake 5: Misreading Aspect Ratio as Height in Millimeters.
- Symptom: Assuming a 60 aspect ratio means the sidewall is exactly 60mm tall.
- Fix: Calculate sidewall height by multiplying the section width by the aspect ratio percentage ($Width \times Ratio = Height$).
Variations and Alternative Situations
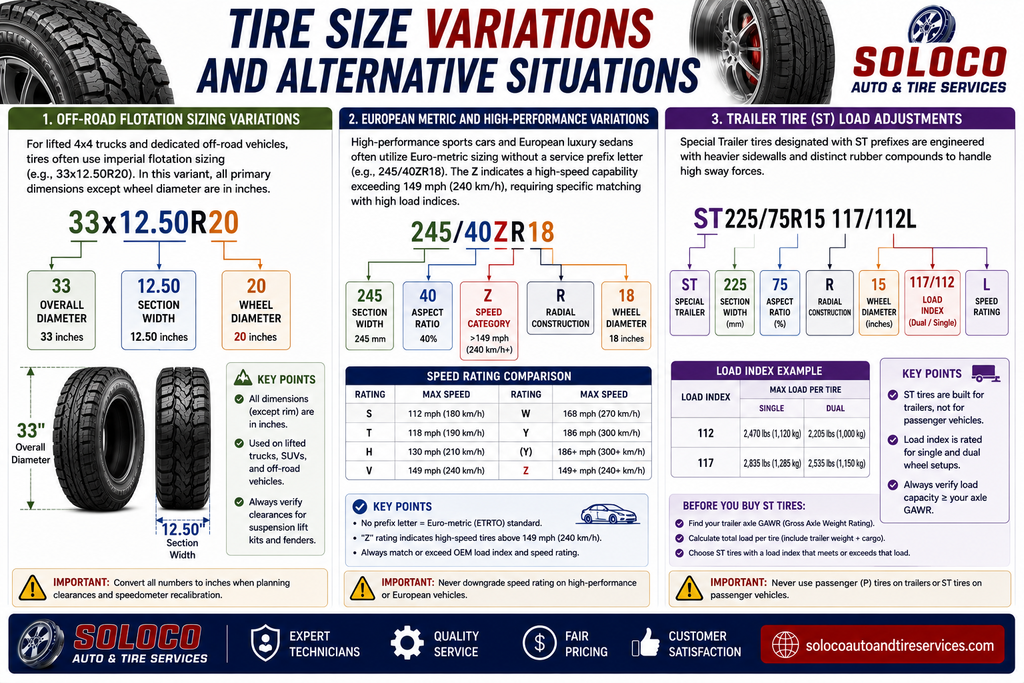
Off-Road Flotation Sizing Variations
For lifted 4×4 trucks and dedicated off-road vehicles, tires often use imperial flotation sizing (e.g., 33×12.50R20). In this variant, all primary dimensions except wheel diameter are expressed in inches. When calculating clearances for suspension lift kits, convert all numbers to inches: overall diameter is 33 inches, section width is 12.50 inches, and it mounts on a 20-inch rim.
European Metric and High-Performance Variations
High-performance sports cars and European luxury sedans often utilize Euro-metric sizing without a service prefix letter (e.g., 245/40ZR18). The presence of the Z inside the construction string indicates a high-speed capability exceeding 149 mph (240 km/h), requiring specific matching with high load indices.
Trailer Tire (ST) Load Adjustments
Special Trailer tires designated with ST prefixes are engineered with heavier sidewalls and distinct rubber compounds to handle high sway forces. Never convert passenger car sizing directly to trailer applications without verifying that the load index meets or exceeds the Gross Axle Weight Rating (GAWR) of your specific trailer axle.
How Long Does It Take / What Does It Cost
- Time Commitment: Inspecting and interpreting all four tires on a vehicle takes approximately 5 to 10 minutes total when using a flashlight and cleaning stubborn sidewall areas.
- Financial Cost: Completely free ($0) when performed manually using household cleaning supplies and standard flashlights. Professional tire shop inspections or digital tread depth gauge assessments are also typically provided free of charge by local tire retailers.
Frequently Asked Questions
Where is the tire size located on my vehicle?
The tire size is stamped directly into the raised black rubber on the outer sidewall of the tire in an alphanumeric sequence. You can also find the exact factory-approved tire sizes printed on the white or yellow safety compliance certification placard located on the driver-side door jamb or inside the glove box.
Can I install a tire with a different width than my original size?
Installing a slightly different tire width is possible, but you must ensure the new width does not cause the tire tread or sidewall to rub against suspension components, brake lines, or fender liners during full steering lock or suspension compression. Consult a professional tire technician before altering factory widths.
What happens if I install a tire with a lower load index?
Installing a tire with a lower load index than specified by your vehicle manufacturer reduces the maximum weight capacity of the vehicle. This can cause severe tire overloading, excessive heat buildup, accelerated tread wear, and catastrophic tire blowout risks under heavy payloads or high-speed driving.
How do I know if my tires are too old to use?
Locate the letters DOT on the lower sidewall followed by a 12-character alphanumeric code. The final four digits represent the manufacturing date (for example, 1424 means the tire was manufactured during the 14th week of 2024). Industry safety standards recommend replacing tires that are more than six years old regardless of remaining tread depth.
Do winter tires use a different sizing format?
Winter and snow tires use the exact same standardized metric sizing format as all-season tires (e.g., P215/65R15 95H). However, they frequently feature an alpine symbol (a three-peaked mountain with a snowflake) alongside the size string, and may sometimes be approved for a slightly lower speed rating if paired with a dashboard speed warning label.


