Knowing when to replace tires keeps you safe on the road. You can check your tires in about 15 minutes using basic tools to inspect tread depth, physical damage, and age. Mastering this essential 5-step process ensures optimal traction, prevents catastrophic blowouts, and saves you money on premature replacements.
Before You Start
- Time Required: 15 to 20 minutes
- Difficulty Level: Beginner
- Typical Cost: $0 (using household items) to $15 (if purchasing a dedicated tread depth gauge)
- Tools and Materials Checklist:
- 1 Penny or quarter coin
- 1 Tire tread depth gauge (optional, for precise millimeter measurements)
- 1 High-lumen LED flashlight
- 1 Tire pressure gauge (digital or dial)
- 1 Pair of work gloves (to protect hands from road grime and sharp wire protruding from damaged rubber)
- Prerequisite Conditions: Park the vehicle on a completely flat, hard asphalt or concrete surface away from active traffic. Never inspect tires while the vehicle is parked on soft dirt, gravel, or a steep incline.
Step 1: Park, Chock, and Prep the Vehicle Safely
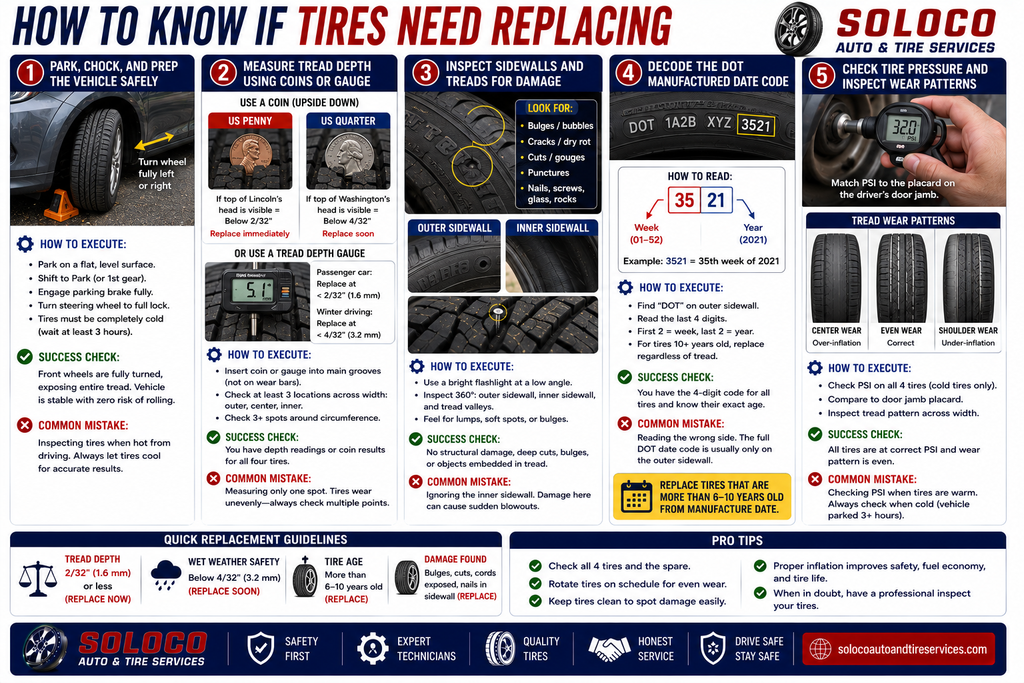
Park your vehicle on a flat, level surface and engage the parking brake fully before turning the steering wheel sharply outward to expose the front tread face.
To execute this step properly, shift your automatic transmission into Park or your manual transmission into First gear. Pull the mechanical parking brake lever up firmly or engage the electronic parking brake switch until the dashboard indicator illuminates steadily. Step out of the vehicle and turn the steering wheel completely to the left or right lock position. This exposes the inner tread face and sidewalls of your front tires, giving you unobstructed visual and physical access. If you are inspecting rear tires, leave the steering wheel centered. Make sure the tires are completely cold; do not attempt an inspection immediately after driving long distances, as heat causes rubber expansion and artificially alters internal pressure readings and tread contour measurements.
You will know this step worked when the front wheels are fully articulated, allowing clear sightlines across the entire tread width from shoulder to shoulder, and the vehicle is completely stable with zero risk of rolling.
A common mistake at this stage is inspecting tires immediately after highway driving when the rubber is hot. Always allow the vehicle to sit parked for at least 3 hours so the tires cool down to ambient temperature before conducting measurements.
Step 2: Measure Tread Depth Using Coins or Gauge
Insert a standard coin upside down into multiple primary tread grooves across the face of each tire to evaluate remaining tread life.
Take a United States penny or quarter and hold it between your thumb and forefinger with Lincoln’s or Washington’s head pointing directly downward into the deepest central grooves of the tire tread. Do not place the coin inside the shallow raised wear indicator bars; instead, place it in the deep channels where water evacuation occurs. If using a physical tread depth gauge, push the sliding pin downward until the base sits flat on the rubber blocks, then read the measurement in millimeters or thirty-seconds of an inch. Inspect at least three different circumferential locations around each individual tire: the outer edge, the exact center, and the inner edge.
You will know this step worked when you have recorded specific depth readings or visual coin results for all four tires. With a penny, if the top of Lincoln’s head is completely visible, your tread depth is below 2/32 of an inch and the tire must be replaced immediately. With a quarter, if the top of Washington’s head is visible, your tread depth is below 4/32 of an inch, signaling that wet-weather traction is severely compromised and replacement should be planned soon. If using a gauge, any reading below 2/32 of an inch (1.6 mm) for passenger cars or 4/32 of an inch for winter driving fails legal safety standards.
A common mistake here is measuring only one single spot on a tire. Tires often wear unevenly due to suspension issues or incorrect inflation, meaning a single measurement can give a false sense of security while another section is completely bald. Always check multiple points across the width and circumference of every tire.
Step 3: Inspect Sidewalls and Treads for Structural Damage
Shine a high-lumen flashlight closely across both outer and inner sidewalls while searching for bulges, cracks, punctures, or embedded foreign objects.
Turn on your LED flashlight and hold it nearly parallel to the rubber surface to cast low-angle light, which highlights micro-cracks, cuts, and abrasions that direct overhead light misses. Slowly trace your gloved hand around the entire outer sidewall, feeling for any abnormal lumps, bubbles, or soft depressions where the internal fabric cords may have ruptured. Safely crouch down or use a creeper to look behind the tire at the inner sidewall facing the vehicle suspension components, as damage frequently hides away from plain view. Carefully examine the tread blocks for sharp objects like roofing nails, screws, glass shards, or jagged rocks wedged deep into the rubber compound.
You will know this step worked when you have performed a 360-degree tactile and visual sweep of every tire’s outer face, inner face, and tread valley without finding any structural deformities, deep gouges exposing steel belts, or localized bulges.
A common mistake at this step is ignoring the inner sidewall because it requires bending down or crawling underneath the vehicle. Tire impacts with deep potholes or curbs often pinch the inner sidewall against the wheel rim, creating invisible structural failures that can result in a sudden blowout at high speeds.
Step 4: Decode the DOT Manufactured Date Code
Locate the Department of Transportation (DOT) serial number stamped into the tire sidewall and read the final four digits to determine the exact manufacturing age.
Scan the lower outer sidewall near the wheel rim for the letters “DOT followed by a series of alphanumeric characters, ending in a distinct 4-digit numeric block. Focus entirely on these final four numbers. The first two digits represent the calendar week of manufacture (ranging from 01 to 52), and the final two digits represent the manufacturing year. For example, a stamp reading “3521” means the tire was manufactured during the 35th week of the year 2021. For older tires manufactured before the year 2000, you may encounter a 3-digit code, but modern vehicles will feature the standard 4-digit ISO format.
You will know this step worked when you successfully identify the 4-digit manufacture code on all four tires and calculate their exact chronological age relative to the current calendar year. Replace any tire that is more than 6 to 10 years old from its manufacture date, regardless of how much tread depth remains visually available.
A common mistake at this stage is looking at the wrong side of the tire. On many asymmetric or directional tires, the full DOT code with the date stamp is only printed on the outer sidewall, while the inner sidewall displays only the partial plant and mold identification codes. Always verify you are reading the side facing outward.
Step 5: Check Tire Pressure and Inspect Wear Patterns
Attach a calibrated tire pressure gauge to each valve stem to verify proper inflation levels and analyze the wear pattern across the tread face.
Remove the black plastic valve stem cap from the first tire, press the nozzle of your digital or dial pressure gauge firmly onto the valve stem, and hold it steady until the digital display or mechanical needle locks in the reading. Compare this measured PSI against the official placard located on the inside of the driver’s door jamb; never use the maximum pressure printed on the tire sidewall. While checking pressure, observe the wear pattern across the tread width: even wear indicates proper alignment and inflation, center wear indicates chronic over-inflation, and shoulder wear on both edges indicates chronic under-inflation.
You will know this step worked when all four tires match the vehicle manufacturer’s specified PSI requirements and you have verified that the tread pattern wears evenly across the flat contact patch. Replace any tire exhibiting severe feathering, cupping, or asymmetric bald spots that indicate ruined suspension geometry.
A common mistake here is adjusting tire pressure while the tires are warm from driving. Warm air expands, giving a falsely high pressure reading. Always set tire pressure when the vehicle has been stationary for at least three hours.
Common Mistakes and How to Fix Them
- Mistake 1: Replacing only one worn tire on an All-Wheel-Drive (AWD) vehicle.
- Why it happens: Drivers try to save money by swapping a single damaged tire.
- How to fix it: AWD systems require rolling diameters to match closely to prevent severe differential overheating and mechanical failure. If one tire is worn beyond safe limits, you must often replace all four tires or have a specialty shop shave a new tire down to match the remaining tread depth of the axle set.
- Mistake 2: Relying solely on tread depth while ignoring rubber degradation.
- Why it happens: A vehicle stored in a sunny climate or garage exposed to ozone can have deep tread remaining while the rubber compounds undergo severe dry rot.
- How to fix it: Inspect the tread blocks and sidewalls for fine web-like cracking or crazing. If rubber is brittle or cracking, replace the tires immediately regardless of the penny test results.
- Mistake 3: Ignoring persistent slow air leaks.
- Why it happens: Drivers simply pump air into the tire every week instead of finding the root cause.
- How to fix it: Submerge the tire in a water tank or spray soapy water across the tread and valve stem to locate bubbling air leaks. Have a professional patch punctures smaller than one-fourth of an inch located strictly on the tread crown; never patch sidewall punctures.
- Mistake 4: Skipping wheel alignment after noticing uneven edge wear.
- Why it happens: Replacing bald tires without correcting underlying suspension geometry ruins the new tires prematurely.
- How to fix it: Always invest in a professional 4-wheel alignment immediately whenever you notice feathered edges, cupping, or one-sided baldness on your old tires.
Variations of the Inspection Process
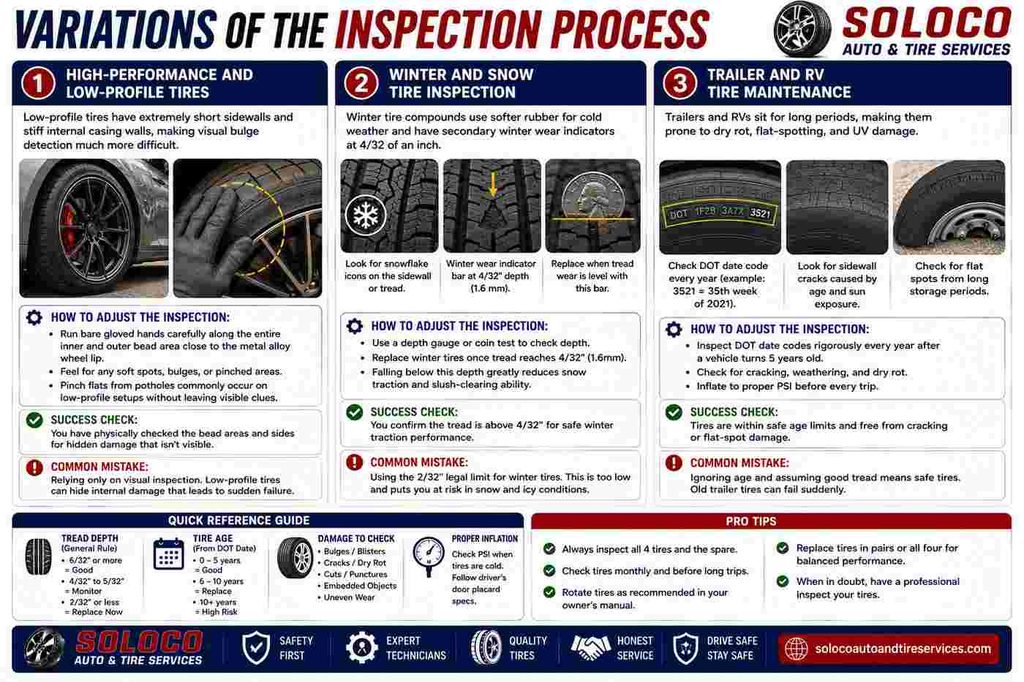
- High-Performance and Low-Profile Tires: Low-profile tires have extremely short sidewalls and stiff internal casing walls, making visual bulge detection much more difficult. When inspecting performance tires, run your bare gloved hands carefully along the entire inner and outer bead area close to the metal alloy wheel lip, as pinch flats from potholes commonly occur on low-profile setups without leaving visible external clues.
- Winter and Snow Tire Inspection: Winter tire compounds utilize softer rubber formulations designed for sub-freezing temperatures and feature secondary winter wear indicators (often molded as snowflake icons or raised depth bars at 4/32 of an inch). When checking winter tires, ensure you replace them once they hit this 4/32 threshold, because falling below this depth destroys snow compaction and slush-clearing capabilities long before standard summer or all-season legal limits are reached.
- Trailer and RV Tire Maintenance: Trailers and recreational vehicles sit parked for extended periods, making them prime candidates for severe dry rot and flat-spotting. Inspect trailer tire DOT date codes rigorously every single year after a vehicle turns five years old, and look for sidewall cracking caused by constant ultraviolet sun exposure during long-term storage.
How Long Does It Take / What Does It Cost
- Time Investment: A thorough, all-four-tire physical inspection takes between 15 to 20 minutes for a beginner working carefully with a flashlight and coin.
- Financial Investment: Conducting the visual and tactile inspection costs $0. Purchasing an accurate digital tread depth gauge and a reliable dial tire pressure gauge costs between $10 to $25 total at any auto parts retailer. Professional tire replacement and balancing services typically range from $15 to $35 per tire in labor, excluding the cost of the new tires themselves.
Frequently Asked Questions
Can I drive with tires that show Lincoln’s head?
No, driving with tread depth below two-thirty-seconds of an inch (where Lincoln’s head is fully visible) is dangerous and illegal in most jurisdictions. Low tread depth completely destroys your tire’s ability to channel water away from the contact patch, resulting in immediate hydroplaning, extended stopping distances on wet pavement, and potential loss of vehicle control.
How often should I check my tire health?
You should visually inspect your tires and check their pressure at least once every month, as well as before embarking on any long road trip. Conducting a tactile inspection for physical damage, sidewall bulges, and tread depth should be performed thoroughly at least twice a year during seasonal weather transitions.
What causes sidewall bulges on a tire?
Sidewall bulges are caused by structural internal damage where the fabric cords inside the tire carcass have fractured or torn, allowing air pressure to push the outer rubber outward. This is typically triggered by hitting a sharp pothole, slamming into a concrete curb at speed, or driving with severely under-inflated tires over rough terrain.
Can a tire be repaired if it gets a nail in it?
Yes, a tire can often be safely repaired if the puncture is smaller than one-fourth of an inch, located strictly within the flat tread crown area, and does not cross over into the shoulder or sidewall. The proper repair method requires dismounting the tire from the wheel and applying a combination plug-patch unit from the inside to ensure an airtight seal.
Why do tires crack if they have good tread?
Tires crack due to environmental degradation caused by ultraviolet solar radiation, prolonged exposure to ozone, high ambient storage temperatures, and natural chemical breakdown of the rubber compounds over time. Even if a vehicle is driven infrequently and retains deep tread blocks, the rubber loses its elasticity and structural integrity past the 6 to 10-year mark.


