Choosing the right replacement tires ensures vehicle safety, optimal fuel economy, predictable handling, and maximum tread life. This comprehensive guide walks you through the entire selection process across six precise steps, taking approximately 30 to 45 minutes to complete from your driveway. Success depends entirely on matching your vehicle manufacturer specifications while accurately assessing your local climate and driving habits.
Before You Start
- Time Required: 30 to 45 minutes.
- Difficulty Level: Beginner.
- Typical Cost: $400 to $1,200+ per set of four (depending on vehicle class and tire tier).
- Tools and Materials Needed:
- Owner’s manual: 1 physical book or digital PDF copy.
- Current tires: 4 mounted on the vehicle.
- Smartphone: 1 internet-connected device for specification lookups.
- Tread depth gauge: 1 mechanical or digital measuring tool.
- Flashlight: 1 portable light source.
- Prerequisite Conditions: Park the vehicle on a flat, level, hard surface with the parking brake fully engaged and the engine turned off. Ensure the tires are cool to the touch (driven less than 2 miles).
Step 1: Inspect Current Tire Wear Patterns and Health
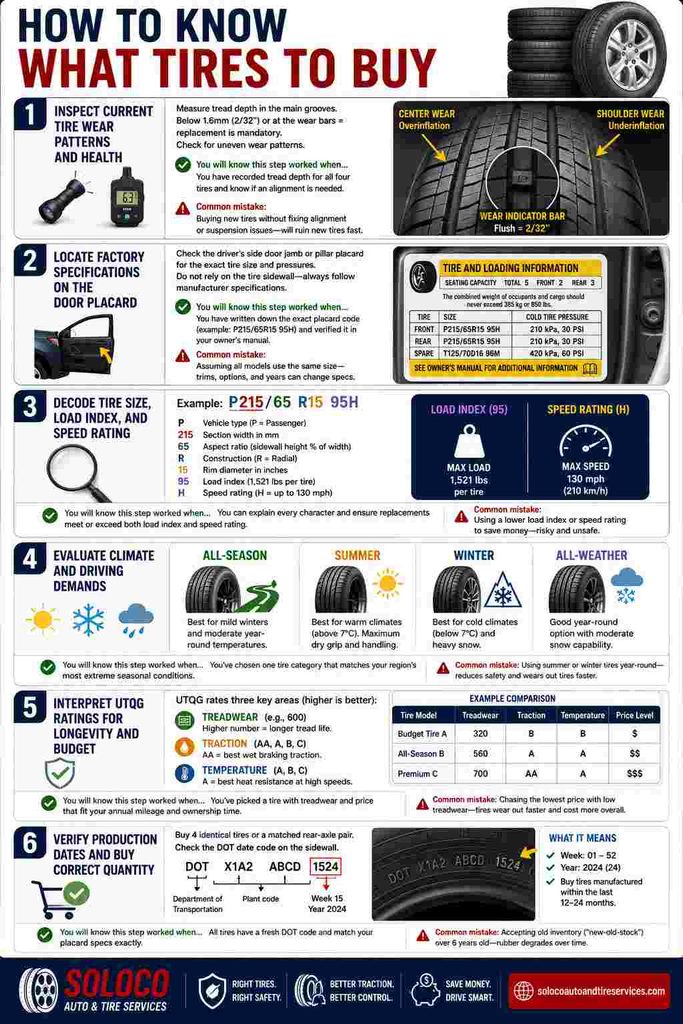
Inspect your current tires to diagnose underlying mechanical issues and confirm whether immediate replacement is necessary. Grab your flashlight and tread depth gauge, then examine each of the four mounted tires individually. Measure the tread depth across the main circumferential grooves in millimeters or 32nds of an inch. If any groove measures below 1.6mm (2/32 of an inch) or hits the built-in wear indicator bars flush with the tread surface, replacement is mandatory. Look closely for irregular wear patterns, such as center-heavy wear indicating overinflation, shoulder wear indicating underinflation, or cupping and scalloping indicating worn suspension components.
You will know this step worked when you have documented the remaining tread depth for all four tires and identified whether your vehicle requires an alignment correction before installing new rubber. A common mistake at this stage is buying new tires without fixing a bad suspension alignment, which will destroy the brand-new tread within 5,000 miles.
Step 2: Locate Factory Specifications on the Door Placard
Locate the official vehicle placard to find the exact tire size and inflation pressures mandated by your car’s manufacturer. Open the driver’s side front door and inspect the metal or paper placard affixed to the door pillar or door jamb. Read the specific alphanumeric code listed under the tire and loading information section, noting the front and rear sizes if they differ. Do not rely solely on the numbers printed on the sidewall of your current tires, as a previous owner or dealership may have installed an incorrect or non-standard size. Cross-reference this placard information with the technical specifications section of your owner’s manual to confirm factory compliance.
You will know this step worked when you have written down the exact alphanumeric placard code (for example, P215/65R15 95H) and verified it against your owner’s manual. A common mistake here is assuming all vehicles of the same make and model use identical tires; trim packages, optional wheel sizes, and production year revisions often alter factory specifications.
Step 3: Decode Tire Size, Load Index, and Speed Rating
Translate every character of your alphanumeric tire specification code to understand its precise physical dimensions and safety thresholds. Examine the code segment by segment: the first letter indicates the vehicle type (such as P for Passenger or LT for Light Truck), followed by the first three digits representing the section width in millimeters (e.g., 215). The two digits following the slash represent the aspect ratio or sidewall profile percentage relative to the width (e.g., 65). The letter following that indicates internal construction (R for Radial), and the final two digits indicate the wheel rim diameter in inches (e.g., 15). Finally, examine the numbers and letter at the end of the string, which denote the load index (e.g., 95, representing a maximum weight capacity of 1,521 pounds per tire) and the speed rating letter (e.g., H, rated for sustained speeds up to 130 mph).
You will know this step worked when you can explain every single digit and letter of your tire code and confirm that any replacement candidate matches or exceeds both the load index and speed rating. A common mistake at this stage is dropping to a lower load index or speed rating to save money, which can lead to tire failure under heavy loads or high-speed cornering.
Step 4: Evaluate Regional Climate and Driving Demands
Select the appropriate tire category based on your local environmental conditions, seasonal temperature shifts, and daily commuting requirements. Choose dedicated All-Season tires if you live in a region with mild winters and moderate year-round temperatures, as they balance wet, dry, and light snow traction. Choose dedicated Summer tires if you drive a high-performance vehicle in warm climates where temperatures consistently remain above 7°C, as their rubber compounds maximize dry grip and cornering agility. Choose Winter tires marked with the three-peak mountain snowflake symbol if your local temperatures consistently drop below 7°C or you encounter heavy snowfall, as their specialized rubber remains pliable in freezing weather. Choose All-Weather tires if you live in a region with moderate winter snow but want to avoid the hassle and expense of swapping between summer and winter sets twice a year.
You will know this step worked when you have selected one single tire category that aligns with your region’s most extreme seasonal weather patterns. A common mistake here is running summer or aggressive winter tires year-round, which drastically increases braking distances and degrades rubber compound performance out of season.
Step 5: Interpret UTQG Ratings for Longevity and Budget
Compare Uniform Tire Quality Grading ratings to balance your budget against your expected mileage and handling priorities. Look at the UTQG label molded into the sidewall or listed on manufacturer specification sheets, which details three distinct metrics: Treadwear, Traction, and Temperature. Compare the Treadwear grade, expressed as a three-digit number (such as 600 or 400), where a higher number indicates greater resistance to wear and longer expected tread life relative to a baseline tire graded 100. Check the Traction grade, rated as AA, A, B, or C from highest to lowest, which measures straight-line wet braking capability on asphalt and concrete. Check the Temperature grade, rated as A, B, or C, which indicates the tire’s ability to dissipate heat under high-speed operation.
You will know this step worked when you have identified a tire model whose treadwear rating and price point match your expected annual mileage and vehicle ownership timeline. A common mistake at this stage is prioritizing the lowest possible purchase price while ignoring low treadwear ratings, resulting in tires that wear out twice as fast and cost more in the long run.
Step 6: Verify Production Dates and Purchase Correct Quantities
Purchase either a complete set of four identical tires or a matched axle pair, and physically inspect the production date stamps upon delivery. Order four identical tires of the exact size, speed rating, and load index, or replace a rear-axle pair if your budget restricts partial replacement while ensuring the newer tires are always installed on the rear axle to maintain stability. Locate the Department of Transportation serial code on the tire sidewall, which begins with the letters DOT followed by a series of characters and ends with a 4-digit manufacturing date code. Read this 4-digit code: the first two digits represent the manufacturing week (01 to 52), and the last two digits represent the manufacturing year (such as 26 for 2026). Verify that the tires were manufactured within the last 12 to 24 months.
You will know this step worked when you have confirmed that all purchased tires bear a fresh 4-digit DOT code and match your vehicle placard specifications exactly. A common mistake here is accepting old inventory or “new-old-stock” tires sitting in a warehouse for more than six years, as rubber degrades chemically over time regardless of remaining tread depth.
Common Mistakes and How to Fix Them
Even careful shoppers can encounter pitfalls during tire selection and installation. Review these common failure modes and their corrective actions to protect your investment.
Buying the Wrong Size Due to Sidewall Misreading
- Cause: Reading an aftermarket modification size off an old tire instead of consulting the original manufacturer door jamb placard.
- Fix: Verify your size requirements against the vehicle’s door placard or owner’s manual before placing any purchase order. If you have aftermarket rims, measure the wheel width directly or consult a professional wheel specialist.
Mixing Mismatched Speed Ratings or Construction Types
- Cause: Purchasing two different tire models with disparate speed ratings or mixing radial and bias-ply tires on the same axle.
- Fix: Never mix different tire constructions or speed ratings on the same axle. If you must replace tires in pairs, install the new pair on the rear axle and move the remaining good tires to the front.
Ignoring Maximum Vehicle Load Capacity Limits
- Cause: Installing standard load passenger tires on a heavy utility vehicle or truck that requires reinforced or light truck ratings.
- Fix: Check your vehicle’s Gross Vehicle Weight Rating in the manual and ensure the numerical load index on the new tire sidewall meets or exceeds factory specifications.
Purchasing Expired Warehouse Inventory
- Cause: Buying discounted online tires that have spent years degrading in an uncontrolled warehouse environment.
- Fix: Inspect the 4-digit DOT date code upon arrival. If the tires are more than three to four years old from the date of manufacture, reject the shipment and request fresh inventory.
Variations Based on Vehicle Type and Use Case
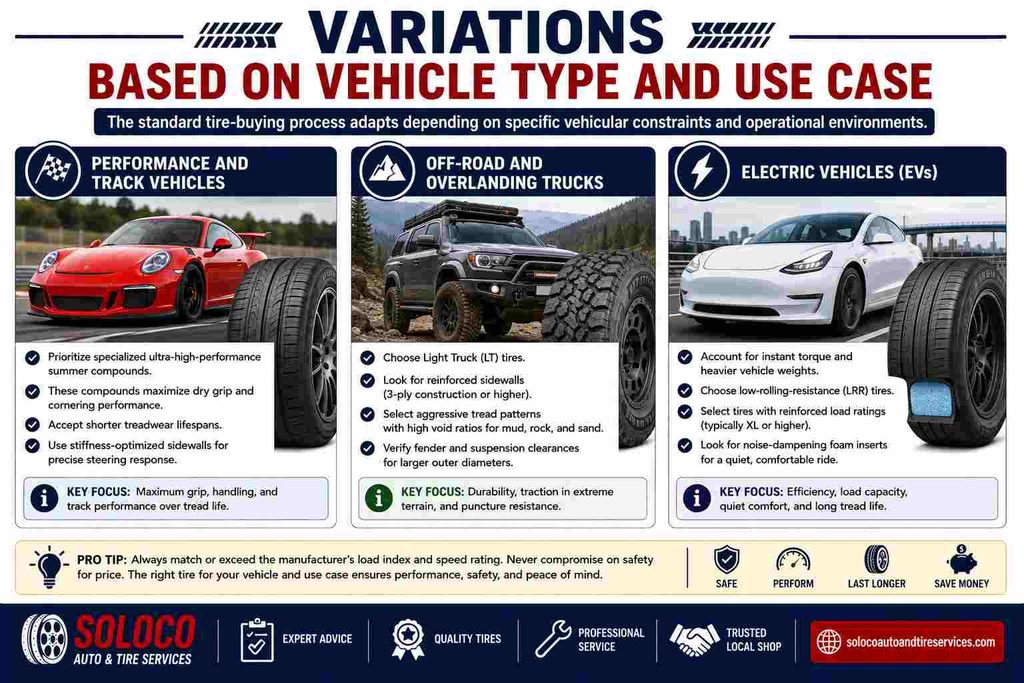
The standard tire-buying process adapts depending on specific vehicular constraints and operational environments.
- Performance and Track Vehicles: Drivers seeking track-day performance should prioritize specialized ultra-high-performance summer compounds with stiffness-optimized sidewalls, accepting shorter treadwear lifespans in exchange for maximum cornering grip.
- Off-Road and Overlanding Trucks: Drivers operating in mud, rock, and sand should look beyond standard passenger sizes to select Light Truck tires with reinforced sidewalls (such as 3-ply construction) and aggressive void ratios, while verifying that fender and suspension clearances accommodate the larger outer diameter.
- Electric Vehicles (EVs): Electric vehicle owners must account for instant torque and heavier vehicle weights by selecting low-rolling-resistance tires specifically engineered with reinforced load ratings and noise-dampening foam inserts.
How Long Does It Take and What Does It Cost?
- Time Investment: Researching specifications and selecting the correct tire model takes 30 to 45 minutes. Physical installation, balancing, and mounting at a professional shop takes an additional 45 to 60 minutes.
- Financial Cost: Budget between $400 and $1,200 for a standard passenger car set of four tires, or $800 to $2,000+ for large SUVs, trucks, and performance vehicles. Professional mounting, balancing, and old tire disposal typically add $80 to $150 to the total bill.
Frequently Asked Questions
Can I put wider tires on my factory rims?
Yes, minor width variations are often possible, but you must stay within the wheel rim width range approved by the tire manufacturer. Increasing width excessively without matching aspect ratio adjustments will cause severe rubbing against your vehicle’s inner fenders and suspension components during sharp turns.
How do I know when my tires are too old to drive on?
Regardless of remaining tread depth, rubber compounds harden and degrade over time due to UV exposure and thermal cycling. Most tire manufacturers and safety agencies recommend inspecting tires annually after five years in service and mandating complete replacement once a tire reaches ten years from its DOT manufacturing date.
Is it safe to replace only one tire at a time?
Replacing a single tire is generally unsafe and discouraged unless the remaining three tires are brand new and match the exact brand, model, and tread depth. Mismatched tread depths create rolling circumference discrepancies that damage all-wheel-drive differential systems and compromise emergency braking traction.
What is the difference between All-Season and All-Weather tires?
All-Season tires are engineered for mild year-round climates with decent dry and wet performance but limited capability in freezing snow. All-Weather tires feature a more aggressive winter tread compound and carry the three-peak mountain snowflake symbol, offering genuine winter performance without requiring seasonal tire swaps.


