Knowing how to know when to change tires prevents dangerous blowouts and ensures reliable traction in all weather conditions. This complete five-step process evaluates tread depth, structural integrity, wear patterns, and age in 15 to 20 minutes. Success relies on systematic measurement across all four tires using standardized physical gauges and precise visual checks.
Before You Start
- Time Required: 15 to 20 minutes
- Difficulty Level: Beginner
- Typical Cost: Free (using household items) to $15 for a dedicated gauge kit
- Tools and Materials:
- Tread depth gauge (Quantity: 1)
- Standard penny coin (Quantity: 1)
- Standard quarter coin (Quantity: 1)
- High-output LED flashlight (Quantity: 1)
- Tire pressure gauge (Quantity: 1)
- Clean microfiber towel and water (Quantity: 1)
- Prerequisite Conditions: Park your vehicle on a flat, level surface, engage the emergency brake, turn off the ignition, and turn your front steering wheel fully to one side to expose the tire tread face.
Step-by-Step Inspection Process
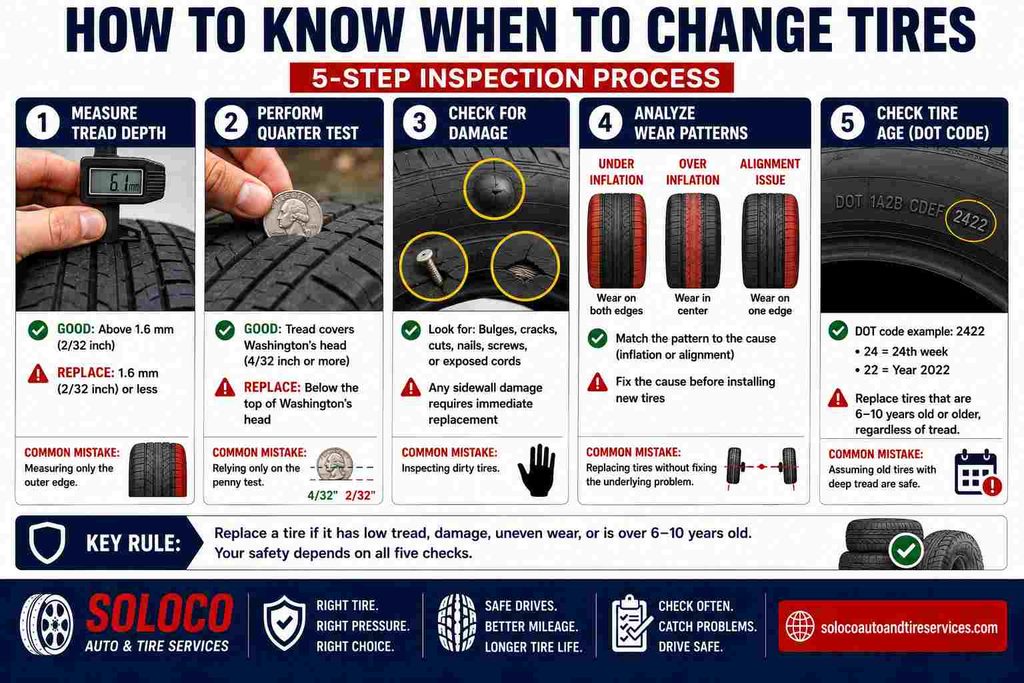
Step 1: Measure Tread Depth with a Dedicated Gauge
- Action: Insert the metal probe of your tread depth gauge directly into the deepest main circumferential grooves of the tire.
- Precise Execution: Place the flat base of the gauge firmly on top of the highest rubber rib. Avoid positioning the probe directly on the raised rubber wear indicator bars molded across the grooves. Press the gauge down until the base sits flush against the tread blocks. Check at least three separate locations across the inner, center, and outer circumferences of each tire.
- Success Checkpoint: You will know this step worked when you obtain a stable numerical reading on the sliding scale or digital screen. Replace the tire immediately if any measurement registers $1.6\text{ mm}$ ($2/32\text{ inch}$) or less.
- Common Mistake: Measuring only the outer edge of the front tires. Front tires wear differently than rear tires, and inner edges often wear out faster due to negative camber settings.
Step 2: Perform the Quarter Test for Wet-Weather Safety
- Action: Insert a standard quarter upside down into several main tread grooves with Washington’s head facing downward toward the center of the tire.
- Precise Execution: Hold the coin between your thumb and forefinger, place it squarely into the center groove, and observe the top of Washington’s head. While $1.6\text{ mm}$ ($2/32\text{ inch}$) is the absolute legal minimum represented by the penny test, safety experts recommend changing tires when the tread drops below the top of Washington’s head ($4/32\text{ inch}$), which signals reduced water displacement and slipping risks in heavy rain.
- Success Checkpoint: You will know this step worked when you can clearly determine whether the tread rubber covers the top of the President’s head or leaves it exposed.
- Common Mistake: Relying solely on the penny test. The penny test measures the legal failure limit rather than safe driving performance in wet weather.
Step 3: Scan the Sidewalls and Tread for Physical Damage
- Action: Run your bare hands and a high-output flashlight systematically over the entire outer sidewall, inner sidewall, and tread face.
- Precise Execution: Wipe away loose dirt first with a damp towel. Slowly slide your palm across the rubber while shining your flashlight at a shallow angle to catch shadows. Feel for any raised lumps, localized bumps, deep splits, fabric cord exposure, or embedded foreign objects like sharp nails, screws, and glass shards.
- Success Checkpoint: You will know this step worked when you have visually and tactilely inspected 100 percent of the tire circumference on both sides. Any sidewall bulge, blister, or deep crack exposing internal cords requires immediate tire replacement, regardless of remaining tread depth.
- Common Mistake: Inspecting dirty tires. Dried mud and road grime can easily camouflage dangerous sidewall dry rot and structural separation cracks.
Step 4: Analyze Wear Patterns to Diagnose Mechanical Issues
- Action: Compare the wear characteristics across the inner, center, and outer zones of the tread face.
- Precise Execution: Examine the distribution of rubber wear. Heavy wear exclusively on both the inner and outer shoulders indicates consistent under-inflation. Heavy wear concentrated strictly down the middle rib indicates chronic over-inflation. Wear limited to only one inner or outer edge indicates a bad wheel alignment or worn suspension components.
- Success Checkpoint: You will know this step worked when you match your tire wear pattern to a specific inflation or alignment cause and record the findings for your mechanic.
- Common Mistake: Replacing unevenly worn tires without fixing the underlying mechanical problem, which ruins the replacement tires within a few thousand miles.
Step 5: Read the DOT Code to Determine Tire Age
- Action: Locate the Department of Transportation (DOT) code stamped into the lower outer or inner sidewall and read the final four digits.
- Precise Execution: Search the sidewall for letters starting with “DOT” followed by a string of alphanumeric characters. Look for the final four digits enclosed in a slight oval recession. The first two digits represent the manufacturing week (01 to 52), and the last two digits represent the manufacturing year (e.g., code 2422 means the tire was manufactured during the 24th week of the year 2022).
- Success Checkpoint: You will know this step worked when you successfully decode the manufacture date. Replace any tire that exceeds 6 to 10 years of age from its manufacture date, even if the tread depth looks acceptable.
- Common Mistake: Assuming tires with deep tread are safe to drive on despite being 10 years old. Rubber compounds degrade, harden, and micro-crack over time due to UV exposure and oxidation.
Common Mistakes and How to Fix Them
- Only Checking One Tire: Front tires wear significantly faster than rear tires on front-wheel-drive vehicles. Fix: Inspect all four tires individually, plus the spare tire in your trunk, during every maintenance check.
- Ignoring the Spare Tire: Spare tires age, lose air pressure, and degrade from environmental exposure even if they are never driven on. Fix: Check your spare tire’s pressure and age annually.
- Measuring Structural Wear Indicators Incorrectly: Placing your depth gauge directly on the raised tread wear indicator bars (TWI) yields a false reading of zero tread remaining across the entire tire. Fix: Always measure in the deep channels adjacent to the indicator bars.
- Skipping Wheel Position Rotation Records: Forgetting when tires were last rotated accelerates localized wear. Fix: Rotate your tires every 8,000 to 10,000 kilometers (5,000 to 6,000 miles) to ensure even wear across all positions.
Variations and Adaptations
Variations for All-Wheel-Drive (AWD) Vehicles
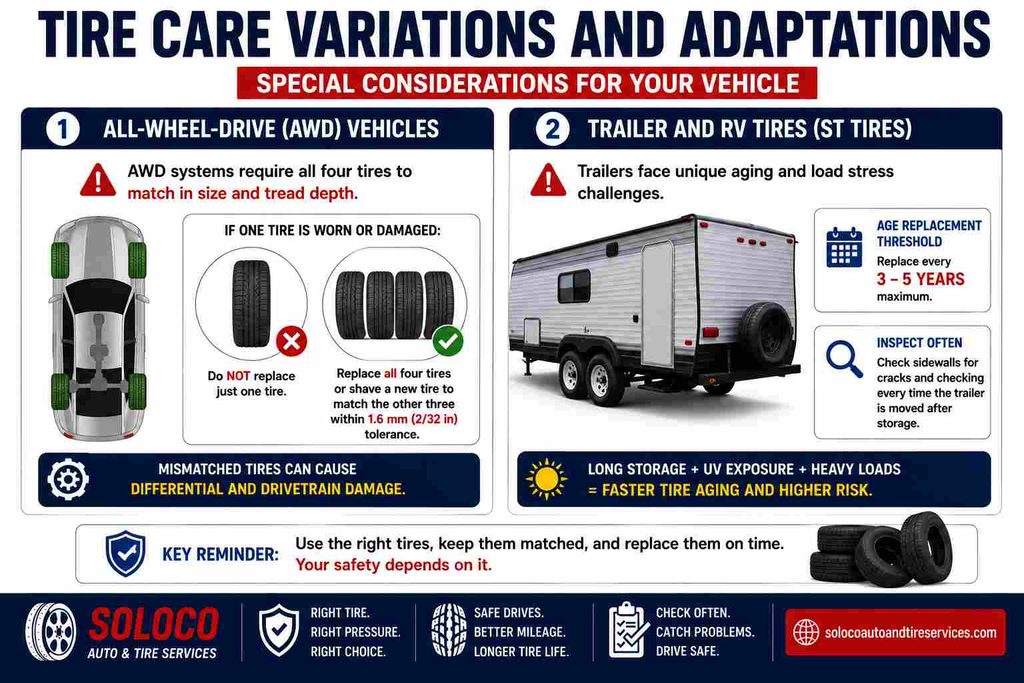
AWD systems require precise rolling circumference matching across all four wheels to prevent severe differential damage. If one tire is severely worn or damaged beyond repair, you cannot simply replace a single tire. You must replace all four tires, or have a professional tire shop shave a new tire down to match the exact remaining tread depth of the other three tires within a $1.6\text{ mm}$ tolerance.
Variations for Trailer and RV Tires (Special Trailer / ST Tires)
Trailers sit stationary for long periods, exposing tires to high UV degradation and heavy load stress without flexing. For trailers, reduce the age replacement threshold from 10 years down to 3 to 5 years maximum. Inspect the sidewalls for checking and cracking every time the trailer is moved after storage.
Frequently Asked Questions
Can I replace just one tire if only one is worn or damaged?
Replacing a single tire is acceptable only if your vehicle is a front-wheel-drive or rear-wheel-drive model and the remaining three tires have high tread depth (above $6/32\text{ inch}$) with matching brand and tread patterns. For all-wheel-drive vehicles, replacing a single tire with a brand-new one while the others are worn can ruin the center differential due to mismatched wheel rotation speeds.
How do I know if my vibration is caused by a bad tire or bad alignment?
If your steering wheel vibrates consistently at highway speeds between 80 to 110 kilometers per hour (50 to 70 miles per hour), the tires are likely out of balance or have internal belt separation. If your car pulls strongly to the left or right while holding the steering wheel straight, the issue is an incorrect wheel alignment or a dragging brake caliper.
What should I do if my tire pressure drops continuously after inflating?
Continuous pressure loss means you have a slow leak, typically caused by a punctured tread, a corroded wheel rim bead, or a leaking valve core. Spray soapy water around the valve stem, bead, and tread blocks. Expanding bubbles pinpoint the leak. If the leak is on the sidewall, the tire cannot be repaired and must be replaced immediately.
Are cheap budget tires safe compared to premium tire brands?
Budget tires sold by reputable manufacturers still meet official safety regulations and legal minimum standards like DOT or E-Mark certifications. However, premium tires typically offer superior rubber compounds for shorter braking distances on wet roads, lower rolling resistance, and better puncture resistance over their lifespan.


