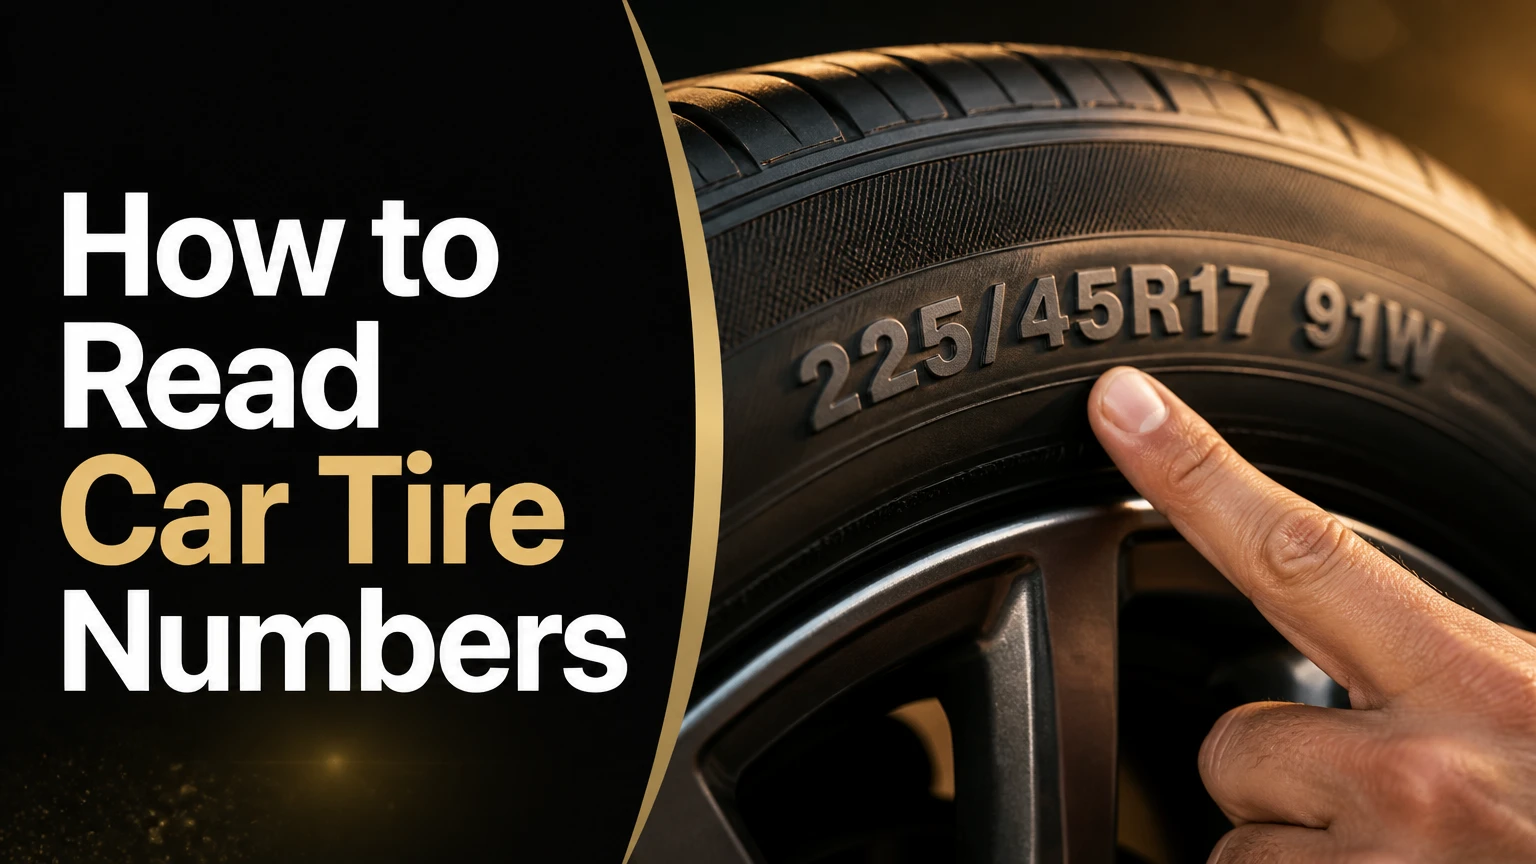
Mastering how to read car tire numbers allows you to decode your vehicle exact size capabilities, load limits, and manufacturing age in 3 to 5 minutes per tire with high precision. This comprehensive, step-by-step guide walks you through every character molded into the rubber sidewall so you can buy replacement tires safely and avoid costly sizing mistakes.
Before You Start
- Total Time Required: 3 to 5 minutes per tire.
- Difficulty Level: Beginner.
- Estimated Cost: Zero dollars (uses household items).
- Tools and Materials:
- Flashlight or smartphone light (1 source).
- Clean microfiber cloth or paper towel (1 towel).
- Water or mild automotive glass cleaner (1 small spray bottle).
- Soft-bristled nylon utility brush (1 brush, optional for heavy brake dust).
- Prerequisites: The vehicle must be completely parked on level ground with the emergency brake securely engaged and the ignition turned off.
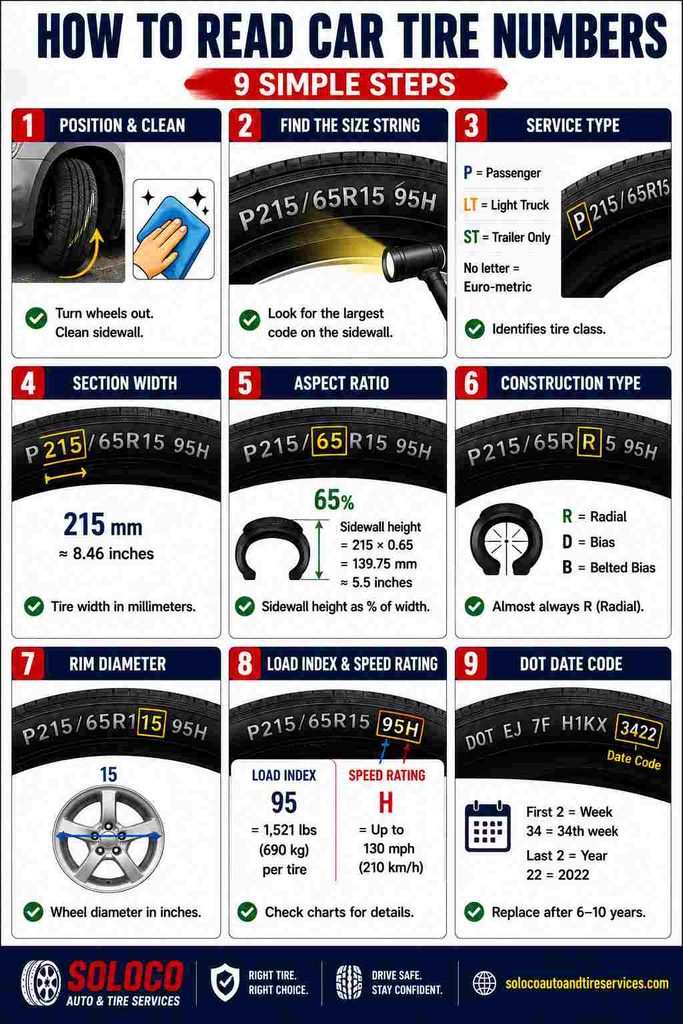
Step 1: Position and Prepare the Vehicle for Maximum Visibility
Turn your steering wheel fully to the left or right before exiting the vehicle to angle the front tires outward into open space.
Positioning your steering wheel completely to one lock gives you direct, unhindered line-of-sight access to the outer sidewall without forcing you to crouch deep inside tight wheel wells. For rear tires, keep the vehicle parked securely on a level surface. Take your microfiber cloth, spray a small amount of water or cleaner onto the rubber, and scrub away surface dirt, mud, and baked-on brake dust along the outer perimeter of the tire.
You will know this step worked when the entire outer sidewall is clean, dry, and free of obscuring grime across all raised rubber lettering.
Common Mistake: Trying to read tire numbers while the wheels are straight tucked inward under the fender wells makes it nearly impossible to see the complete string of characters without a mirror. Always turn your wheels outward first.
Step 2: Locate and Illuminate the Main Alphanumeric Size String
Scan the outer sidewall of the tire to find the largest, most prominent string of raised numbers and letters, typically formatted like P215/65R15 95H.
Hold your smartphone light or flashlight completely parallel and flush against the rubber surface pointing horizontally across the sidewall rather than straight at it. Direct, flat lighting casts harsh micro-shadows inside the recessed molded letters and numbers, making faint characters instantly legible. Trace your eyes along this primary sequence from left to right to ensure you are looking at the main sizing block rather than the secondary brand names or DOT serial numbers.
You will know this step worked when you can clearly distinguish every single letter, slash, and digit of the primary code sequence without squinting.
Step 3: Read the Service Type Prefix
Identify the single capital letter at the extreme left-hand side of the main size string, such as the letter P in P215/65R15.
The service type prefix tells you the intended vehicle class and engineering design standard for the tire. If your string begins with a P, the tire is engineered for Passenger vehicles under strict U.S. load standards. If it begins with LT, it stands for Light Truck, meaning it features heavier ply ratings for towing and hauling heavy cargo. An ST prefix indicates Special Trailer use only and should never be installed on motor vehicle steering or drive axles. If there is no starting letter at all and the sequence begins directly with a three-digit number, you are looking at a Euro-metric tire designed according to European technical standards.
You will know this step worked when you correctly categorize your tire class based on its starting letter or lack thereof.
Step 4: Read the Section Width in Millimeters
Note the three-digit number immediately following the service type prefix, such as the 215 in P215/65R15.
This three-digit number represents the total nominal section width of the tire measured in millimeters from the outer edge of one sidewall to the outer edge of the other sidewall when mounted on its designated rim at normal pressure. A value of 215 means the tire is 215 millimeters wide, which equals approximately 8.46 inches. Keep in mind that actual mounted width varies slightly depending on the specific width of the wheel rim you install it on.
You will know this step worked when you can state the exact millimeter width of your tire profile.
Common Mistake: Assuming the section width represents the width of the tire tread contacting the road. The section width is always wider than the actual tread footprint because it measures the widest point across the inflated sidewalls.
Step 5: Identify the Aspect Ratio Percentage
Locate the two-digit number positioned directly after the forward slash separator, such as the 65 in P215/65R15.
The aspect ratio defines the profile or height of the tire sidewall expressed as a percentage of its total section width. A value of 65 means that the vertical height of the sidewall from the edge of the wheel rim to the outer tread is exactly 65 percent of the 215 millimeter section width. To calculate the physical sidewall height in millimeters, multiply 215 by 0.65, which gives you 139.75 millimeters or about 5.5 inches of sidewall cushion. Lower aspect ratio numbers like 35 or 40 indicate low-profile tires with stiff, short sidewalls for aggressive cornering, while higher numbers like 75 or 80 indicate tall, comfortable sidewalls.
You will know this step worked when you successfully calculate the physical sidewall height by multiplying the section width by the aspect ratio decimal.
Step 6: Verify the Construction Type Letter
Look at the single capital letter immediately following the aspect ratio number, which is almost universally the letter R.
The letter R stands for Radial construction, which means the internal body plies of the tire run radially across the tire from bead to bead at a 90-degree angle to the centerline of the tread. Radial tires are the global industry standard for modern passenger vehicles because they offer superior flexibility, cooler running temperatures, and longer tread life. Older classic cars might occasionally feature a D for Diagonal Bias or a B for Belted Bias construction, but you will rarely encounter these on modern passenger automobiles.
You will know this step worked when you confirm the letter R designates your tire as a modern radial build.
Step 7: Measure the Wheel Rim Diameter in Inches
Read the two-digit number located directly after the construction letter, such as the 15 in P215/65R15.
This two-digit number specifies the exact diameter of the metal wheel rim in inches that the tire is specifically manufactured to fit. A value of 15 means the inner bead diameter of the tire matches a 15-inch wheel rim. You can never install a 15-inch tire onto a 16-inch wheel or vice versa, because the tire bead will either refuse to seat or blow off the rim during inflation.
You will know this step worked when you match the rim diameter number directly to your wheel size in inches.
Common Mistake: Trying to measure your wheel rim size by looking at outer decorative hubcap diameters. Always read the wheel diameter straight from the tire sidewall code to ensure complete accuracy.
Step 8: Decode the Load Index and Speed Rating
Move your eyes slightly to the right of the main size string to find a separate two- or three-digit number followed by a single capital letter, such as 95H.
The first component is the Load Index, which is a numerical code ranging from 75 to 105 for passenger cars that correlates to the maximum weight a fully inflated tire can safely support. A load index of 95 means the tire can support up to 1,521 pounds (690 kilograms) under maximum design load limits. The trailing letter is the Speed Rating, which designates the maximum safe operating speed certified for the tire under optimal conditions. For example, an H rating certifies the tire for speeds up to 130 mph (210 km/h), while a V rating covers up to 149 mph (240 km/h).
You will know this step worked when you cross-reference your load index number and speed rating letter against standard industry conversion charts.
Step 9: Locate and Decode the 4-Digit DOT Manufacturing Date Code
Scan the perimeter of the outer or inner sidewall to find the letters DOT followed by a block of characters, and focus strictly on the final four digits at the end of that sequence.
The Department of Transportation requires every tire sold to display a manufacturing stamp. The final 4 digits of this sequence represent the exact calendar age of the tire. The first two digits indicate the manufacturing week of the year (ranging from 01 to 52), and the final two digits indicate the manufacturing year. For example, a code reading 3422 means the tire was manufactured during the 34th week of the year 2022 (roughly August 2022).
You will know this step worked when you can state the exact week and year your tire was manufactured.
Safety Warning: Tires degrade structurally over time due to UV exposure, heat cycles, and oxidation, regardless of remaining tread depth. Most tire manufacturers and safety organizations recommend replacing tires that are older than 6 years from their manufacturing date, and replacing all tires unconditionally once they reach 10 years of age.
Common Mistakes and How to Fix Them
- Confusing Maximum Inflation Pressure with Optimal Vehicle Pressure: People frequently read the maximum PSI rating printed on the tire sidewall (e.g., Max Press 51 PSI) and inflate their tires to that exact level. This causes a harsh, bouncy ride and uneven center tread wear. The Fix: Always inflate your tires to the recommended PSI settings listed on the safety placard sticker located on your vehicle driver-side door jamb.
- Checking Only One Sidewall for the DOT Date Code: Many modern asymmetric or directional tires are molded so that the full 4-digit DOT date stamp only appears on one side of the tire casing. If you inspect the outer sidewall and see only the letters DOT followed by manufacturing plant codes without the final four numbers, the date stamp is molded on the inner sidewall facing underneath the vehicle chassis. The Fix: Shine your flashlight underneath the car or turn the steering wheel completely in the opposite direction to inspect the inner sidewall.
- Mistaking Aspect Ratio for Absolute Height: Beginners often assume a 65 aspect ratio means the sidewall is 65 millimeters high. The Fix: Always treat the aspect ratio as a percentage multiplier applied against the millimeter section width.
Variations of the Decoding Process
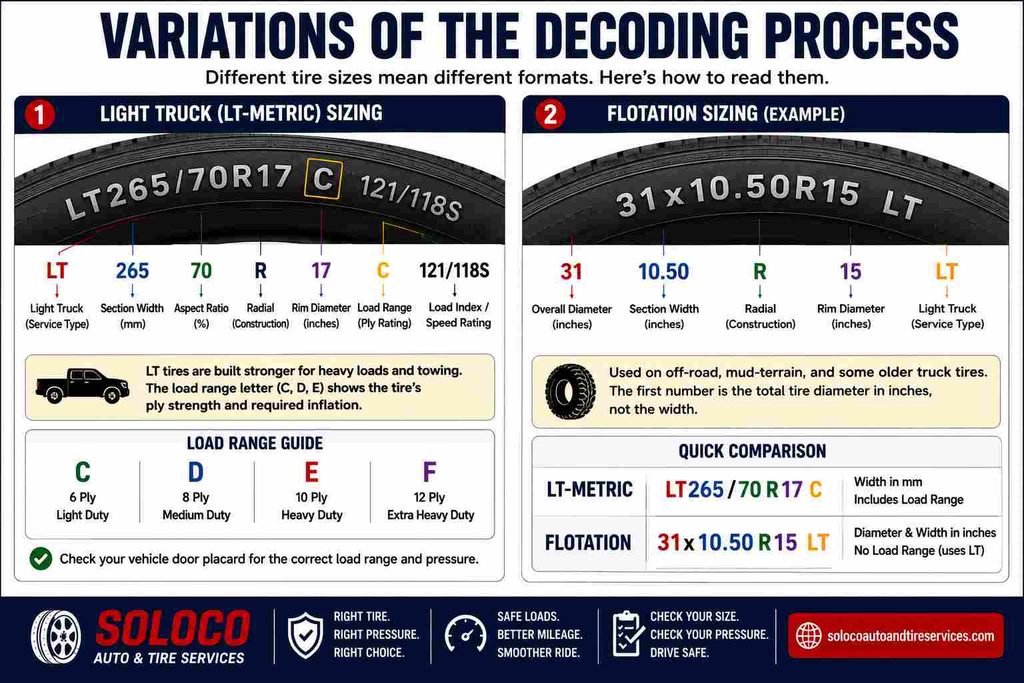
Light Truck (LT-Metric and Flotation) Sizing Variations
If your vehicle is a heavy-duty pickup truck or large SUV, the sizing string often starts with LT (e.g., LT265/70R17 C) or uses older Flotation Sizing format (e.g., 31×10.50R15 LT).
- LT-Metric: Decoded exactly like passenger tires, but includes a load range letter at the end (e.g., C, D, E) indicating heavy ply construction and higher inflation thresholds.
- Flotation Sizing: The first number (31) represents the total outer tire diameter in inches, the second number (10.50) represents the section width in inches, and the final letter (R) designates radial construction followed by the rim diameter in inches.
How Long Does It Take and What Does It Cost?
- Time Investment: Expect to spend 3 to 5 minutes per tire, totaling 12 to 20 minutes for a complete four-tire vehicle inspection.
- Financial Cost: Completely free. No special diagnostic scanners, micrometers, or paid software tools are required to decode standard tire sidewall markings.
Frequently Asked Questions
What does the letter P mean on my car tire number?
The letter P stands for Passenger, indicating that the tire is engineered and tested to meet U.S. safety and load standards for passenger cars, minivans, crossovers, and light SUVs. If your tire lacks a P prefix and starts directly with numbers, it uses Euro-metric sizing standards, which share identical width and aspect ratio dimensions but feature different load capacity calculation methods.
How do I know if my car tires are too old to drive on safely?
Check the 4-digit DOT manufacturing code located near the rim edge on the sidewall. If the final four digits are 1518, for example, your tires were built in the 15th week of 2018. Because rubber compounds harden, dry rot, and experience internal belt separation as they age, tires exceeding 6 to 10 years of age should be replaced immediately regardless of whether the tread appears deep and healthy.
What happens if I install tires with a lower speed rating than factory specifications?
Installing tires with a lower speed rating than your vehicle manufacturer recommends can compromise high-speed handling stability, cornering grip, and emergency braking performance. Always match or exceed the original equipment speed rating specified in your owner manual or door jamb placard to maintain safe vehicle dynamics during highway driving.
Why do some tires have a 3-digit date code instead of 4 digits?
If your tire displays a 3-digit DOT date code (such as 259), it was manufactured before the year 2000, when date codes used a 3-digit format (two digits for week, one digit for year). Tires manufactured before 2000 are critically expired, structurally compromised, and extremely dangerous to drive on at any speed. Replace them immediately.
Should I replace my tires based on the vehicle manual or the numbers on the tire?
Always buy replacement tires based on the numbers physically stamped on the sidewall of your current tires rather than the owner manual if your vehicle has custom aftermarket wheels or upgraded rim sizes installed. Factory manuals only reflect original factory specifications and will result in incorrect sizing purchases if your wheels have been modified.


