Accurately measuring your tire tread ensures optimal wet-weather traction, prevents hydroplaning, and saves you from unexpected blowouts. By following a clear 5-step process that takes just 5 minutes total, you can inspect all four tires using a handheld gauge, record precise millimeter or 32nd-inch readings across three distinct groove locations, and evaluate whether your tires are safe for the road or due for replacement.
Before You Start
- Time Required: 5 minutes total (1 minute prep, 1 minute per tire).
- Difficulty Level: Beginner friendly.
- Cost Range: $5 to $25 for a standard digital or mechanical plunger gauge.
- Tools and Materials:
- 1 tire tread depth gauge (digital, plunger, or color-coded pin style).
- 1 clean rag or paper towel.
- 1 pen and paper or a smartphone notes app.
- 1 flashlight or smartphone light (helpful for dark wheel wells).
- Prerequisite Conditions: Vehicle parked on flat, stable ground with the engine turned off and the parking brake firmly engaged.
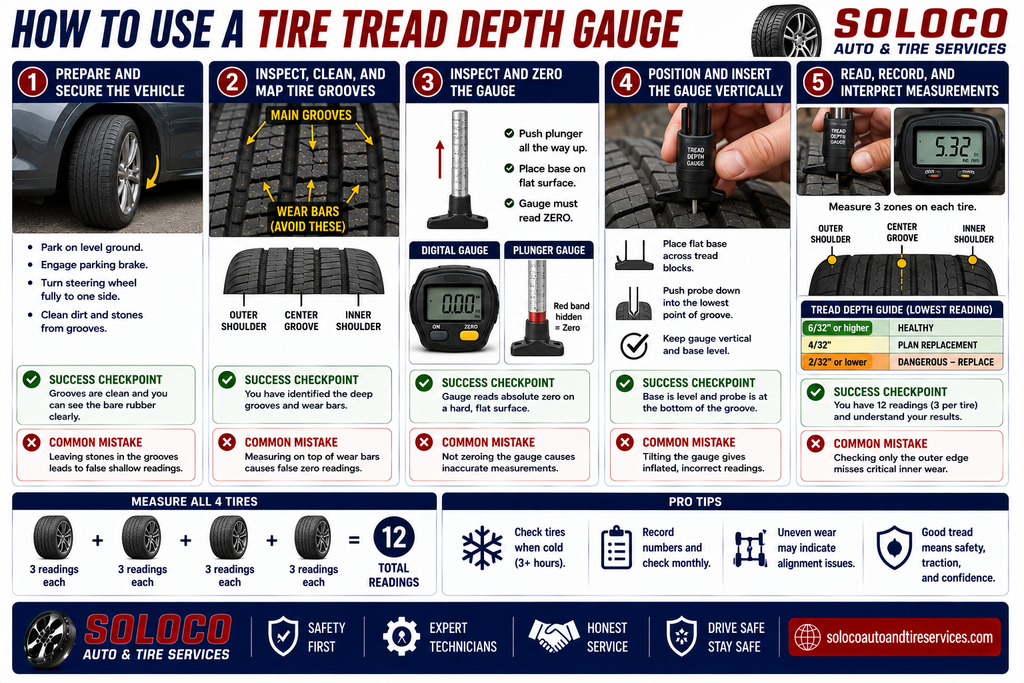
Step 1: Prepare and Secure the Vehicle
Park the vehicle on a flat, level surface, engage the emergency brake, and turn the steering wheel fully to one side to expose the front tire treads.
To execute this correctly, turn your engine off after positioning the wheels. If you are inspecting the front-left tire, turn your steering wheel all the way to the right; if you are inspecting the front-right tire, turn the wheel all the way to the left. This exposes the inner tread blocks that are otherwise hidden behind the fender liner. For rear tires, you do not need to turn the steering wheel, but you must ensure the vehicle is on completely level ground so it cannot roll. Take your rag and wipe away loose mud, small stones, or embedded gravel from the primary circumferential grooves.
- Success Checkpoint: You will know this step worked when you can clearly see the bare rubber at the base of the tire grooves across the entire width of the tread face without any obstructing debris.
- Common Mistake: Leaving small stones wedged inside the main grooves. This blocks the gauge pin, resulting in artificially shallow depth readings that make good tires look worn out.
Step 2: Inspect, Clean, and Map Tire Grooves
Examine the tire face to identify the main longitudinal grooves and locate the raised rectangular rubber bumps known as wear bars.
Passenger car tires feature between two and four deep circumferential grooves running around the entire circumference of the tire. Look closely inside these wide channels for the tread wear indicator bars—these are small, horizontal ridges molded into the bottom of the groove at a height of 2/32 of an inch. You must intentionally avoid placing your gauge on top of these raised wear bars during measurement, because doing so will give you a false reading of zero or near-zero wear, even if the rest of the tread is deep. Map out in your mind that you will measure three distinct zones across the tread width: the outer shoulder, the center groove, and the inner shoulder.
- Success Checkpoint: You will know this step worked when you have visually distinguished the deep drainage channels from the flat, raised wear bars across the tire width.
- Common Mistake: Measuring directly on top of the wear indicators, which leads drivers to believe their tires are completely bald when the surrounding tread is still serviceable.
Step 3: Inspect and Zero the Tire Tread Depth Gauge
Push the gauge scale line or plunger completely down, press the needle against a hard, flat surface, and verify the tool reads exactly zero.
Before taking any measurements on rubber, you must confirm your measuring tool is accurately zeroed. If you are using a traditional plunger or pin-style gauge, push the metal pin or plastic scale completely up into the barrel until the base foot is flush against the metal rod tip. If you are using a digital gauge, place the base flat on a hard, clean tabletop and press the power button, followed by the zero button, ensuring the screen displays a solid 0.00 inches or 0.0 millimeters. If you are using a color-coded plunger gauge, make sure the red band is completely hidden inside the barrel when pressed flat.
- Success Checkpoint: You will know this step worked when the mechanical needle or digital screen displays absolute zero while the flat base rests firmly on a solid flat surface.
- Common Mistake: Failing to zero a digital gauge before starting, which introduces cumulative error from previous measurement sessions or minor electronic drift.
Step 4: Position and Insert the Gauge Vertically
Place the flat base of the gauge firmly across the tread blocks and push the center plunger down into the lowest point of the groove.
Hold the gauge body with two fingers, keeping the metal or plastic probe perfectly perpendicular to the surface of the tire. Position the flat bridge base so it spans across two adjacent tread blocks, ensuring the base does not dip into the groove itself. Gently push the center plunger or slide the measuring pin down until its tip rests at the absolute bottom of the drainage groove. Keep your hand steady so the tool does not tilt sideways against the flexible rubber walls of the tread blocks, which would artificially increase your depth measurement.
- Success Checkpoint: You will know this step worked when the flat base sits flush and level across the rubber ribs with the probe resting squarely at the base of the groove without any visible angle or tilt.
- Common Mistake: Tilting the gauge at an angle while pushing the pin down. An angled insertion measures the diagonal distance across the groove wall rather than the true vertical depth, yielding an inflated, inaccurate reading.
Step 5: Read, Record, and Interpret Measurements
Keep the gauge steady by its base, remove it carefully without disturbing the pin, and record the measurement in 32nds of an inch or millimeters.
Carefully lift the gauge straight up out of the tire groove, taking care not to bump the sliding scale or plunger against your fingers or clothing. Read the exact number where the scale meets the housing, or look at the digital readout on the screen. Take measurements at three distinct points across each tire: the outer groove, the center groove, and the inner groove. Repeat this entire process for all four tires, writing down every individual number in your smartphone or notebook. Once you have all your numbers, compare them against standard safety benchmarks: 6/32″ or higher is healthy tread, 4/32″ means you should plan for replacement before winter or wet seasons, and 2/32″ or lower means the tires are legally bald and must be replaced immediately.
- Success Checkpoint: You will know this step worked when you have a complete grid of twelve recorded numbers (three measurements per tire across all four tires) and understand whether your tread depth falls into the safe, warning, or danger zone.
- Common Mistake: Measuring only the outer edge of the tire and ignoring the inner shoulder. Inner shoulder wear is often invisible at a glance and is the primary indicator of severe vehicle wheel alignment issues.
Common Mistakes and How to Fix Them
- Measuring on Wear Bars: Taking measurements on the built-in wear indicators produces a false, overly optimistic reading. Fix: Always shift your probe 1 inch away from any wear bar into the deepest portion of the main circumferential groove.
- Tilting the Gauge During Insertion: Holding the tool at an angle forces the probe to measure a diagonal path through the rubber, inflating your depth numbers. Fix: Use one hand to press the flat base firmly against two adjacent tread ribs, ensuring the shaft points directly toward the center of the wheel hub.
- Pressing the Probe Too Hard: Forcing a mechanical plunger down with excessive physical force can bend the thin metal pin or distort the sliding friction fit. Fix: Let the weight of the plunger drop naturally until it meets solid resistance at the bottom of the groove without applying downward muscle pressure.
- Skipping the Inner Edges: Only checking the visible outer tread leaves you blind to inner-edge wear caused by negative camber or worn suspension components. Fix: Always complete the three-point measurement method (outer, center, inner) for every single tire on the vehicle.
Variations: Adapting the Process for Different Tools.
Using a Color-Coded Plunger Gauge
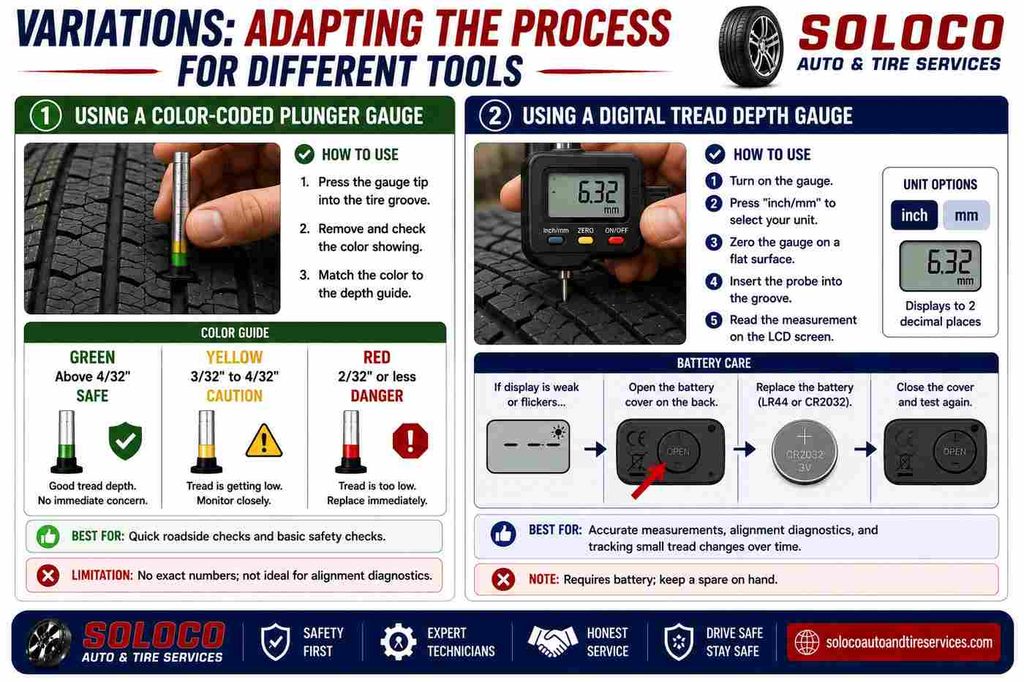
Color-coded gauges replace numerical scales with a simple visual band system designed for quick roadside checks. Instead of reading numbers, look at the color exposed on the sliding post after pressing the tip into the groove. Green indicates a tread depth above 4/32 of an inch (safe condition). Yellow indicates a tread depth between 3/32 and 4/32 of an inch (caution, monitor closely). Red indicates a tread depth of 2/32 of an inch or less (immediate replacement required). While fast, this method lacks the granular precision needed to diagnose subtle vehicle alignment problems.
Using a Digital Tread Depth Gauge
Digital gauges provide instant conversion between metric and imperial units at the push of a button. Before inserting the probe into the tire, turn on the unit and select your preferred unit of measurement by pressing the inch/mm button. Once set, press the zero button while the pin is fully retracted against a flat surface. When inserted into the tire groove, the LCD screen displays the exact measurement to two decimal places. If the screen flickers or displays erratic numbers, remove the battery cover on the back and replace the LR44 or CR2032 button cell battery with a fresh one.
Frequently Asked Questions
What is the legal minimum tire tread depth?
In most jurisdictions, the legal minimum tire tread depth is 2/32 of an inch (approximately 1.6 millimeters) for passenger cars. When your tire tread wears down to this level, the tire can no longer channel water effectively, dramatically increasing your stopping distance and risk of hydroplaning on wet asphalt.
How often should I check my tire tread depth?
You should check your tire tread depth at least once a month, as well as before embarking on any long road trips. Regular monthly checks help you catch uneven wear patterns early, giving you time to correct tire inflation pressures or wheel alignment before you ruin a brand-new set of tires.
Why are my inner tire grooves wearing faster than the outer grooves?
Rapid inner shoulder wear is typically caused by excessive negative wheel camber, where the top of the tires tilt inward toward the vehicle center, or by worn-out suspension bushings and ball joints. If your inner groove measurements are significantly lower than your outer groove measurements, schedule a professional wheel alignment and suspension inspection immediately.
Can I use a coin instead of a tire tread depth gauge?
You can use a standard coin as a quick emergency substitute if you do not have a dedicated gauge. In the United States, insert a quarter upside down into the tread groove; if the top of Washington’s head is visible, your tread is below 4/32 of an inch. In the UK, insert a 20-pence coin; if the outer band is visible, your tread is near the legal limit. However, coins only give crude estimates and cannot provide precise millimeter data for alignment diagnostics.


