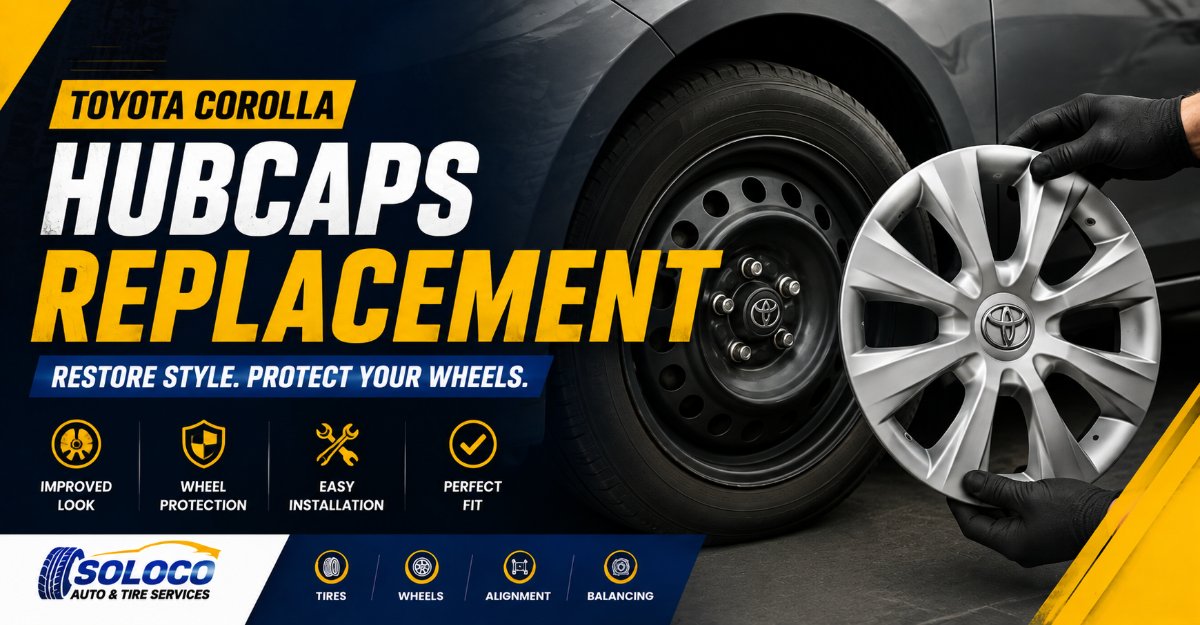
Replacing your Toyota Corolla hubcaps is the most cost-effective mechanical procedure to restore exterior factory aesthetics, conceal rusted steel rims, and protect lug nuts from road salt accumulation. This comprehensive guide covers exact sizing metrics, OEM versus aftermarket purchasing options, a complete installation walkthrough, and advanced troubleshooting for loose retention rings across all model years from 2000 to 2026.
Key Facts At a Glance
- Core Sizing Metric: Standard Corolla factory steel wheels require either 15-inch or 16-inch hubcaps, verified via the tire sidewall code following the letter “R”.
- Compatibility Limit: Hubcaps mount exclusively onto factory steel wheels and cannot be installed on aluminum alloy wheels.
- Replacement Cost: Ranging from $25 to $35 for individual aftermarket replicas to $110 for genuine OEM components.
- Time Commitment: Approximately 5 minutes per wheel, requiring zero automotive mechanical experience or specialized hydraulic lifts.
- Primary Failure Mode: Misalignment with the rubber tire air valve stem, which crushes the valve core and causes rapid tire deflation.
What is a Toyota Corolla Hubcap and How Does It Work?
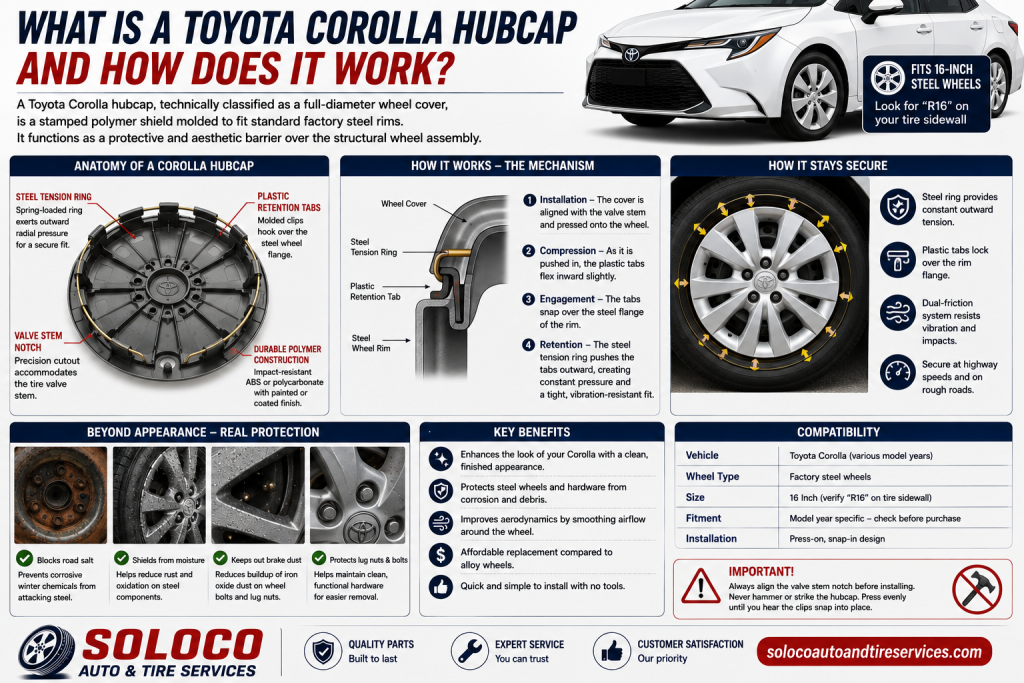
A Toyota Corolla hubcap, technically classified as a full-diameter wheel cover, is a stamped polymer shield molded to fit standard factory steel rims. It functions as a protective and aesthetic barrier over the structural wheel assembly.
The mechanism relies on a perimeter steel tension ring combined with molded plastic clips. The spring-loaded steel ring exerts outward pressure against the inside of the wheel lip, while the plastic retention tabs hook firmly over the steel flange. This dual-friction system prevents the cover from detaching during high-speed transit or when driving over severe road imperfections. Beyond visual enhancement, the cover blocks corrosive winter road salt, moisture, and iron oxide dust from accelerating structural corrosion on the wheel bolts and lug nuts.
How to Verify Your Toyota Corolla Hubcap Size
Ordering the incorrect wheel cover size is the most frequent purchasing error among vehicle owners. You cannot determine your wheel size by guessing or by looking at the car’s overall model trim without confirmation.
To find your exact size, inspect the sidewall of your tire for a standardized alphanumeric code formatted like P205/55R16. Locate the capital letter R, which stands for radial construction. The numeric value immediately following the letter R represents your exact wheel and hubcap diameter in inches. For example, a code ending in R15 requires a 15-inch hubcap, while an R16 code requires a 16-inch hubcap.
Historically, older Toyota Corolla generations spanning 2003 through 2013 predominantly utilized 15-inch wheels on base and LE trims. Modern Corolla generations spanning 2014 through 2026 transitioned to standard 16-inch steel wheels on base LE models, while higher trims like the SE and XSE feature aluminum alloy wheels that do not accept hubcaps.
Comparing Toyota Corolla Hubcap Replacement Options
Choosing replacement wheel covers involves balancing cost, material durability, and brand authenticity. Three distinct tiers dominate the replacement market.
Genuine Toyota OEM Hubcaps
Genuine Original Equipment Manufacturer parts are sourced directly from authorized Toyota distribution networks.
- Design & Specs: They feature the exact factory multi-spoke geometry, high-impact ABS plastic formulation, matching metallic silver lacquer, and the embossed Toyota center logo.
- Pricing: Ranging from $60 to $110 for a single replacement unit.
- Best For: Lease returns, vehicle resale preparation, and owners demanding absolute factory authenticity.
Premium Factory Aftermarket Replicas
These are third-party reproductions manufactured to mirror the exact physical dimensions and clip placements of original Toyota factory designs.
- Design & Specs: They match OEM spoke patterns and snap configurations precisely, but omit the trademarked Toyota emblem in the center. Reputable manufacturers include HubStar and Winjet.
- Pricing: Ranging from $25 to $35 individually, or $50 to $75 for a complete set of four.
- Best For: Daily commuters seeking identical factory styling at a fraction of the cost.
Custom Style Upgrades
Aftermarket custom wheel covers allow owners to alter the vehicle’s visual profile entirely.
- Design & Specs: Available in aggressive multi-spoke, mesh, and blackout configurations finished in gloss black, matte black, or gunmetal gray.
- Pricing: Ranging from $45 to $80 for a full set of four.
- Best For: Budget-conscious drivers looking to modernize an older Corolla with a contemporary alloy-wheel appearance.
| Decision Criteria | Genuine Toyota OEM | Premium Aftermarket Replicas | Custom Style Upgrades |
| Price Point (Set of 4) | $240 – $440 | $50 – $75 | $45 – $80 |
| Center Logo | Official Embossed Toyota | Blank / Plain Center | Custom or Blank Center |
| Material Quality | High-Grade OEM ABS | Standard ABS Plastic | Variable Plastic Density |
| Fitment Accuracy | Perfect Factory Tolerance | Exact Structural Replica | Universal Fit with Tension Rings |
| Primary Risk | High replacement cost | Missing center emblem | Potential for brittle plastic failure |
Tools and Preparation Required for Replacement
Replacing snap-on wheel covers is an accessible maintenance task requiring minimal physical exertion and basic garage tools.
Pre-Work Checklist
- Time Required: 5 minutes per wheel (20 minutes total for all four wheels).
- Difficulty Level: Beginner / Entry-Level.
- Tools Needed: Flathead screwdriver, automotive pry bar, or your Toyota Corolla factory lug wrench. Clean shop rags for wiping away accumulated brake dust on the steel rim lip.
- Prerequisites: Park the vehicle on a flat, level surface, engage the electronic parking brake, and ensure the engine is turned off.
Step-by-Step Toyota Corolla Hubcap Replacement Guide
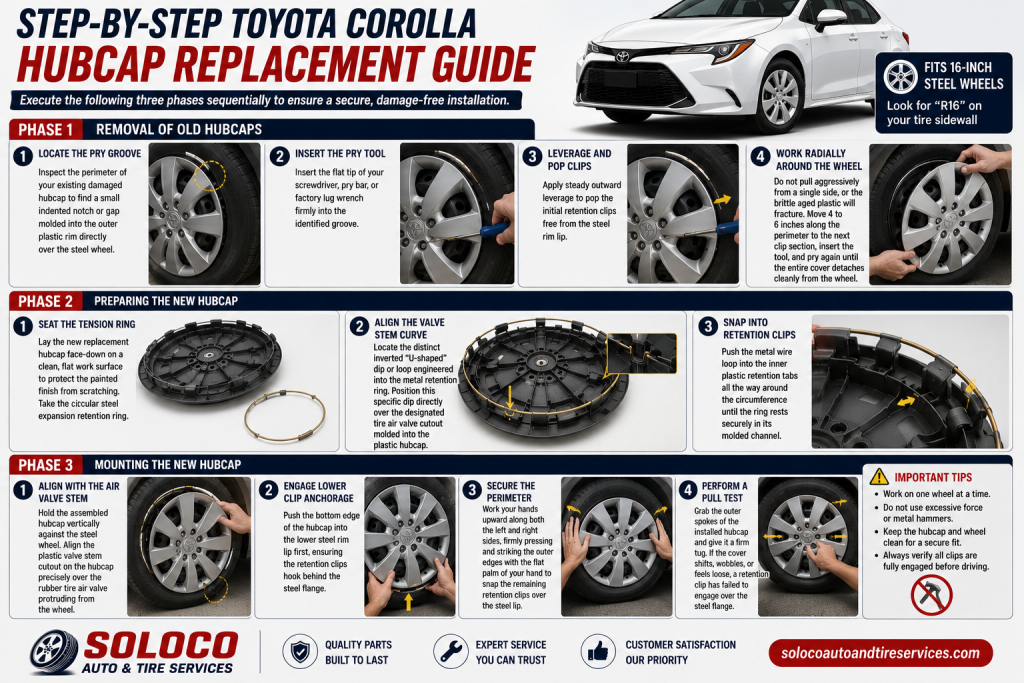
Execute the following three phases sequentially to ensure a secure, damage-free installation.
Phase 1: Removal of Old Hubcaps
- Locate the Pry Groove: Inspect the perimeter of your existing damaged hubcap to find a small indented notch or gap molded into the outer plastic rim directly over the steel wheel.
- Insert the Pry Tool: Insert the flat tip of your screwdriver, pry bar, or factory lug wrench firmly into the identified groove.
- Leverage and Pop Clips: Apply steady outward leverage to pop the initial retention clips free from the steel rim lip.
- Work Radially Around the Wheel: Do not pull aggressively from a single side, or the brittle aged plastic will fracture. Move 4 to 6 inches along the perimeter to the next clip section, insert the tool, and pry again until the entire cover detaches cleanly from the wheel.
Phase 2: Preparing the New Hubcap
- Seat the Tension Ring: Lay the new replacement hubcap face-down on a clean, flat work surface to protect the painted finish from scratching. Take the circular steel expansion retention ring.
- Align the Valve Stem Curve: Locate the distinct inverted “U-shaped” dip or loop engineered into the metal retention ring. Position this specific dip directly over the designated tire air valve cutout molded into the plastic hubcap.
- Snap into Retention Clips: Push the metal wire loop into the inner plastic retention tabs all the way around the circumference until the ring rests securely in its molded channel.
Phase 3: Mounting the New Hubcap
- Align with the Air Valve Stem: Hold the assembled hubcap vertically against the steel wheel. Align the plastic valve stem cutout on the hubcap precisely over the rubber tire air valve protruding from the wheel.
- Engage Lower Clip Anchorage: Push the bottom edge of the hubcap into the lower steel rim lip first, ensuring the retention clips hook behind the steel flange.
- Secure the Perimeter: Work your hands upward along both the left and right sides, firmly pressing and striking the outer edges with the flat palm of your hand to snap the remaining retention clips over the steel lip.
- Perform a Pull Test: Grab the outer spokes of the installed hubcap and give it a firm tug. If the cover shifts, wobbles, or feels loose, a retention clip has failed to engage over the steel flange.
[Correct Alignment Target]
Plastic Valve Cutout ──► ( O )
Metal Ring Dip       ──►  ( ∪ )
Rubber Valve Stem    ──►    █
Troubleshooting Loose Hubcaps and Common Installation Mistakes
Even with correct sizing, improper installation techniques can lead to loose wheel covers or tire damage. Review these common pitfalls to ensure long-term security.
- Mistake 1: Misaligning the Air Valve Stem: Smashing the hubcap onto the steel wheel without verifying that the plastic cutout aligns with the rubber air valve. This crushes or bends the rubber valve stem, causing a slow air leak or preventing tire inflation at service stations.
- Mistake 2: Hammering with Metal Tools: Using a steel hammer or heavy rubber mallet to force a stubborn clip into place. This instantly shatters ABS plastic covers. Always use the flat palm of your hand for installation pressure.
- Mistake 3: Ignoring Tension Ring Adjustment: If a newly installed aftermarket hubcap spins or wobbles during driving, remove the unit immediately. Use standard pliers to grasp the U-shaped loop on the metal expansion ring and bend it outward slightly. This increases the overall diameter of the ring, expanding outward tension against the plastic clips for a secure fit.
- Mistake 4: Purchasing Without Checking Sizing Codes: Assuming all Corolla model years utilize identical wheel diameters. Always verify the tire sidewall code before purchasing replacements to prevent compatibility failures.
Frequently Asked Questions
Can I install hubcaps on Toyota Corolla aluminum alloy wheels?
No, hubcaps cannot be installed on factory aluminum alloy wheels. Hubcaps are engineered exclusively for attachment to bare stamped steel wheels using a perimeter tension ring and snap clips. Alloy wheels feature a completely different rim geometry and center bore configuration that lacks the outer lip necessary to secure a wheel cover. Attempting to mount hubcaps onto alloy wheels will result in immediate detachment during vehicle operation.
How do I prevent my new Toyota Corolla hubcaps from being stolen?
While factory OEM hubcaps are frequent targets for theft due to their high replacement cost, you can secure them using heavy-duty plastic zip ties. Weave thick black zip ties through the outer decorative spokes of the hubcap and around the structural cutouts of the underlying steel wheel rim before pulling them tight and clipping the excess tails. This prevents casual removal while remaining invisible from a distance against dark steel wheels.
What should I do if a hubcap flies off while driving?
If a hubcap detaches while driving, pull over safely at the earliest opportunity if it is safe to retrieve it. If the unit is lost or structurally damaged beyond repair, you will need to purchase a replacement. Avoid driving indefinitely with missing wheel covers, as exposed steel wheels are vulnerable to moisture and road salt, which accelerates rust formation on the lug nuts and wheel bolts.
Are aftermarket hubcaps as durable as genuine Toyota OEM covers?
Premium aftermarket replicas constructed from high-impact ABS plastic offer durability comparable to OEM units for daily commuting environments. However, budget-tier generic alternatives utilize brittle polymer blends that become fragile in sub-freezing temperatures, increasing the likelihood of cracking when driving over deep potholes. If you live in an area with harsh winters and heavy road salting, invest in genuine OEM parts or high-grade polycarbonate replicas.
Do I need to remove the wheel nuts to replace a Corolla hubcap?
No, you do not need to loosen or remove any lug nuts to replace a Toyota Corolla hubcap. Factory wheel covers are independent snap-on attachments that mount entirely over the exterior edge of the steel wheel rim without interfering with the lug nuts or wheel studs. The entire replacement process is performed externally without lifting the vehicle or removing the tires.


