A blinking Toyota tire pressure light indicates a system malfunction within your vehicle’s Tire Pressure Monitoring System (TPMS), meaning the Electronic Control Unit (ECU) has failed to communicate with one or more wheel sensors during its initial 60 to 90-second startup check. Unlike a solid dashboard icon that simply signals low inflation pressure, a flashing light points directly to dead sensor batteries, physical hardware damage, lost sensor identification codes, or electronic interference. Resolving this issue requires systematically verifying cold tire pressures, checking the often-overlooked full-size spare, performing manual ECU reset procedures, and utilizing an OBD2 scan tool to isolate faulty transmitters.
Key Facts at a Glance
- Blinking vs. Solid: A flashing TPMS light signifies an electronic or sensor failure; a solid light signifies under-inflation.
- Sensor Lifespan: Sealed lithium-ion batteries inside OE Toyota sensors last between 5 and 10 years before failing completely.
- The Spare Tire Trap: Many mid-to-large Toyota models feature a fully monitored pressure sensor inside the spare tire carrier.
- ID Registration Requirement: Simply installing a new sensor will not turn off the light; its 7-digit ID must be programmed into the ECU.
Before You Start: Prerequisites and Overview
- Estimated Time: 15 minutes for manual checks and resets; 45 to 60 minutes for professional sensor replacement.
- Difficulty Level: Intermediate (requires basic hand tools, digital pressure gauge, and optional OBD2 scan tool).
- Estimated Cost: $0 for manual resets; $25 to $90 for replacement sensors; $50 to $150 per wheel for professional shop labor.
- Tools and Materials Needed: Digital tire pressure gauge, OBD2 scanner with TPMS capability (such as Carista or Autel TS408), 11mm socket or torque wrench (if servicing clamp-in sensors), and safety glasses.
Step 1: Execute a Manual Cold Pressure Audit
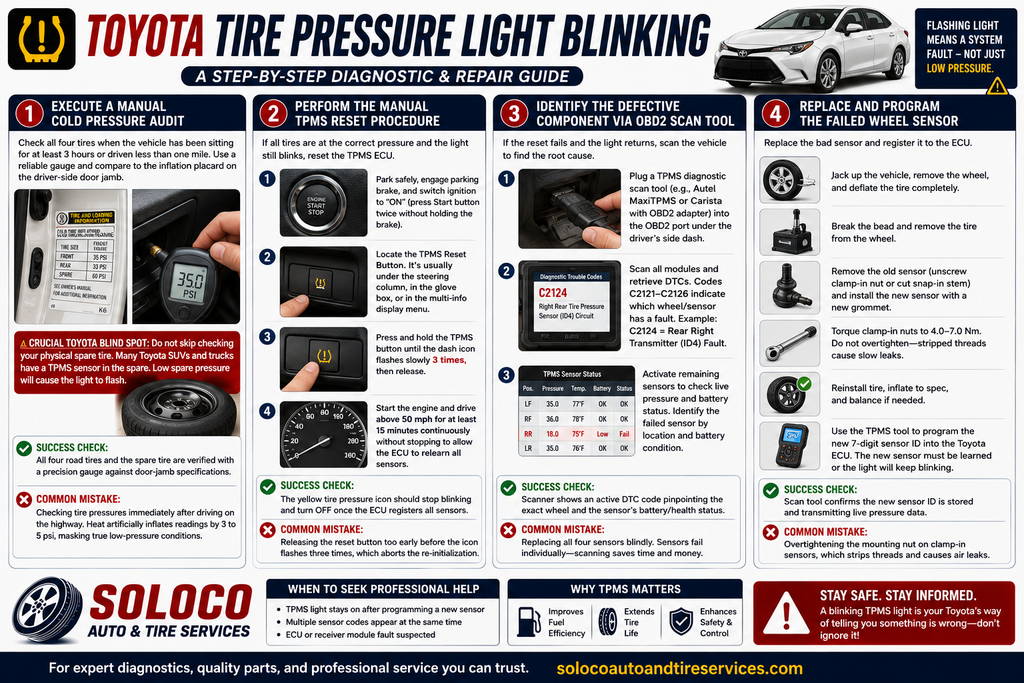
Grab a reliable digital tire pressure gauge and check all four primary tires when the vehicle has been sitting for at least three hours or driven less than one mile. Compare your measured psi readings directly against the official inflation placard located on the driver-side door jamb.
A standard Toyota safety alert triggers when tire pressure drops 20% to 25% below the recommended cold inflation threshold. If your tires measure correctly, the flashing light is definitively caused by a hardware or communication failure rather than simple air loss.
Crucial Toyota Blind Spot: Do not skip checking your physical spare tire. Mid-to-large Toyota vehicles—including the RAV4, Highlander, 4Runner, and Tacoma—frequently house a fully functional TPMS sensor inside the spare tire wheel. If the spare drops below its pressure threshold, the ECU will trigger a persistent flashing dashboard light even when all four road tires are properly inflated.
- Success Check: You will know this step is complete when all four road tires and the spare tire are verified with a precision gauge against door-jamb specifications.
- Common Mistake: Checking tire pressures immediately after driving on the highway. Heat friction artificially inflates psi readings by 3 to 5 psi, masking true low-pressure conditions.
Step 2: Perform the Manual TPMS Reset Procedure
If all tires are inflated precisely to specification and the light continues to blink, attempt to clear the error code by manually resetting the TPMS Electronic Control Unit.
- Park your Toyota safely on level ground, engage the parking brake, and switch the ignition to the “ON” position without starting the engine (press the Start button twice without holding the brake).
- Locate the physical TPMS Reset Button. On modern Toyotas, this button is typically hidden underneath the lower steering column near the driver’s knee airbag, inside the glove box, or integrated into the multi-information display menu settings.
- Press and hold the TPMS button firmly until the dashboard icon flashes slowly three times, then release it.
- Start the engine and drive continuously above 50 mph for at least 15 minutes without stopping. This forces the ECU to actively scan and rebuild its wireless handshake with all wheel sensors.
- Success Check: The yellow tire pressure icon should transition from a continuous blink to turning completely off once the ECU successfully registers sensor telemetry.
- Common Mistake: Releasing the reset button too early before the icon flashes three distinct times, which aborts the ECU re-initialization sequence.
Step 3: Identify the Defective Component via OBD2 Scan Tool
If the manual reset fails and the dashboard light returns to a flashing state, you must interface directly with the vehicle body control module to isolate the root cause.
Plug a dedicated TPMS diagnostic scan tool (such as an Autel MaxiTPMS or a Bluetooth adapter running diagnostic software like Carista) into the OBD2 port located under the driver’s side dash. Execute a full module scan to pull specific Diagnostic Trouble Codes. Look for codes ranging from C2121 to C2126, which identify exact transmitter faults by wheel position (e.g., Code C2124 indicates a transmitter ID4 fault on the rear right wheel).
Once the dead sensor is identified, use an activation tool to trigger the remaining healthy sensors to verify if their battery health indicators read low or dead.
- Success Check: The diagnostic screen displays an active DTC code pinpointing the exact wheel location and battery voltage status of the failed sensor.
- Common Mistake: Replacing all four sensors blindly without scanning. Because sensors fail individually based on minor manufacturing variances in battery drain, scanning saves unnecessary parts replacement costs.
Step 4: Replace and Program the Failed Wheel Sensor
Once the defective sensor is isolated, the physical hardware must be replaced and registered to the vehicle computer.
Drive the vehicle to a tire service center or jack up the specific wheel using a hydraulic floor jack, secure it with jack stands, and deflate the tire completely. Use a professional bead breaker to separate the tire bead from the wheel rim near the valve stem. Unscrew the retaining nut (for clamp-in metal stems) or cut the base (for snap-in rubber stems), remove the old sensor body, and install the new OEM or programmable aftermarket sensor with a fresh rubber sealing grommet. Torque clamp-in sensor nuts to manufacturer specifications (typically 4.0 Nm to 7.0 Nm) to prevent air leaks and avoid shearing the aluminum stem. Re-inflate the tire and balance the assembly if required.
Crucially, connect your programming tool to the OBD2 port and manually input or scan the new 7-digit sensor ID numbers into the Toyota ECU. Merely bolting in a new sensor will leave the dashboard light blinking until the computer learns the new digital signature.
- Success Check: The TPMS scan tool confirms that the new sensor ID is successfully stored in the ECU memory and is transmitting live pressure data.
- Common Mistake: Overtightening the mounting nut on metal clamp-in sensors, which strips the aluminum threads and creates a slow air leak from the rim well.
Common Mistakes and How to Fix Them
Navigating a flashing tire pressure light often leads mechanics and DIYers down expensive dead ends. Avoid these three common pitfalls:
- Ignoring Electromagnetic Interference: Plugging cheap, unshielded USB chargers, aftermarket LED headlight conversion kits, or low-quality dash cameras into your vehicle’s power outlets can emit high-frequency electromagnetic noise. This interference blocks the 315MHz or 433MHz radio signals broadcast by your wheel sensors, causing a false flashing error on your dashboard. Fix: Unplug all aftermarket electronic accessories and perform a system reset.
- Skipping ID Cloning During Replacement: When installing replacement sensors, technicians sometimes fail to clone the old sensor IDs onto programmable aftermarket units, forcing a manual OBD2 ECU relearn procedure that can fail on certain trim levels. Fix: Always use a programmer to copy existing IDs if swapping sensors without diagnostic port access.
- Assuming All Toyotas Use the Same Reset Method: Older Toyotas rely on physical under-dash buttons, while modern models (such as 2021+ Camry and RAV4 models) require resetting via the steering wheel instrument cluster multi-information display settings under the “Vehicle Settings” menu. Fix: Consult your specific owner’s manual to locate the exact reset path for your model year.
Cost and Timeframe Breakdown
Understanding the financial and time commitments involved helps you decide whether to tackle the repair yourself or hand it over to a professional shop.
| Service Item | Cost Range | Timeframe | Notes |
|---|---|---|---|
| Manual Reset / Air Adjustment | $0 (DIY) to $20 | 15 Minutes | Free if performed at home with a basic pressure gauge. |
| Single Aftermarket Sensor | $25 – $50 | N/A | Programmable universal sensors (Autel, Schrader). |
| Single OEM Toyota Sensor | $75 – $90 | N/A | Direct factory replacement part purchased through dealership parts counters. |
| Shop Labor (Per Wheel) | $50 – $150 | 30 to 45 Minutes | Includes breaking tire bead, swapping hardware, rebalancing, and ECU programming. |
| Complete 4-Wheel Overhaul | $300 – $600 | 1 Hour | Recommended if your Toyota is past the 8-year mark, as remaining sensors will soon fail. |
Frequently Asked Questions
Can I drive safely with a blinking Toyota tire pressure light?
Yes, you can drive safely with a blinking TPMS light, provided your manual pressure check confirms that all four tires are inflated to correct PSI levels. A blinking light signifies an electronic or sensor communication failure rather than an active tire blowout or sudden deflation. However, you should resolve the issue promptly because you will lose active monitoring capabilities for future air loss.
How long do Toyota TPMS sensor batteries last?
The miniature lithium-ion batteries sealed inside OE Toyota tire pressure sensors last between 5 and 10 years. Because these batteries are hermetically sealed into the sensor housing to protect against moisture and centrifugal force, they cannot be recharged or replaced independently. When the internal battery voltage drops below operational thresholds, the entire sensor assembly must be discarded and replaced.
Why does my Toyota tire pressure light blink for 90 seconds and then turn solid?
When a Toyota TPMS light flashes for roughly 60 to 90 seconds upon startup and then remains solidly illuminated, it indicates a dual fault: the system has detected an electronic sensor communication failure (the blink) and at least one tire has dropped below the low-pressure threshold (the solid light). You must fix the dead sensor communication first before addressing any underlying tire inflation deficits.
Do winter weather temperature drops cause a blinking TPMS light?
Sudden freezing weather drops ambient temperatures significantly, which decreases tire pressure by roughly 1 psi for every 10-degree Fahrenheit drop. However, pure temperature drops result in a solid low-pressure light, not a blinking light. If your light is blinking during cold weather, it means the extreme temperature drop pushed a weak, aging sensor battery past its operational voltage limit, causing permanent sensor failure.
Can I program a new Toyota tire pressure sensor myself?
Programming a new Toyota tire pressure sensor yourself depends entirely on the model year of your vehicle. Many modern Toyota models feature an auto-learn function where the ECU automatically registers new sensor IDs after driving above 25 mph for 20 minutes. Older models, however, require a dedicated OBD2 programming tool or software interface like Toyota Techstream to manually input the 7-digit sensor ID codes into the vehicle computer.


