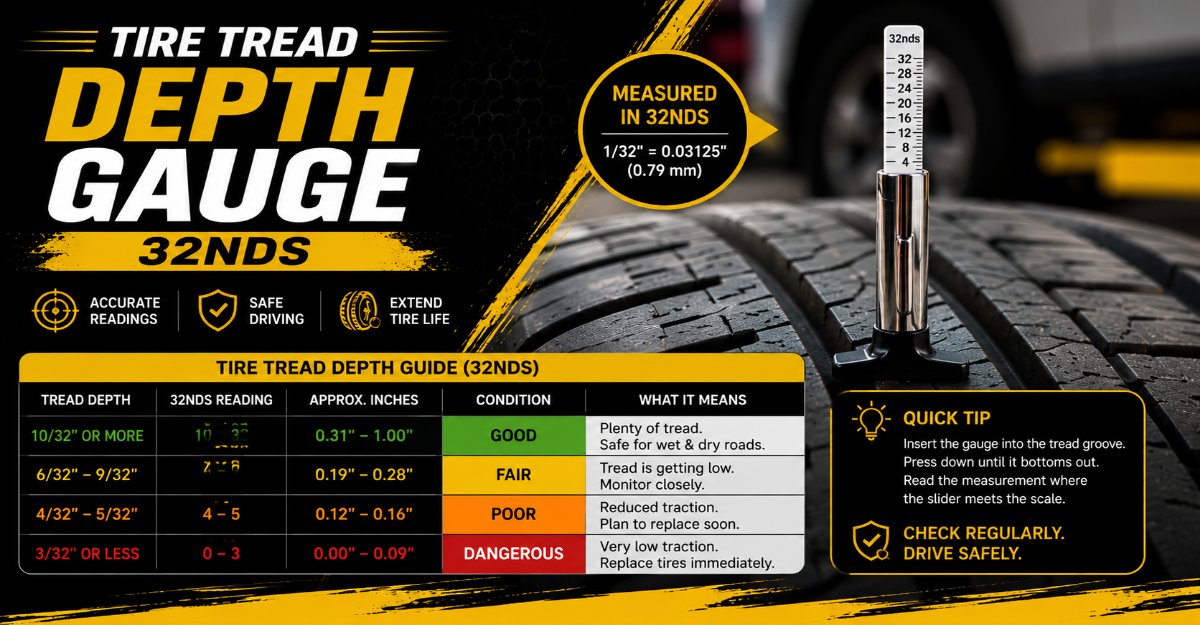
A tire tread depth gauge measured in 32nds of an inch is the standard automotive tool utilized in the United States to quantify the remaining rubber depth on a tire footprint. It isolates the vertical distance between the top of the tread block and the floor of the adjacent drainage groove.
Key Facts at a Glance
- Standard Measurement Unit: United States tire manufacturers and safety agencies measure tread depth in fractional increments of $1/32$ of an inch.
- New Tire Baseline: Passenger car tires typically begin life with $10/32″$ to $12/32″$ of usable tread depth.
- Legal Replacement Threshold: The federal legal minimum limit across most states is $2/32″$, at which point tires must be replaced.
- Primary Tool Types: Standard mechanical sliding pocket gauges, digital LCD units, analog dial gauges, and color-coded visual plungers.
- Critical Safety Marker: Wet traction degrades severely once tread drops below $4/32″$, significantly increasing hydroplaning risks.
What Is a Tire Tread Depth Gauge Measured in 32nds?
A tire tread depth gauge measured in 32nds of an inch is a precision diagnostic instrument designed to evaluate tire health, remaining service life, and road safety compliance. Unlike metric systems that rely on millimeters, the American automotive industry standardizes tread depth into thirty-second fractions of an inch. This fractional breakdown provides high-resolution tracking of rubber degradation over thousands of miles of driving.
The tool isolates the distance from the top surface of the tread rubber down to the deepest point of the circumferential drainage channels. These channels are critical for evacuating water, slush, and debris from beneath the contact patch.
As a tire rolls, rubber wears away due to friction, acceleration forces, braking loads, and cornering stresses. Quantifying this wear in 32nds allows vehicle owners and technicians to predict exact replacement intervals before structural casing or steel belts become exposed.
How a 32nds Mechanical Tread Gauge Operates
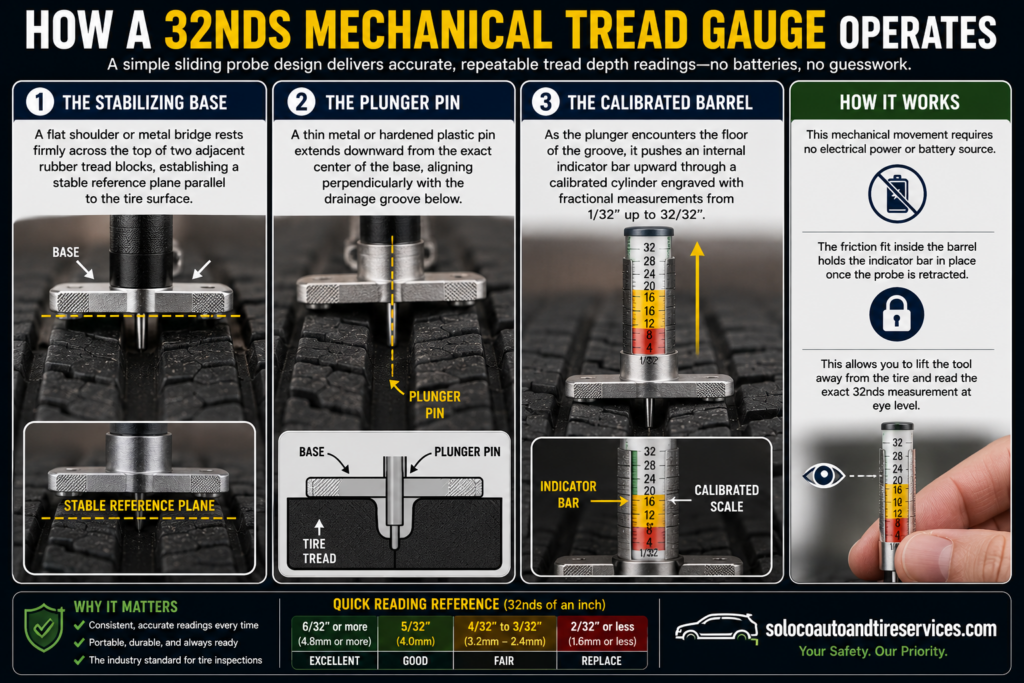
The foundational design of a mechanical pocket tread gauge relies on a simple yet highly effective sliding probe mechanism. Understanding its internal construction prevents user error and ensures consistent, repeatable readings.
- The Stabilizing Base: A flat shoulder or metal bridge rests firmly across the top of two adjacent rubber tread blocks, establishing a stable reference plane parallel to the tire surface.
- The Plunger Pin: A thin metal or hardened plastic pin extends downward from the exact center of the base, aligning perpendicularly with the drainage groove below.
- The Calibrated Barrel: As the plunger encounters the floor of the groove, it pushes an internal indicator bar upward through a calibrated cylinder engraved with fractional measurements from $1/32″$ up to $32/32″$.
This mechanical movement requires no electrical power or battery source. The friction fit inside the barrel holds the indicator bar in place once the probe is retracted, allowing the user to lift the tool away from the tire and read the exact 32nds measurement at eye level.
Step-by-Step Measurement Process for Accurate Readings
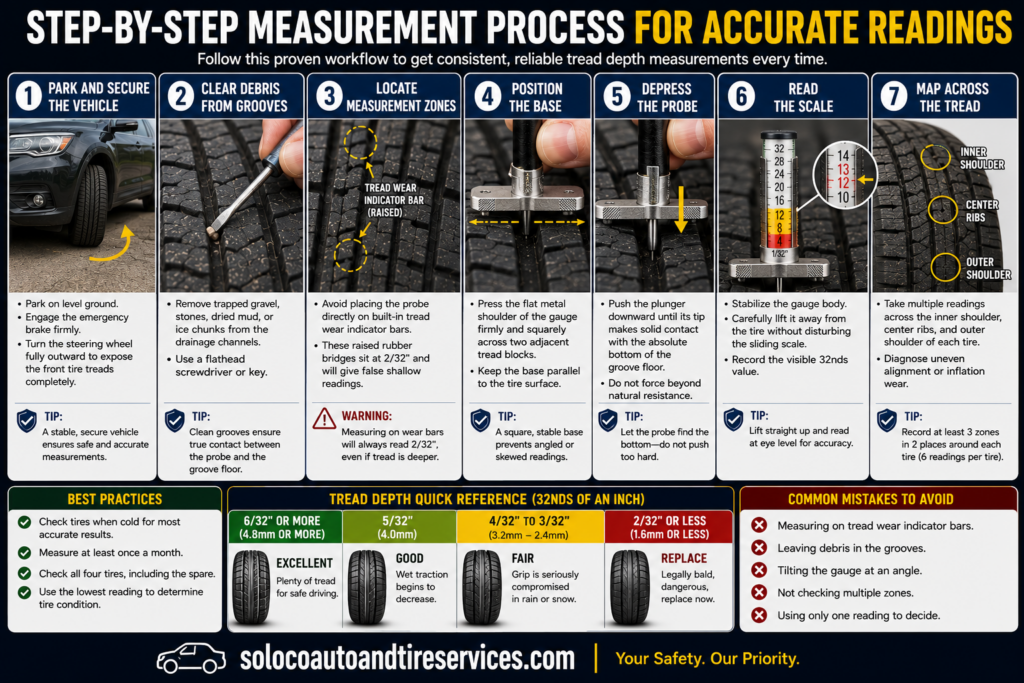
Obtaining an accurate, repeatable measurement requires a disciplined physical technique. Improper positioning or failure to clean the tread blocks can skew readings by several 32nds of an inch. Follow this step-by-step workflow:
- Park and Secure the Vehicle: Park on level ground, engage the emergency brake, and turn the steering wheel fully outward to expose the front tire treads completely.
- Clear Debris from Grooves: Remove trapped gravel, stones, dried mud, or ice chunks from the drainage channels using a flathead screwdriver or key.
- Locate Measurement Zones: Avoid placing the probe directly on built-in tread wear indicator bars, as these raised rubber bridges sit at $2/32″$ and will give false shallow readings.
- Position the Base: Press the flat metal shoulder of the gauge firmly and squarely across two adjacent outer tread blocks.
- Depress the Probe: Push the plunger downward until its tip makes solid contact with the absolute bottom of the groove floor.
- Read the Scale: Stabilize the gauge body, carefully lift it away from the tire without disturbing the sliding scale, and record the visible 32nds value.
- Map Across the Tread: Take multiple readings across the inner shoulder, center ribs, and outer shoulder of each tire to diagnose uneven alignment or inflation wear.
Comprehensive Safety Thresholds Table and Performance Impact
The structural performance of a tire changes dramatically as rubber wears down. The table below outlines what specific 32nds measurements mean for vehicle safety, wet traction, and legal compliance.
| Measurement (32nds) | Safety Status | Performance Impact & Required Action |
| $10/32″$ to $12/32″$ | Excellent | Typical depth for brand new passenger car and crossover tires. Maximum water evacuation capacity. |
| $6/32″$ to $9/32″$ | Good | Safe for all normal driving conditions, including heavy rain and highway speeds. Standard operational wear. |
| $5/32″$ | Caution (Wet) | Water evacuation begins to slow. Hydroplaning risk increases moderately at highway speeds. Consider replacement before winter. |
| $4/32″$ | Warning (Wet) | Wet traction is seriously degraded. Stopping distances in rain increase noticeably. Plan for tire replacement soon. |
| $3/32″$ | Critical | Snow and rain traction is nearly exhausted. Slush planing occurs easily. Replace tires immediately. |
| $2/32″$ | Legal Limit | Legally bald in most jurisdictions. High risk of catastrophic failure, zero wet grip, and potential traffic fines. |
Main Types of Tread Depth Gauges Compared
Different users require different instrument designs based on frequency of use, environment, and desired precision.
Standard Sliding Pocket Gauge
- Design: Cylindrical metal barrel constructed from stainless steel or brass, featuring a square indicator bar sliding out the top.
- Scale: Engraved fractions from $1/32″$ up to $32/32″$.
- Best Suited For: Long-term trunk storage, glove boxes, and rugged outdoor environments where batteries fail.
Digital LCD Gauge
- Design: Electronic housing with an easy-to-read digital display screen and a spring-loaded or manual sliding shaft.
- Scale: Instantly toggles between 32nds fractions, decimal inches, and millimeters with a single button press.
- Best Suited For: Everyday drivers who want absolute clarity without squinting at tiny fractional hash marks.
Analog Dial Gauge
- Design: Circular clock-like analog face featuring a sensitive rotating needle indicator driven by rack-and-pinion internal gears.
- Scale: High-precision sweeping dial marked in 32nds for ultra-precise performance tracking.
- Best Suited For: Automotive technicians and performance enthusiasts tracking subtle fractional wear differentials.
Common Measurement Mistakes and How to Avoid Them
Even experienced DIY mechanics make simple errors when measuring tread depth. Recognizing these pitfalls ensures precise diagnostics.
- Measuring on a Wear Bar: Placing the probe pin on a built-in tread wear indicator bar yields an artificially shallow reading, falsely indicating that a tire is bald when surrounding tread has depth.
- Tilting the Tool: Holding the gauge at an angle instead of perpendicular to the tire surface skews the depth calculation, resulting in inflated measurement readings.
- Ignoring Inner Edge Wear: Only checking the outer visible edge causes technicians to miss severe inside camber wear caused by misaligned suspension geometry.
- Failing to Clear Debris: Leaving packed gravel inside the tread groove blocks the plunger tip, resulting in false, dangerously deep readings.
Troubleshooting Sticky Plungers and Calibration Drift
Mechanical and digital gauges can occasionally behave erratically due to environmental contamination or mechanical wear. Use these targeted fixes to restore functionality.
- The mechanical plunger feels sticky or rough: This is typically caused by brake dust, road salt, or fine dirt accumulation inside the metal barrel. Wipe down the probe slide with a dry microfiber cloth. Avoid wet lubricants or oils, which act as a magnet for future road grime.
- The digital screen shows erratic readings or numbers hop randomly: This usually stems from low battery voltage or microscopic debris coating the capacitive sensor track inside the housing. Swap out the CR2032 button cell battery and blow out internal dust using compressed air.
- The zero point is off on a mechanical gauge: Structural bending from being dropped can misalign the outer sleeve. Manually slip the outer metal sleeve back into exact alignment with the base until the bottom edge aligns precisely with the zero mark.
Frequently Asked Questions
What does 32nds mean on a tire tread depth gauge?
The term 32nds refers to fractions of an inch. Tire manufacturers design new treads with depth measured in thirty-second increments. A reading of $8/32″$ means the remaining rubber is eight thirty-seconds of an inch thick, which equals one-fourth of an inch of usable tread remaining before reaching the bald legal limit.
Is a penny test as accurate as a tread depth gauge?
No. While inserting a Lincoln penny upside down into the tread is a helpful emergency trick to check if tread is below $2/32″$, it cannot provide precise measurements in 32nds. A dedicated gauge allows you to track wear trends across different sections of the tire and catch alignment issues before they become dangerous.
Why do my tires wear out faster on the inside edge?
Rapid inner edge wear is usually caused by incorrect wheel alignment, specifically excessive negative camber or toe-out settings. Suspension component wear, such as worn control arm bushings or ball joints, can also cause the tire to lean inward while driving, chewing through the inner shoulder while the outer tread looks healthy.
How often should I check my tire tread depth?
You should check your tire tread depth using a physical gauge at least once every month, as well as before embarking on long road trips. Regular monthly checks help identify uneven wear patterns early, allowing you to catch tire rotation intervals or suspension alignment problems before premature tire replacement becomes necessary.


