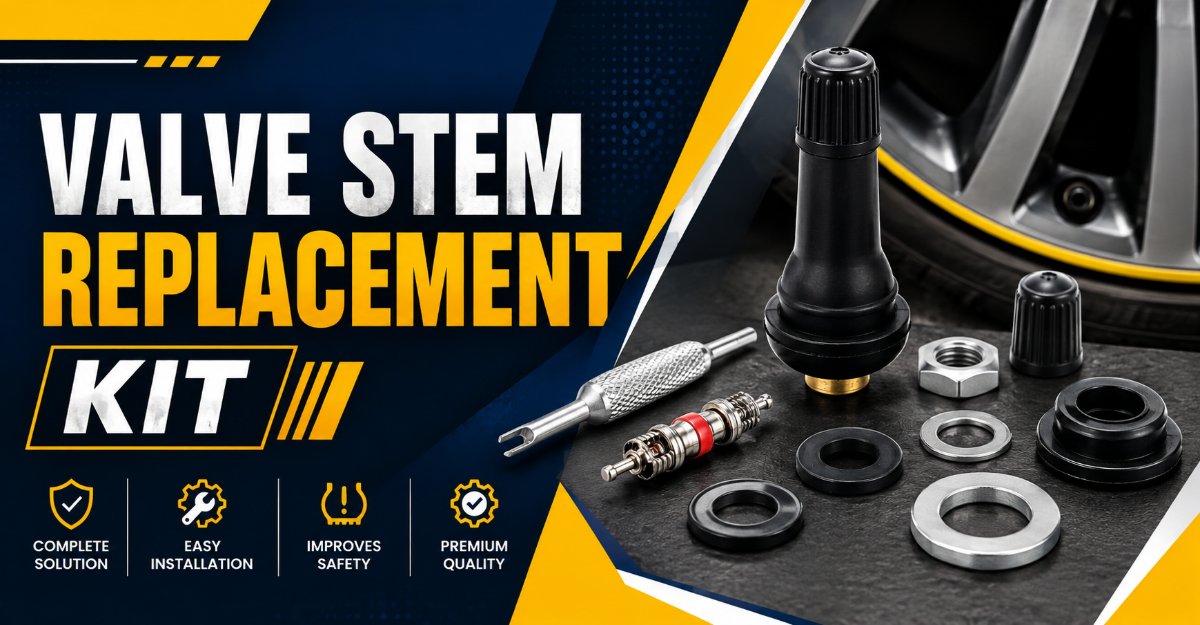
An 18-piece valve stem replacement kit is an essential automotive service bundle containing snap-in rubber stems, valve cores, metal or plastic caps, O-rings, a 4-way valve tool, and a mechanical puller lever designed to repair, rebuild, and maintain airtight inflation channels on tubeless vehicle tires. When a vehicle suffers from chronic slow air leaks, cracked outer rubber housings, or damaged internal threads, replacing the entire valve assembly using a dedicated kit restores structural integrity, prevents catastrophic tire pressure loss, and ensures long-term inflation reliability under heavy highway loads.
Key Facts At a Glance
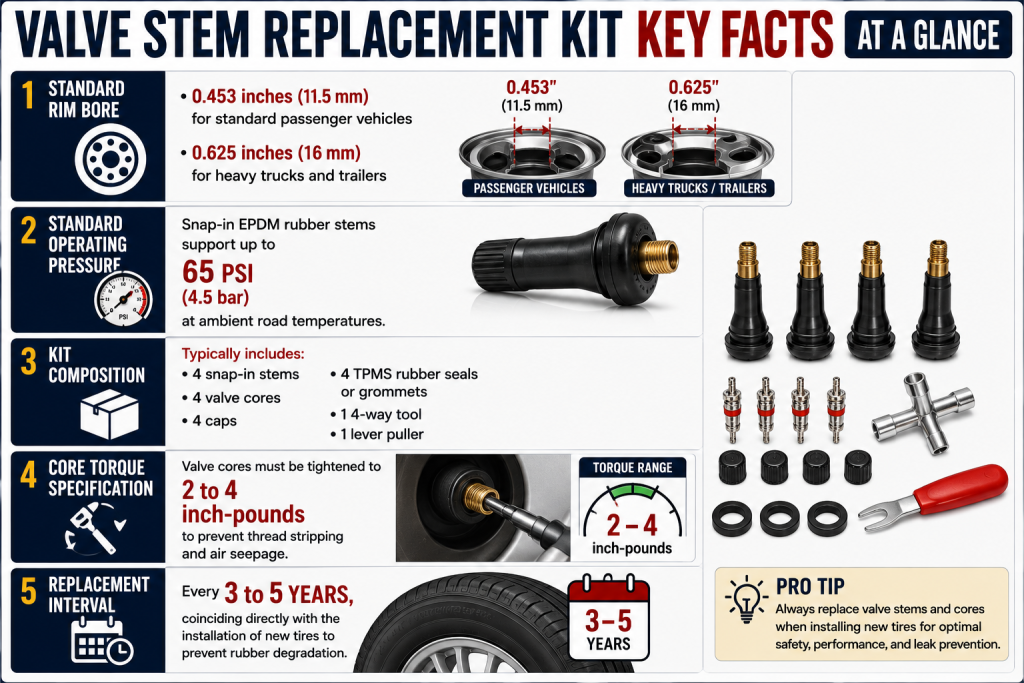
- Standard Rim Bore: $0.453\text{ inches}$ ($11.5\text{ mm}$) for standard passenger vehicles; $0.625\text{ inches}$ ($16\text{ mm}$) for heavy trucks and trailers.
- Standard Operating Pressure: Snap-in EPDM rubber stems support up to $65\text{ PSI}$ ($4.5\text{ bar}$) at ambient road temperatures.
- Kit Composition: Typically includes 4 snap-in stems, 4 valve cores, 4 caps, 4 TPMS rubber seals or grommets, 1 4-way tool, and 1 lever puller.
- Core Torque Specification: Valve cores must be tightened to $2\text{ to }4\text{ inch-pounds}$ to prevent thread stripping and air seepage.
- Replacement Interval: Every 3 to 5 years, coinciding directly with the installation of new tires to prevent rubber degradation.
1. Mechanical Physics of Valve Stem Pressures
Understanding the structural demands placed on a valve stem requires calculating the exact static and dynamic forces acting on the assembly during operation. The mathematical breakdown of forces demonstrates why high-quality replacement kits are necessary for safety.
To calculate the total outward force ($F$) exerted on the valve stem base by the tire’s internal air pressure, use the standard physics formula based on pressure ($P$) and cross-sectional area ($A$):
$$F = P \cdot A$$
For a standard passenger car tire inflated to a standard operating pressure of $35\text{ PSI}$ (pounds per square inch), a typical rim hole with a diameter of $0.453\text{ inches}$ yields a specific radius ($r$):
$$r = \frac{d}{2} = \frac{0.453}{2} = 0.2265\text{ inches}$$
Next, calculate the cross-sectional area ($A$) of the stem base where it interfaces with the rim bore:
$$A = \pi \cdot r^2 = \pi \cdot (0.2265)^2 \approx 0.1612\text{ in}^2$$
Now, compute the static outward force ($F$) acting to push the valve stem out of the wheel rim:
$$F = 35\text{ PSI} \cdot 0.1612\text{ in}^2 \approx 5.64\text{ lbs}$$
While a static force of approximately $5.64\text{ lbs}$ appears minimal, dynamic centrifugal forces at high highway speeds vastly multiply this mechanical stress. At $70\text{ mph}$, centrifugal acceleration subjects a heavy metal valve stem or Tire Pressure Monitoring System (TPMS) sensor to bending forces exceeding $20\text{ to }30\text{ lbs}$ of continuous stress, causing inferior rubber housings to crack, dry-rot, and leak over time.
2. Comprehensive Breakdown of an 18-Piece Kit
An 18-piece valve stem replacement kit provides all the specialized hardware required to service four vehicle wheels entirely while supplying backup components and professional-grade installation tools.
Each component serves a distinct mechanical function within the tire assembly:
- 4x Snap-in Rubber Valve Stems (TR413 or TR418): Molded from EPDM rubber with an embedded brass barrel, these form a mechanical interference seal against the wheel rim hole. TR413 measures $1.25\text{ inches}$ long, while TR418 measures $1.50\text{ inches}$ long for deeper wheels.
- 4x Valve Core Replacements: Spring-loaded brass pins featuring a silicone or Teflon sealing washer. They function as a one-way check valve, allowing air in while keeping pressurized air sealed inside.
- 4x Protective Valve Stem Caps: Plastic or chrome-plated metal caps that thread onto the outer tip of the stem to prevent moisture, road salt, dust, and debris from fouling the internal valve core threads.
- 4x Secondary Rubber O-Rings or Grommets: Specialized sealing washers utilized when servicing wheels equipped with electronic TPMS sensors, preventing air loss around clamp-on metal stems.
- 1x 4-Way Valve Tool: A multi-functional handheld tool used to extract and install valve cores, clean and re-tap damaged internal threads, and ream out external thread burrs.
- 1x Heavy-Duty Valve Stem Puller Lever: A steel leverage tool featuring a rubber-coated head or chain interface, designed to pull snap-in rubber stems straight through the rim hole without gouging alloy wheels.
3. Comparative Specifications Matrix
Different vehicle platforms require distinct valve stem configurations to match rim dimensions, pressure thresholds, and environmental demands.
| Stem Type | Rim Hole Dimension | Max Pressure Rating | Primary Material | Recommended Application |
| TR413 Snap-In | $0.453\text{ inches}$ ($11.5\text{ mm}$) | $65\text{ PSI}$ ($4.5\text{ bar}$) | EPDM Rubber / Brass | Standard passenger cars, sedans, and compact crossovers. |
| TR418 Long Snap-In | $0.453\text{ inches}$ ($11.5\text{ mm}$) | $65\text{ PSI}$ ($4.5\text{ bar}$) | EPDM Rubber / Brass | Deep-dish luxury wheels, older vehicles, and wheels with decorative hubcaps. |
| TR570 Clamp-On | $0.625\text{ inches}$ ($16.0\text{ mm}$) | $200\text{ PSI}$ ($13.8\text{ bar}$) | Forged Brass / Nickel Plate | Heavy-duty trucks, commercial vehicles, and high-load commercial trailers. |
| TPMS Metal Bolt-In | $0.453\text{ or }0.625\text{ inches}$ | $100\text{ PSI}$ ($6.9\text{ bar}$) | Aluminum / Brass Alloy | Modern passenger vehicles equipped with direct tire pressure monitoring sensors. |
4. Step-by-Step Valve Stem Replacement Process
Replacing a valve stem requires breaking the outer bead of the tire away from the wheel rim lip to access the internal anchor base. Follow this structured protocol to complete the replacement safely without damaging your wheels.
[Deflate Tire Completely]
          │
          ▼
[Break Outer Bead Off Rim Lip]
          │
          ▼
[Cut & Extract Old Valve Stem]
          │
          ▼
[Clean & Lubricate Rim Bore]
          │
          ▼
[Pull New Stem Through With Tool]
          │
          ▼
[Reseat Bead & Reinflate Tire]
Step 1: Secure the Vehicle and Deflate the Tire
- Action: Park the vehicle on a level surface, engage the parking brake, elevate the vehicle using jack stands, and remove the wheel assembly. Use the 4-way valve tool to unscrew and fully remove the internal valve core, allowing all compressed air to escape completely.
- Specifics: Never attempt to cut or pull a valve stem while the tire is pressurized; stored energy can violently eject components and cause severe injury.
- Success Checkpoint: You will know it worked when air ceases to hiss from the stem bore and a pressure gauge reads absolute zero.
- Common Mistake: Forgetting to remove the valve core entirely, which leaves residual air pressure trapped inside the tire cavity.
Step 2: Break the Outer Tire Bead
- Action: Place the wheel flat on the ground or onto a manual tire changer machine. Position a bead breaker tool or hydraulic press jaw against the upper tire sidewall approximately one inch away from the outer rim lip. Apply downward mechanical force to push the rubber bead down into the drop-center well of the rim.
- Specifics: You do not need to remove the entire tire from the wheel rim; you only need a $3\text{-to-}4\text{-inch}$ gap between the rubber bead and the rim lip near the valve hole to reach inside.
- Success Checkpoint: You will know it worked when the upper tire bead drops inward toward the center well, revealing the interior base of the old valve stem.
- Common Mistake: Applying the bead breaker tool too close to the edge of the rim lip, which can bend aluminum alloy wheels or pinch the tire sidewall.
Step 3: Remove the Old Valve Stem
- Action: Reach into the gap between the tire and the rim with wire cutters or a sharp utility knife. Slice through the bulbous rubber anchor base of the old valve stem from the inside, or insert a valve puller tool onto the exterior stem and pull firmly outward until the old stem pops completely out.
- Specifics: Exercise extreme caution with utility blades around aluminum alloy sealing surfaces to prevent deep scratches that cause future air leaks.
- Success Checkpoint: You will know it worked when the old stem is completely extracted and the rim hole is fully clear of old rubber remnants.
- Common Mistake: Pulling an old, hardened rubber stem outward without cutting the internal base first, which can distort or gouge the rim hole edge.
Step 4: Clean and Lubricate the Rim Hole
- Action: Insert a wire brush, cylindrical rotary wire wheel, or fine-grit Scotch-Brite pad into the rim hole. Scrub the interior and exterior bore surfaces vigorously to strip away aluminum oxide corrosion, road salt scaling, and old rubber residue. Wipe clean with a rag and apply a liberal coat of rubber lubricant or soapy water solution to the new rubber neck.
- Specifics: A pristine, smooth metal surface is mandatory; microscopic corrosion pits will prevent the new rubber boss from forming an airtight seal.
- Success Checkpoint: You will know it worked when the interior metal bore gleams clean with zero rough scaling or crusty white aluminum oxidation.
- Common Mistake: Installing a new rubber snap-in stem into a dirty, corroded rim hole, which guarantees a slow leak within weeks.
Step 5: Install the New Valve Stem
- Action: Push the new rubber valve stem through the rim hole from the inside out until the retaining groove aligns with the hole. Thread the heavy-duty valve stem puller tool securely onto the external brass threads. Rest the rubber-padded head of the puller tool against the outer edge of the wheel rim, and leverage the tool firmly outward until the rubber groove snaps audibly into place.
- Specifics: Inspect the base from the inside of the rim to verify that the retaining groove is fully seated and not folded or pinched.
- Success Checkpoint: You will know it worked when you feel a distinct mechanical snap and the base sits flush against the interior rim wall.
- Common Mistake: Overtorquing or pulling at an extreme angle, which can tear the new rubber neck or strip the external threads.
Step 6: Reinflate and Perform Leak Testing
- Action: Screw a new valve core into the stem using the 4-way tool and tighten it until snug. Connect an air compressor hose to re-inflate the tire until the bead pops audibly back into place against the rim flange. Spray a rich soapy water solution across the top valve core opening and around the base of the stem.
- Specifics: Standard passenger car tires should be inflated to the vehicle manufacturer placard specification (typically $32\text{ to }36\text{ PSI}$).
- Success Checkpoint: You will know it worked when the tire reaches target pressure and zero expanding soap bubbles appear around the stem base or core.
- Common Mistake: Overtightening the valve core beyond $4\text{ inch-pounds}$, which crushes the internal rubber seal and causes an immediate slow leak.
5. Cost, Timeframe, and Professional Comparison
Understanding the financial and time investments required for a valve stem replacement helps determine whether to perform a DIY repair or hire a professional shop.
- DIY Kit Cost: $\$12.00\text{ to } \$25.00$ for a complete consumer-grade 18-piece kit including puller and 4-way tools.
- Professional Shop Cost: $\$25.00\text{ to } \$60.00$ per wheel at a commercial tire center, which covers unmounting, bead breaking, part replacement, dynamic wheel balancing, and reinflation.
- Time Required: $15\text{ to } 30\text{ minutes}$ per wheel for an experienced DIYer working with hand tools; under $5\text{ minutes}$ per wheel on a commercial pneumatic tire machine.
6. Troubleshooting Slow Leaks and Failures
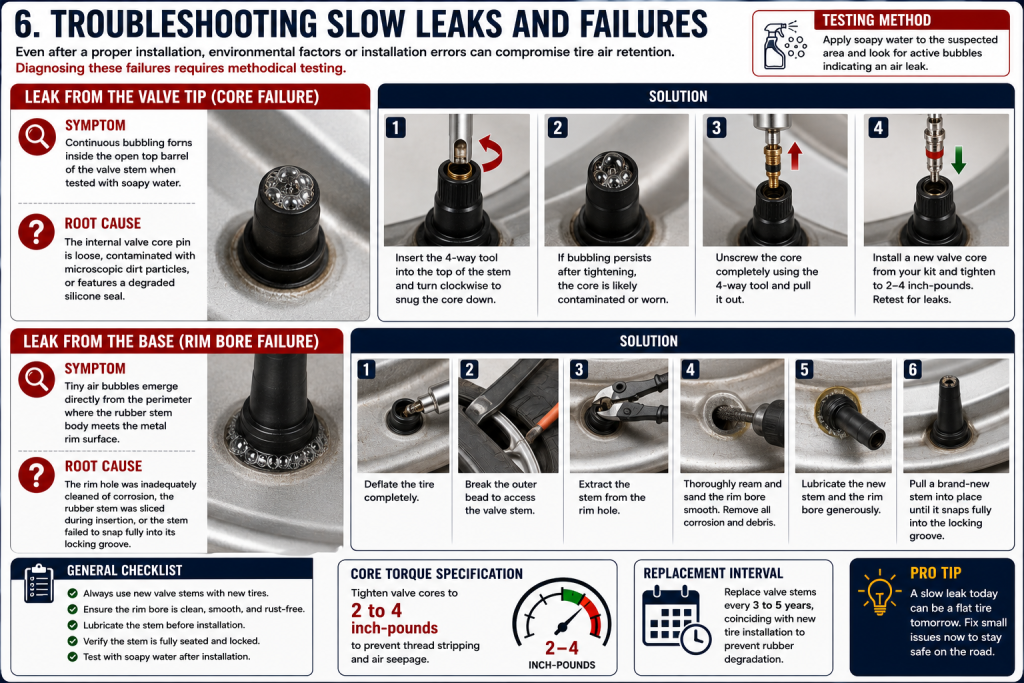
Even after a proper installation, environmental factors or installation errors can compromise tire air retention. Diagnosing these failures requires methodical testing.
Leak from the Valve Tip (Core Failure)
- Symptom: Continuous bubbling forms inside the open top barrel of the valve stem when tested with soapy water.
- Root Cause: The internal valve core pin is loose, contaminated with microscopic dirt particles, or features a degraded silicone seal.
- Solution: Insert the 4-way tool into the top of the stem and turn clockwise to snug the core down. If bubbling persists, unscrew the core completely and replace it with a fresh unit from your 18-piece kit.
Leak from the Base (Rim Bore Failure)
- Symptom: Tiny air bubbles emerge directly from the perimeter where the rubber stem body meets the metal rim surface.
- Root Cause: The rim hole was inadequately cleaned of corrosion, the rubber stem was sliced during insertion, or the stem failed to snap fully into its locking groove.
- Solution: Deflate the tire completely, break the outer bead, extract the stem, thoroughly ream and sand the rim bore smooth with abrasive pads, lubricate, and pull a brand-new valve stem into place.
Frequently Asked Questions
How often should valve stems be replaced?
Valve stems should be replaced every 3 to 5 years, which naturally aligns with the installation interval of a brand-new set of tires. Because rubber degrades under constant UV exposure, ozone attack, and continuous centrifugal bending stress, old stems lose elasticity and develop micro-cracks that cause chronic slow air leaks.
Can I replace a valve stem without taking the tire off the rim?
Yes, you can replace a snap-in rubber valve stem without fully removing the tire from the wheel rim, provided you have a bead-breaking tool. By breaking the outer bead of the tire away from the rim lip, you create enough physical clearance to reach inside, cut out the old stem, and pull a new one through.
Are metal valve stems better than rubber snap-in stems?
Metal bolt-in valve stems offer superior durability, higher pressure thresholds exceeding $100\text{ PSI}$, and greater resistance to high-speed centrifugal forces compared to rubber snap-in stems. However, they are rigid and more expensive, meaning an aggressive impact from road debris can bend the rim hole, whereas flexible rubber stems absorb minor impacts without structural damage.
What causes a valve stem to crack and leak prematurely?
Premature valve stem cracking is primarily caused by environmental ozone exposure, extreme seasonal temperature fluctuations, aggressive road salts, and high-speed centrifugal bending stress. Over time, these factors oxidize the EPDM or natural rubber compounds, causing the outer housing to harden, craze, and split.
Do I need special tools to use an 18-piece valve stem kit?
Yes, an 18-piece kit typically includes specialized service tools such as a 4-way valve core wrench and a mechanical lever puller. While a valve core tool is mandatory for safe deflation and core installation, a lever puller provides the mechanical advantage required to snap the rubber stem base securely through the rim hole without tearing the rubber.


